A Virtual Instance in Cloud7 represents a virtual machine (VM) running in your cloud environment. These instances are the fundamental compute resources that allow you to run applications, perform computations, and store data. Each virtual instance has its own CPU, memory, storage, and network resources, which can be customized according to your workload requirements.
Key Characteristics #
- Compute Power: Virtual instances provide the processing power required for running applications and services. The compute power is determined by the instance type (also known as Flavor), which defines CPU and memory.
- Scalability: Virtual instances can be scaled up or down based on your needs. You can select smaller instances for lightweight tasks or larger ones for more resource-intensive applications.
- Lifecycle Management: Virtual instances can be created, started, stopped, shelved, and deleted as needed, allowing flexibility in resource management.
- Multi-Region Support: Instances can be launched in different regions depending on your requirements, helping you optimize for performance, latency, or compliance.
With Cloud7, you can easily manage your virtual instances, monitor their performance, and perform lifecycle actions like rebooting or shelving instances directly from the interface.
List Virtual Instances #
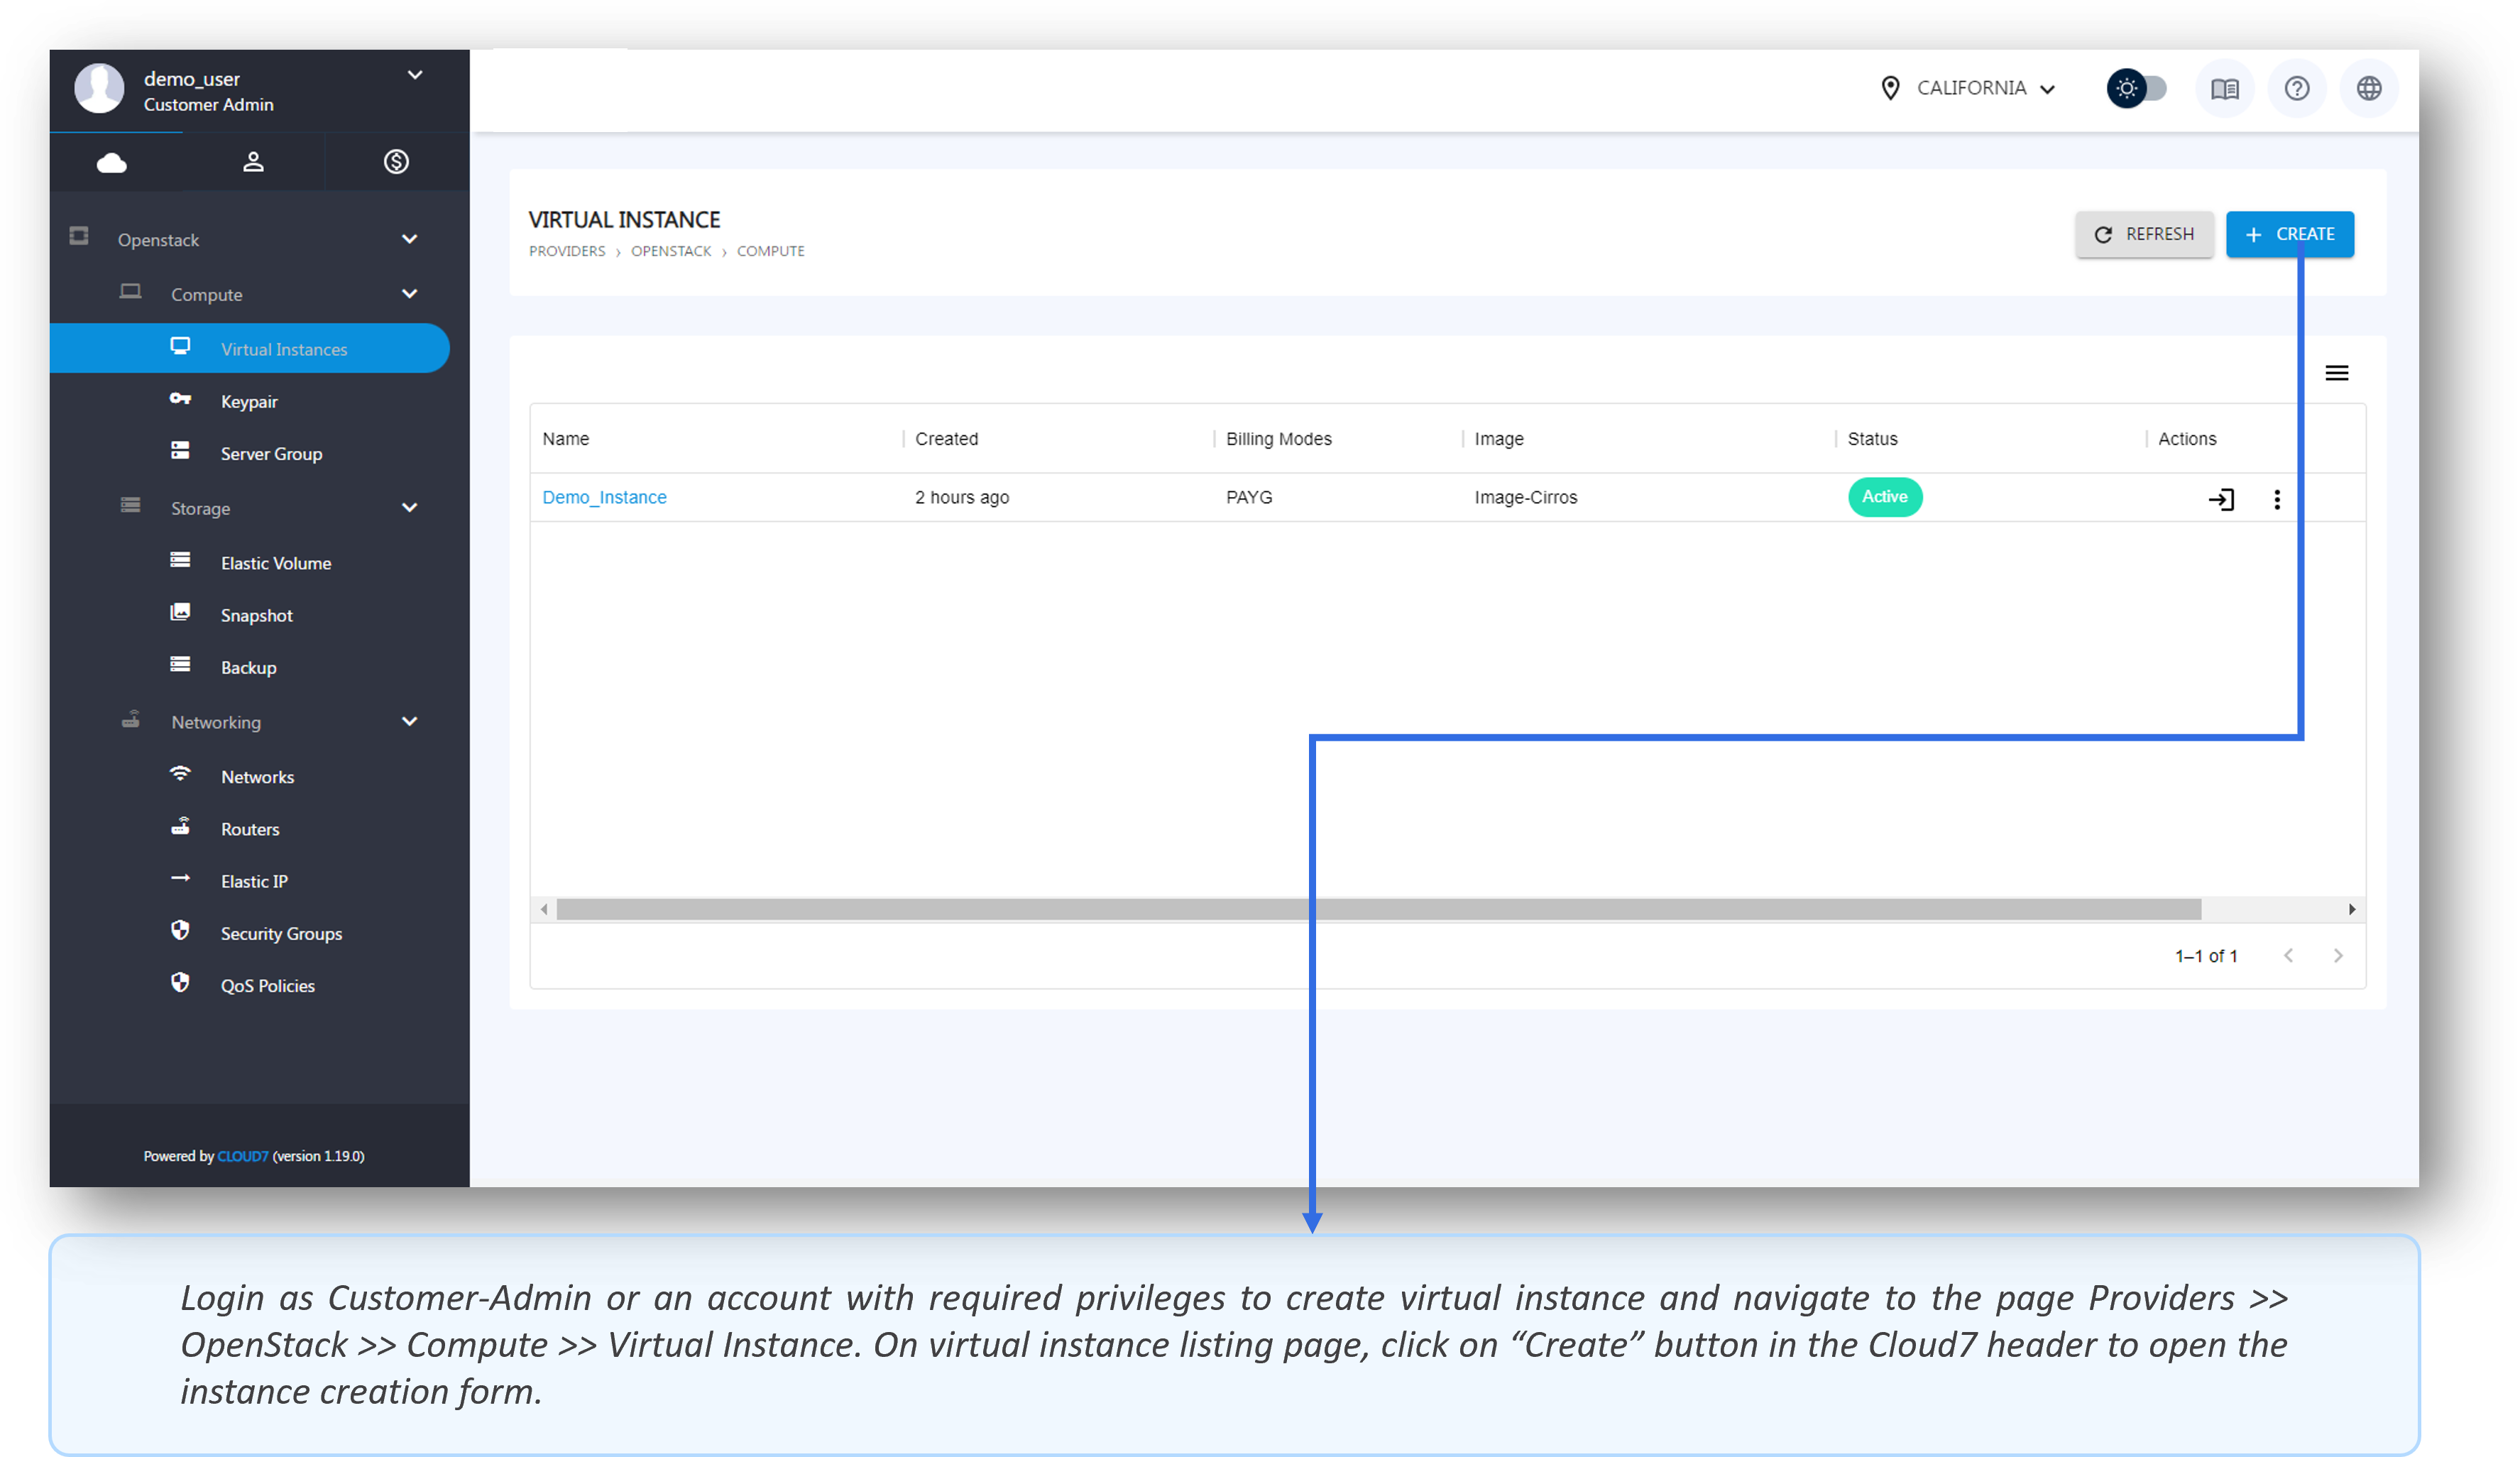
To view the list of virtual instances associated with your account, follow these steps:
- Begin by logging into the Cloud7 portal with your credentials. Ensure that you are logged in as a Customer-Admin or an account with sufficient privileges to view virtual instances.
- From the main menu, go to: Providers >> Provider Name >> Compute >> Virtual Instance.
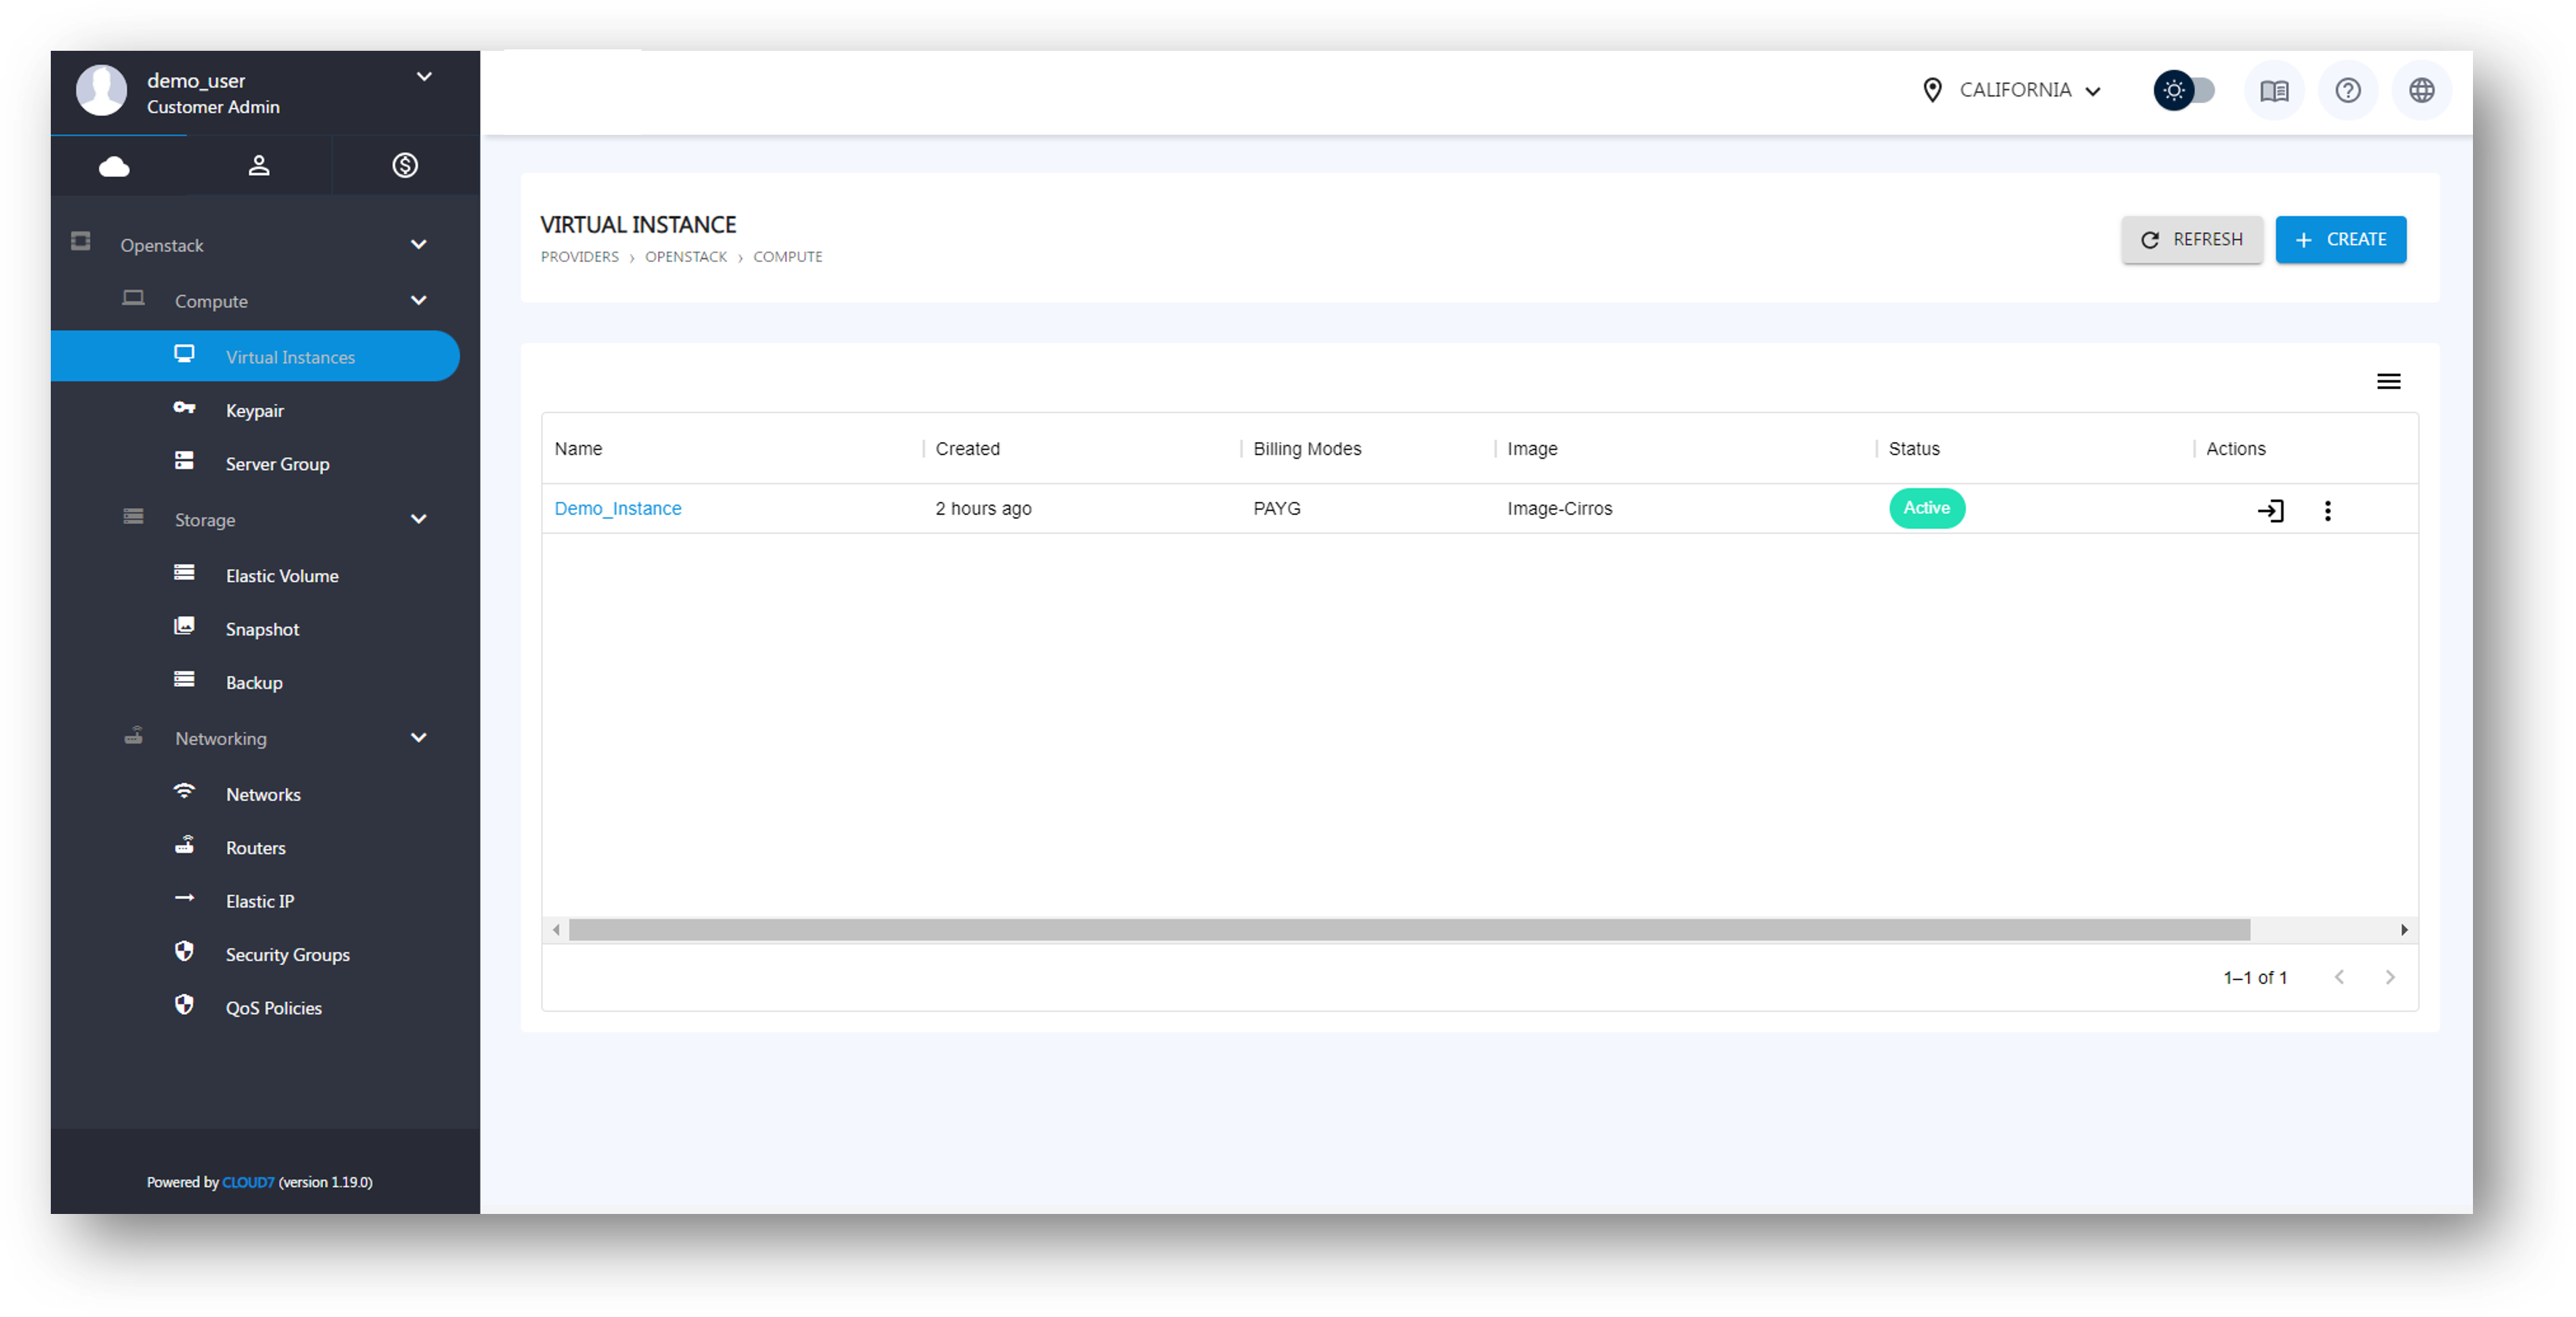
- This will take you to the Virtual Instances page, where all instances are listed.
- On the Virtual Instances page, you will see a table containing details of each instance, including:
- Instance Name: The name assigned to the virtual machine.
- Created: The date the instance was launched.
- Billing Modes: The billing mode (PAYG, Reservation, Bundle) applicable on the instance.
- Image: The image (can also be an OS) used for building the instance.
- Status: The current state of the instance (active, stopped, etc.).
- Flavor: The specifications of the instance such as CPU and memory.
- IP Address: The primary IP address of the instance.
You can use this table to review and manage your virtual instances.
Create Virtual Instances #
To create a new virtual instance in Cloud7, follow the step-by-step process using the form presented in multiple stages. This process ensures that you define all the required settings for your instance, including source selection, network configuration, security options, and metadata.
Step 1: Source Configuration
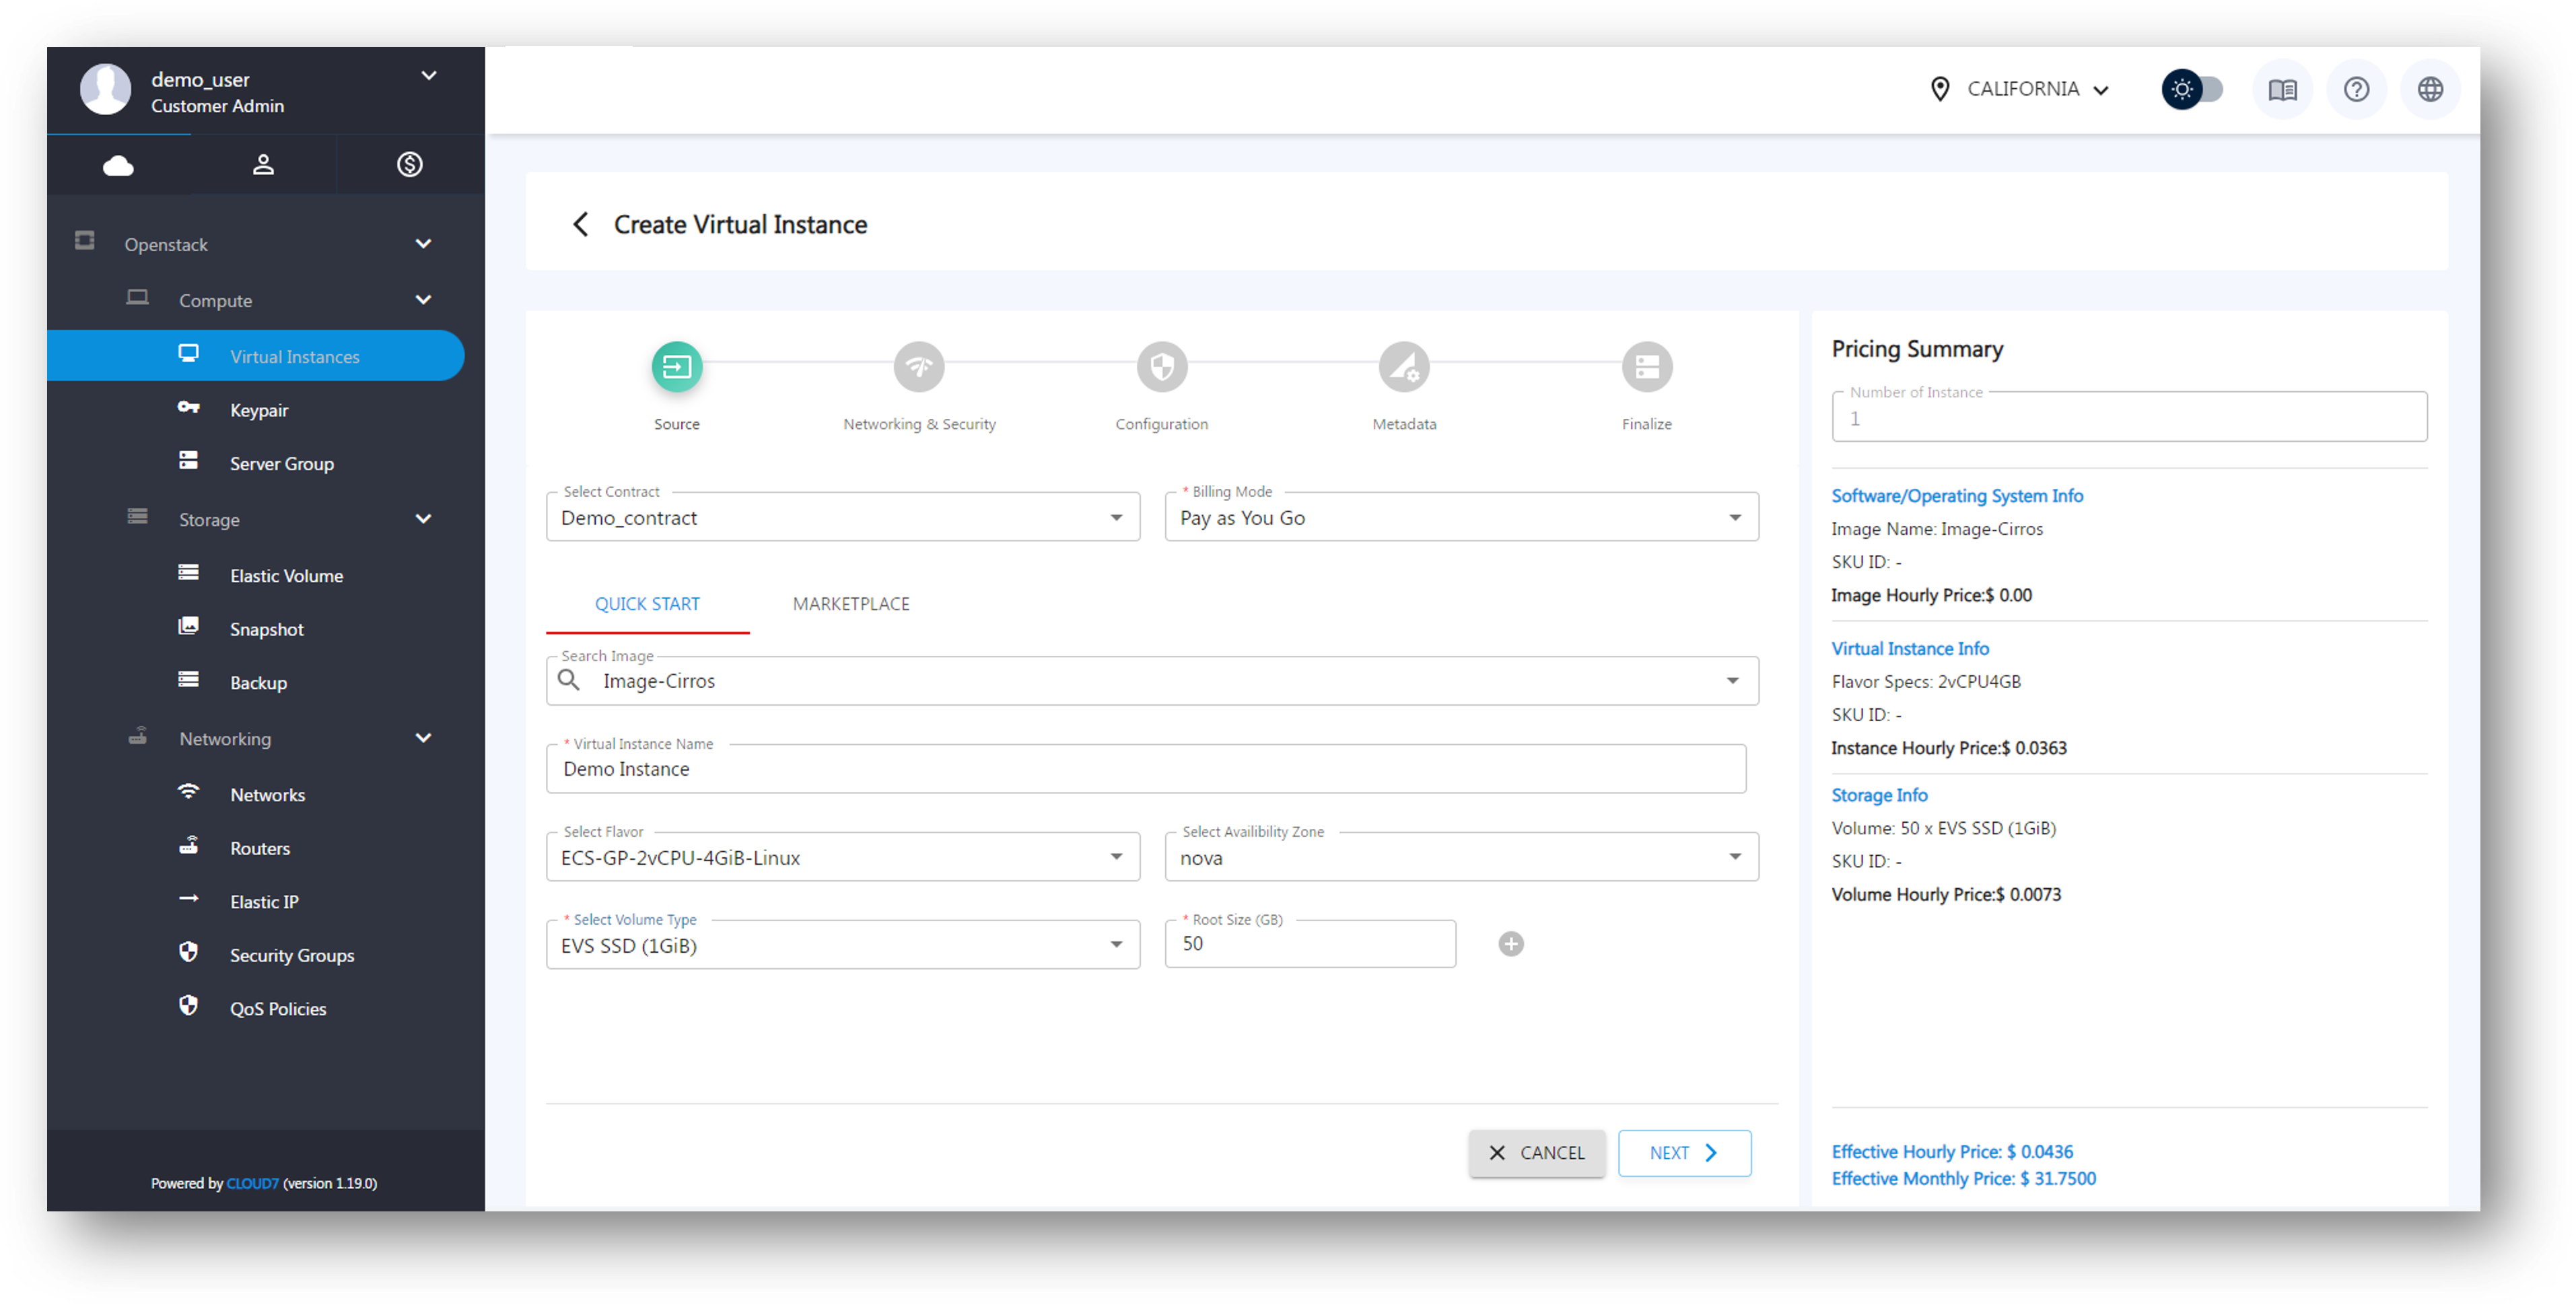
- Select Contract: Start by choosing the applicable contract from the Select Contract dropdown. The contract determines the pricing models available.
- Billing Mode: Based on the selected contract, the Billing Mode dropdown will be populated with the relevant billing or subscription models.
- Select Image: Next, choose an image for the virtual instance:
- Quick Start Images: Predefined images that are ready to use.
- Marketplace Images: Select from a broader range of marketplace options.
- Instance Name: Provide a name for your virtual instance in the Instance Name field.
- Select Flavor: Choose the required specifications (CPU and memory) for the instance by selecting a flavor. The available flavors depend on the contract and billing mode you selected earlier.
- Availability Zone: Choose where you want to deploy the instance by selecting an availability zone from the Select Availability Zone dropdown.
- Volume Type and Size: In the Select Volume Type dropdown, choose the storage type (SSD, HDD, etc.), and then specify the required Volume Size in gigabytes (GB).
Once these fields are filled, click on Next in the Cloud7 footer to proceed to the next step.
Step 2: Network and Security Configuration
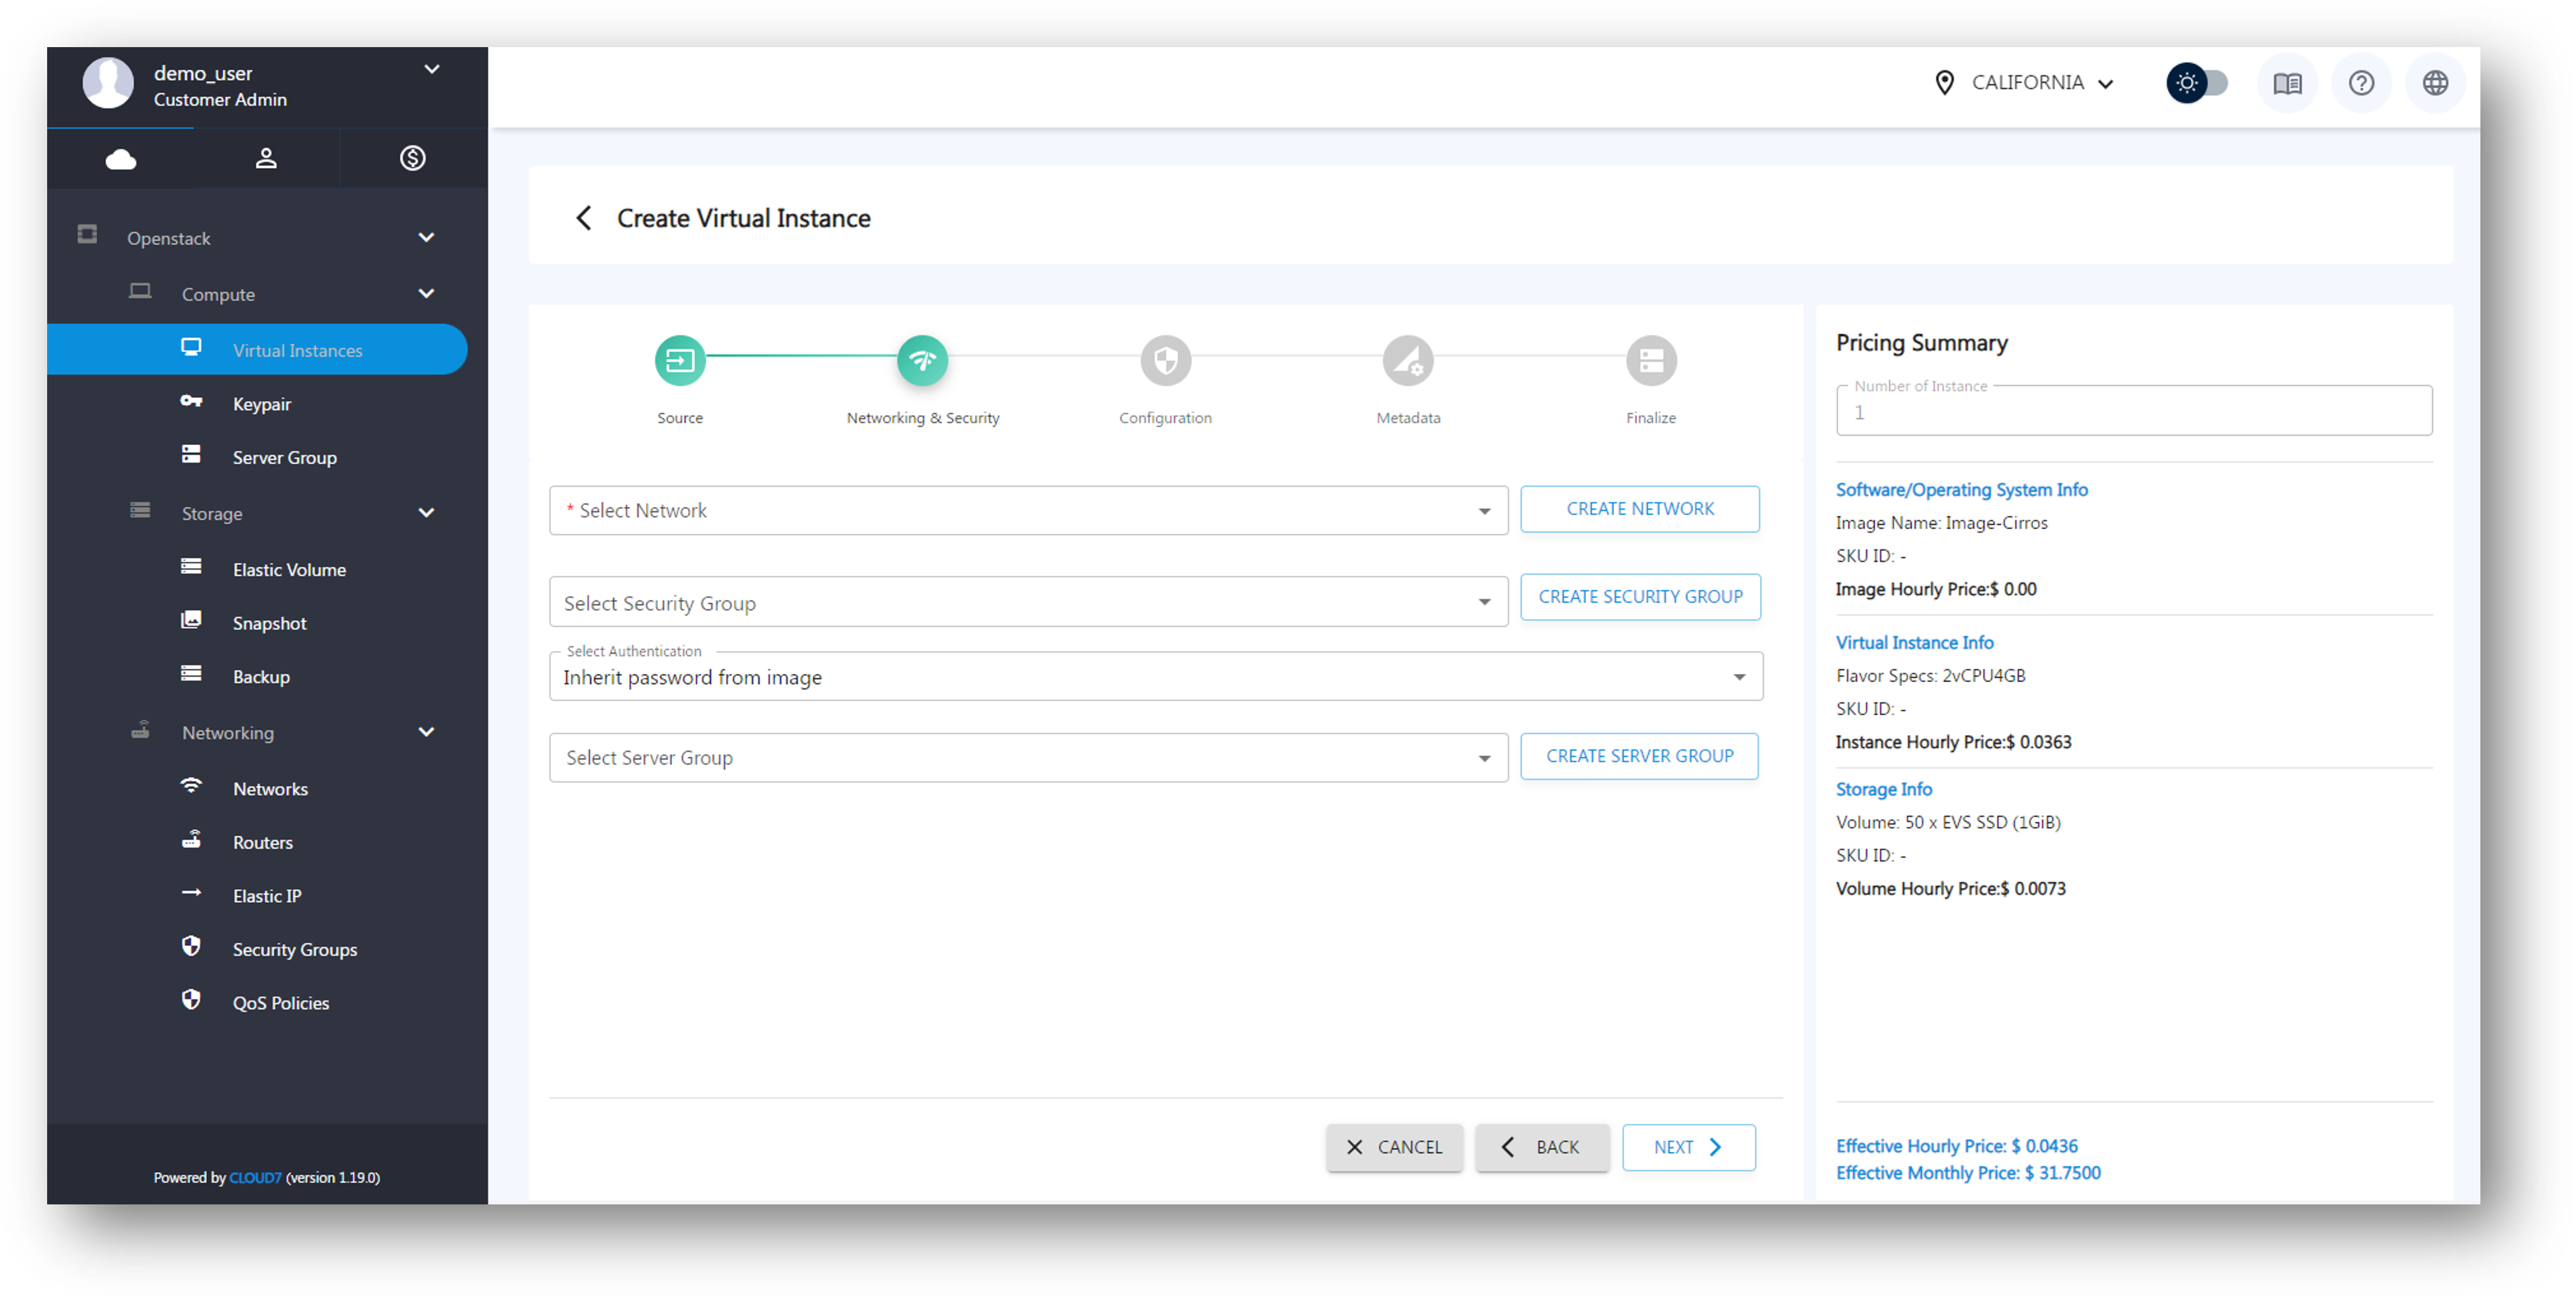
- Select Network: Choose a network from the Select Network dropdown. If no networks are available, click on Create Network to set up a new one.
- Select Security Group: In the Select Security Group dropdown, choose an existing security group to manage traffic to and from your instance. If needed, click on Create Security Group to define a new one.
- Select Authentication: Choose how users will authenticate with the instance:
- Keypair: Select an existing keypair, or create a new one using the Create Keypair button.
- Password: Manually set a password for authentication.
- Inherit Password from Image: Use the password set in the image you selected earlier.
- Server Group: Optionally, select a server group for your instance using the Select Server Group dropdown. If no groups exist, you can create one using Create Server Group.
After configuring network and security, click Next in the footer to continue.
Step 3: Instance Configuration
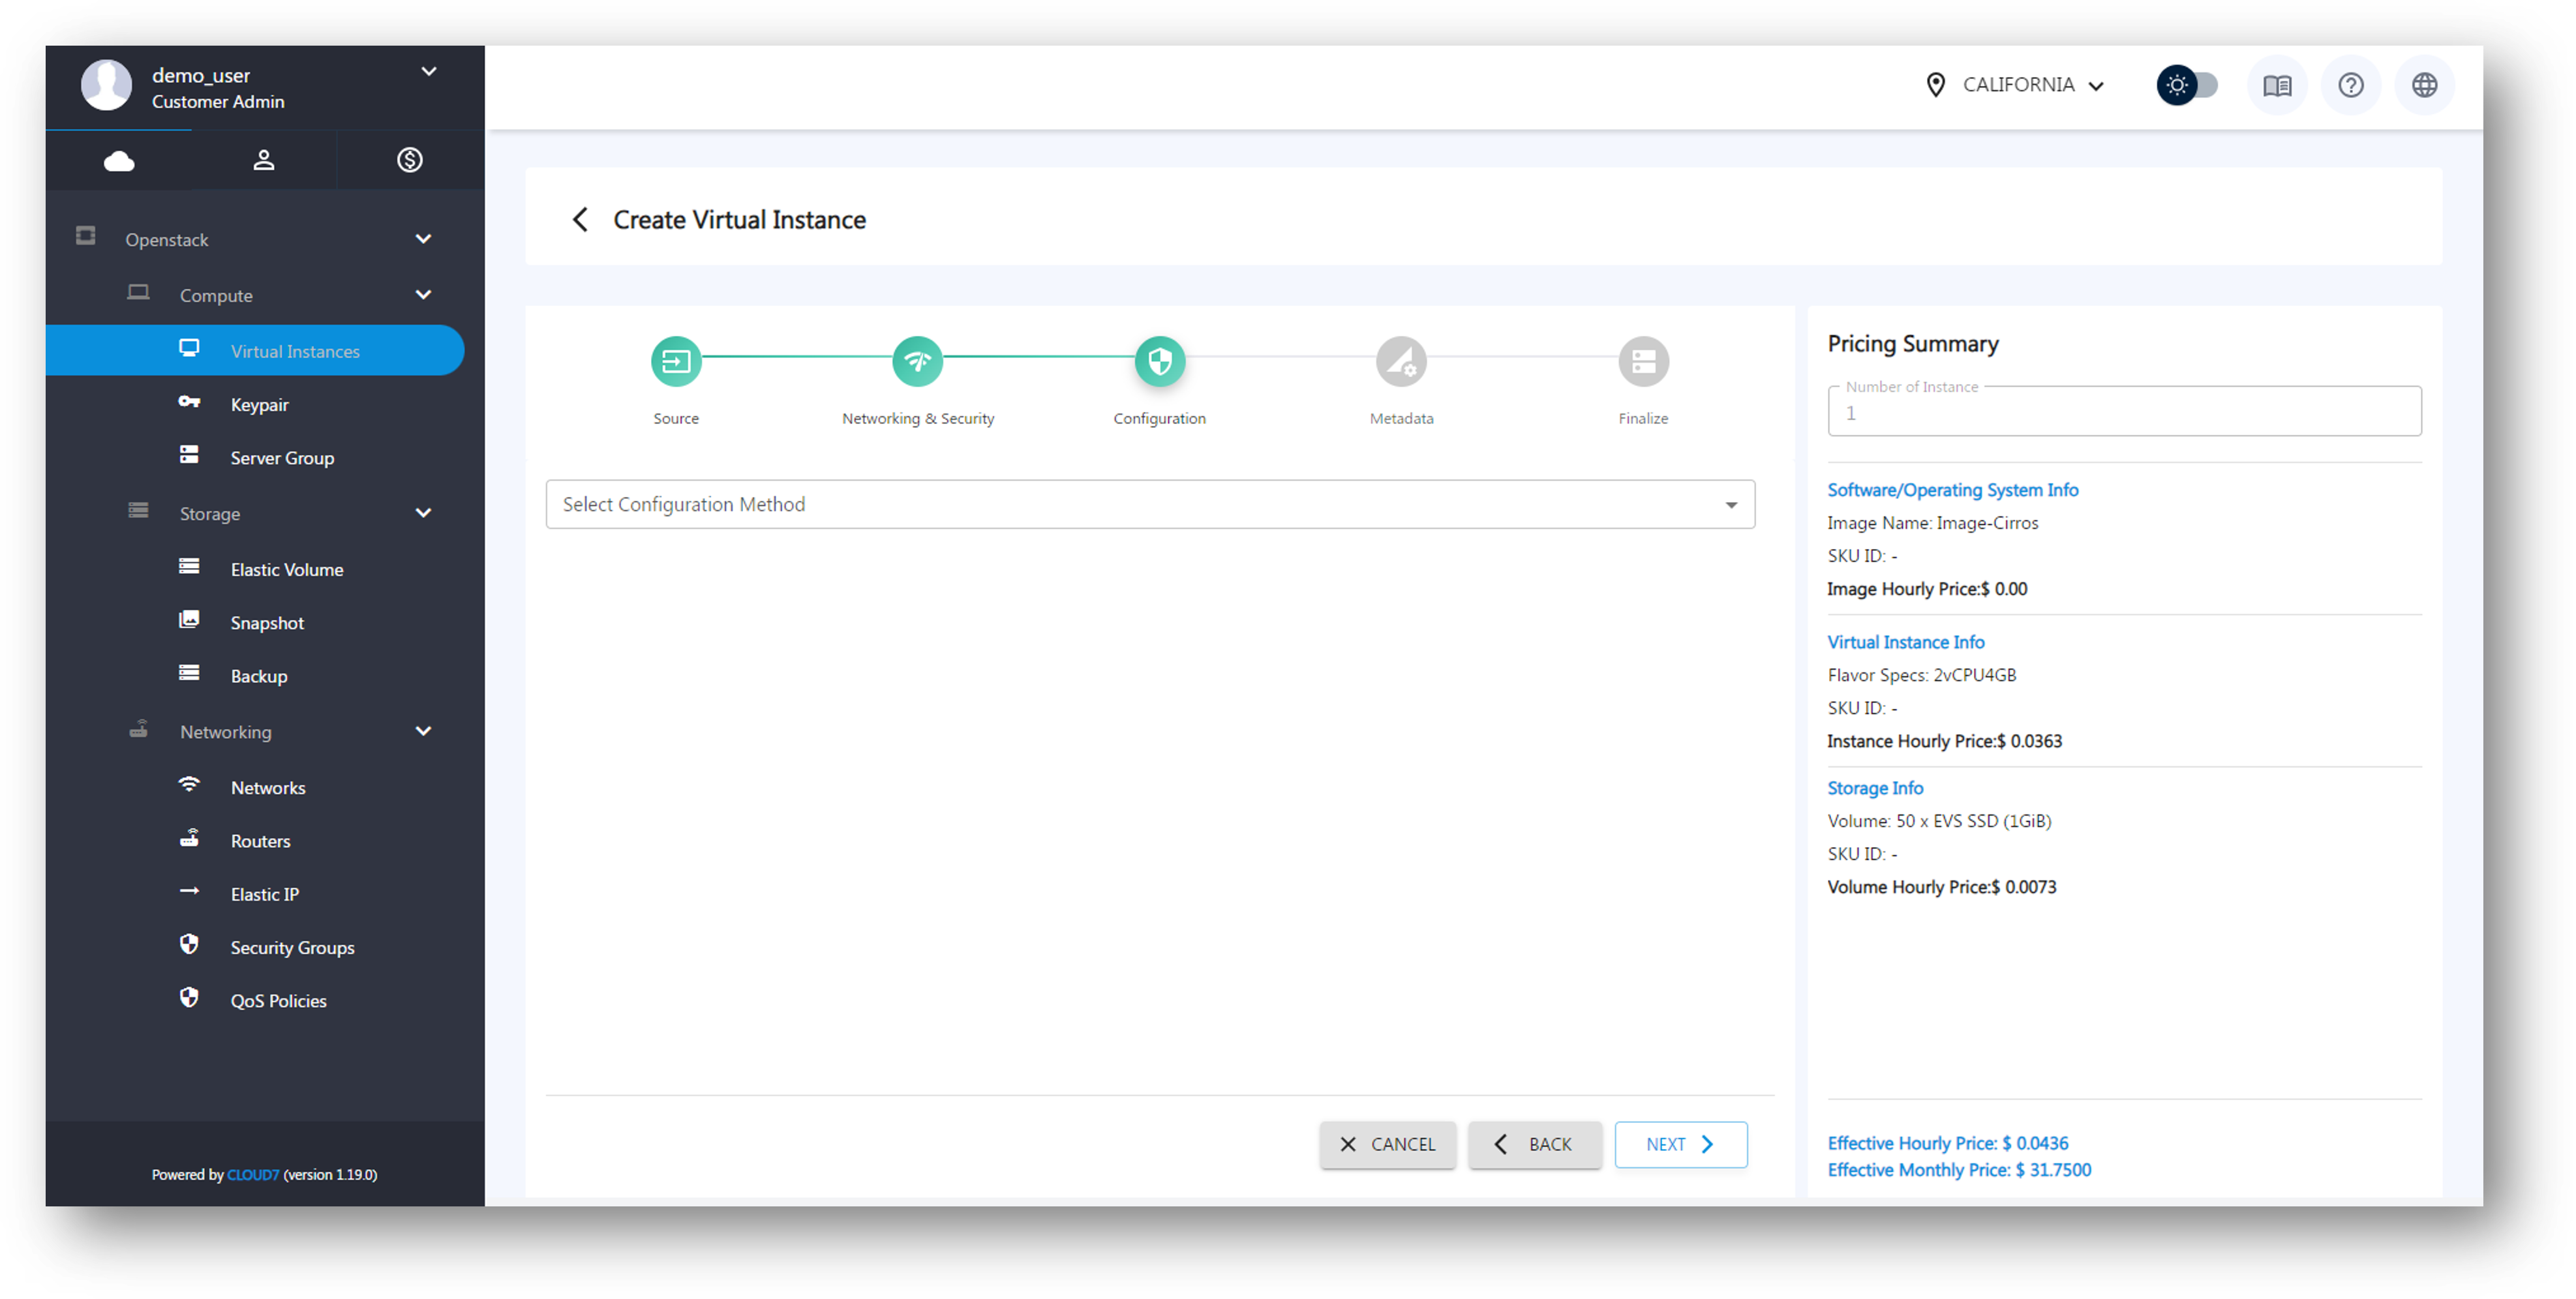
- On this screen, you can upload a script to be executed when the instance is created. This script can be used to automate tasks such as installing software, setting configurations, or performing initial setup actions for the virtual machine.
After adding your script (optional), click on Next to move to the next step.
Step 4: Metadata
- In the Metadata step, you can attach custom key-value pairs to your instance. Metadata can help you store useful information such as tags for instance categorization, environment variables, or configuration details that might be needed by your applications. This step is useful for organizing and automating your infrastructure.
After adding the necessary metadata, click Next.
Step 5: Review and Finalize
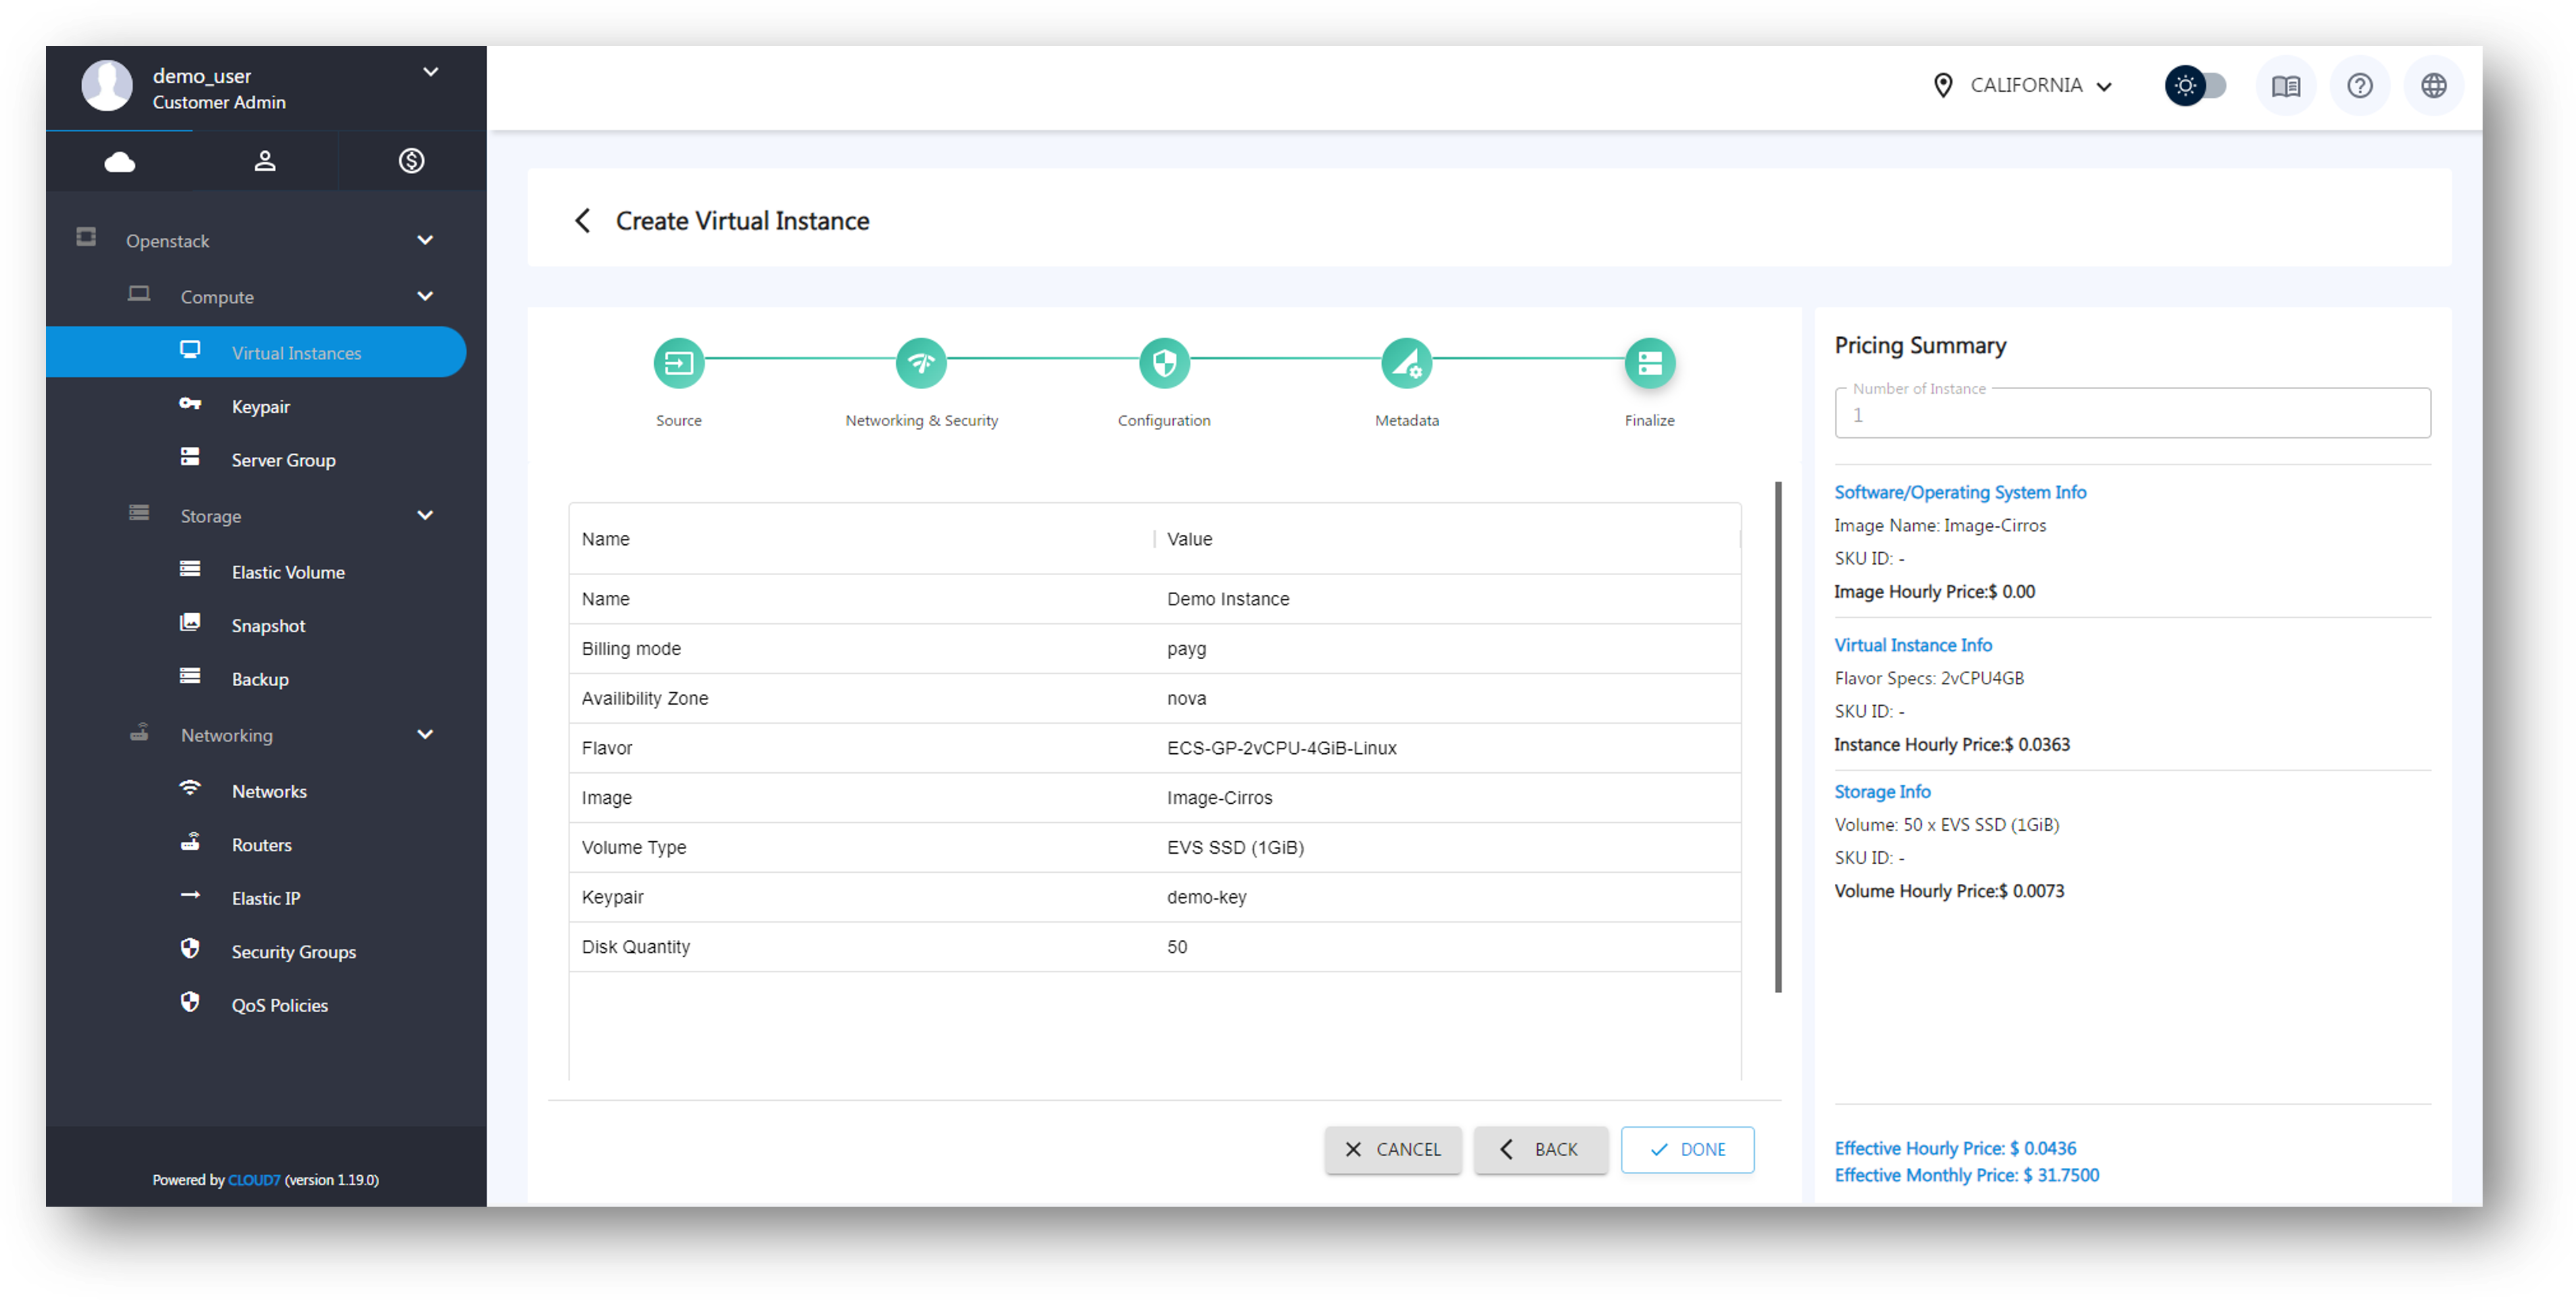
- In the final step, you will see a summary of all the settings you’ve configured. Review the details, including:
-
- Source and Image: The selected image or operating system.
- Instance Name and Flavor: The specifications of the virtual instance.
- Storage: Volume type and size.
- Network and Security: The configured network, security group, and authentication method.
Simultaneously, Cloud7 will display the Pricing Summary in the sidebar, showing a breakdown of individual costs for the selected image, flavor, and volumes.
Once you have confirmed all settings, click Create to initiate the virtual instance creation process. Cloud7 will start provisioning the instance, and you will be notified once it’s ready.
Edit Virtual Instances #
In Cloud7, editing a virtual instance allows you to perform life-cycle management tasks and access specific configurations through the virtual instance dashboard (detail page). This section provides a detailed overview of all the available features and options for managing and customizing virtual instances. The details for both type of editing options are explained below:
Life-Cycle Management Features #
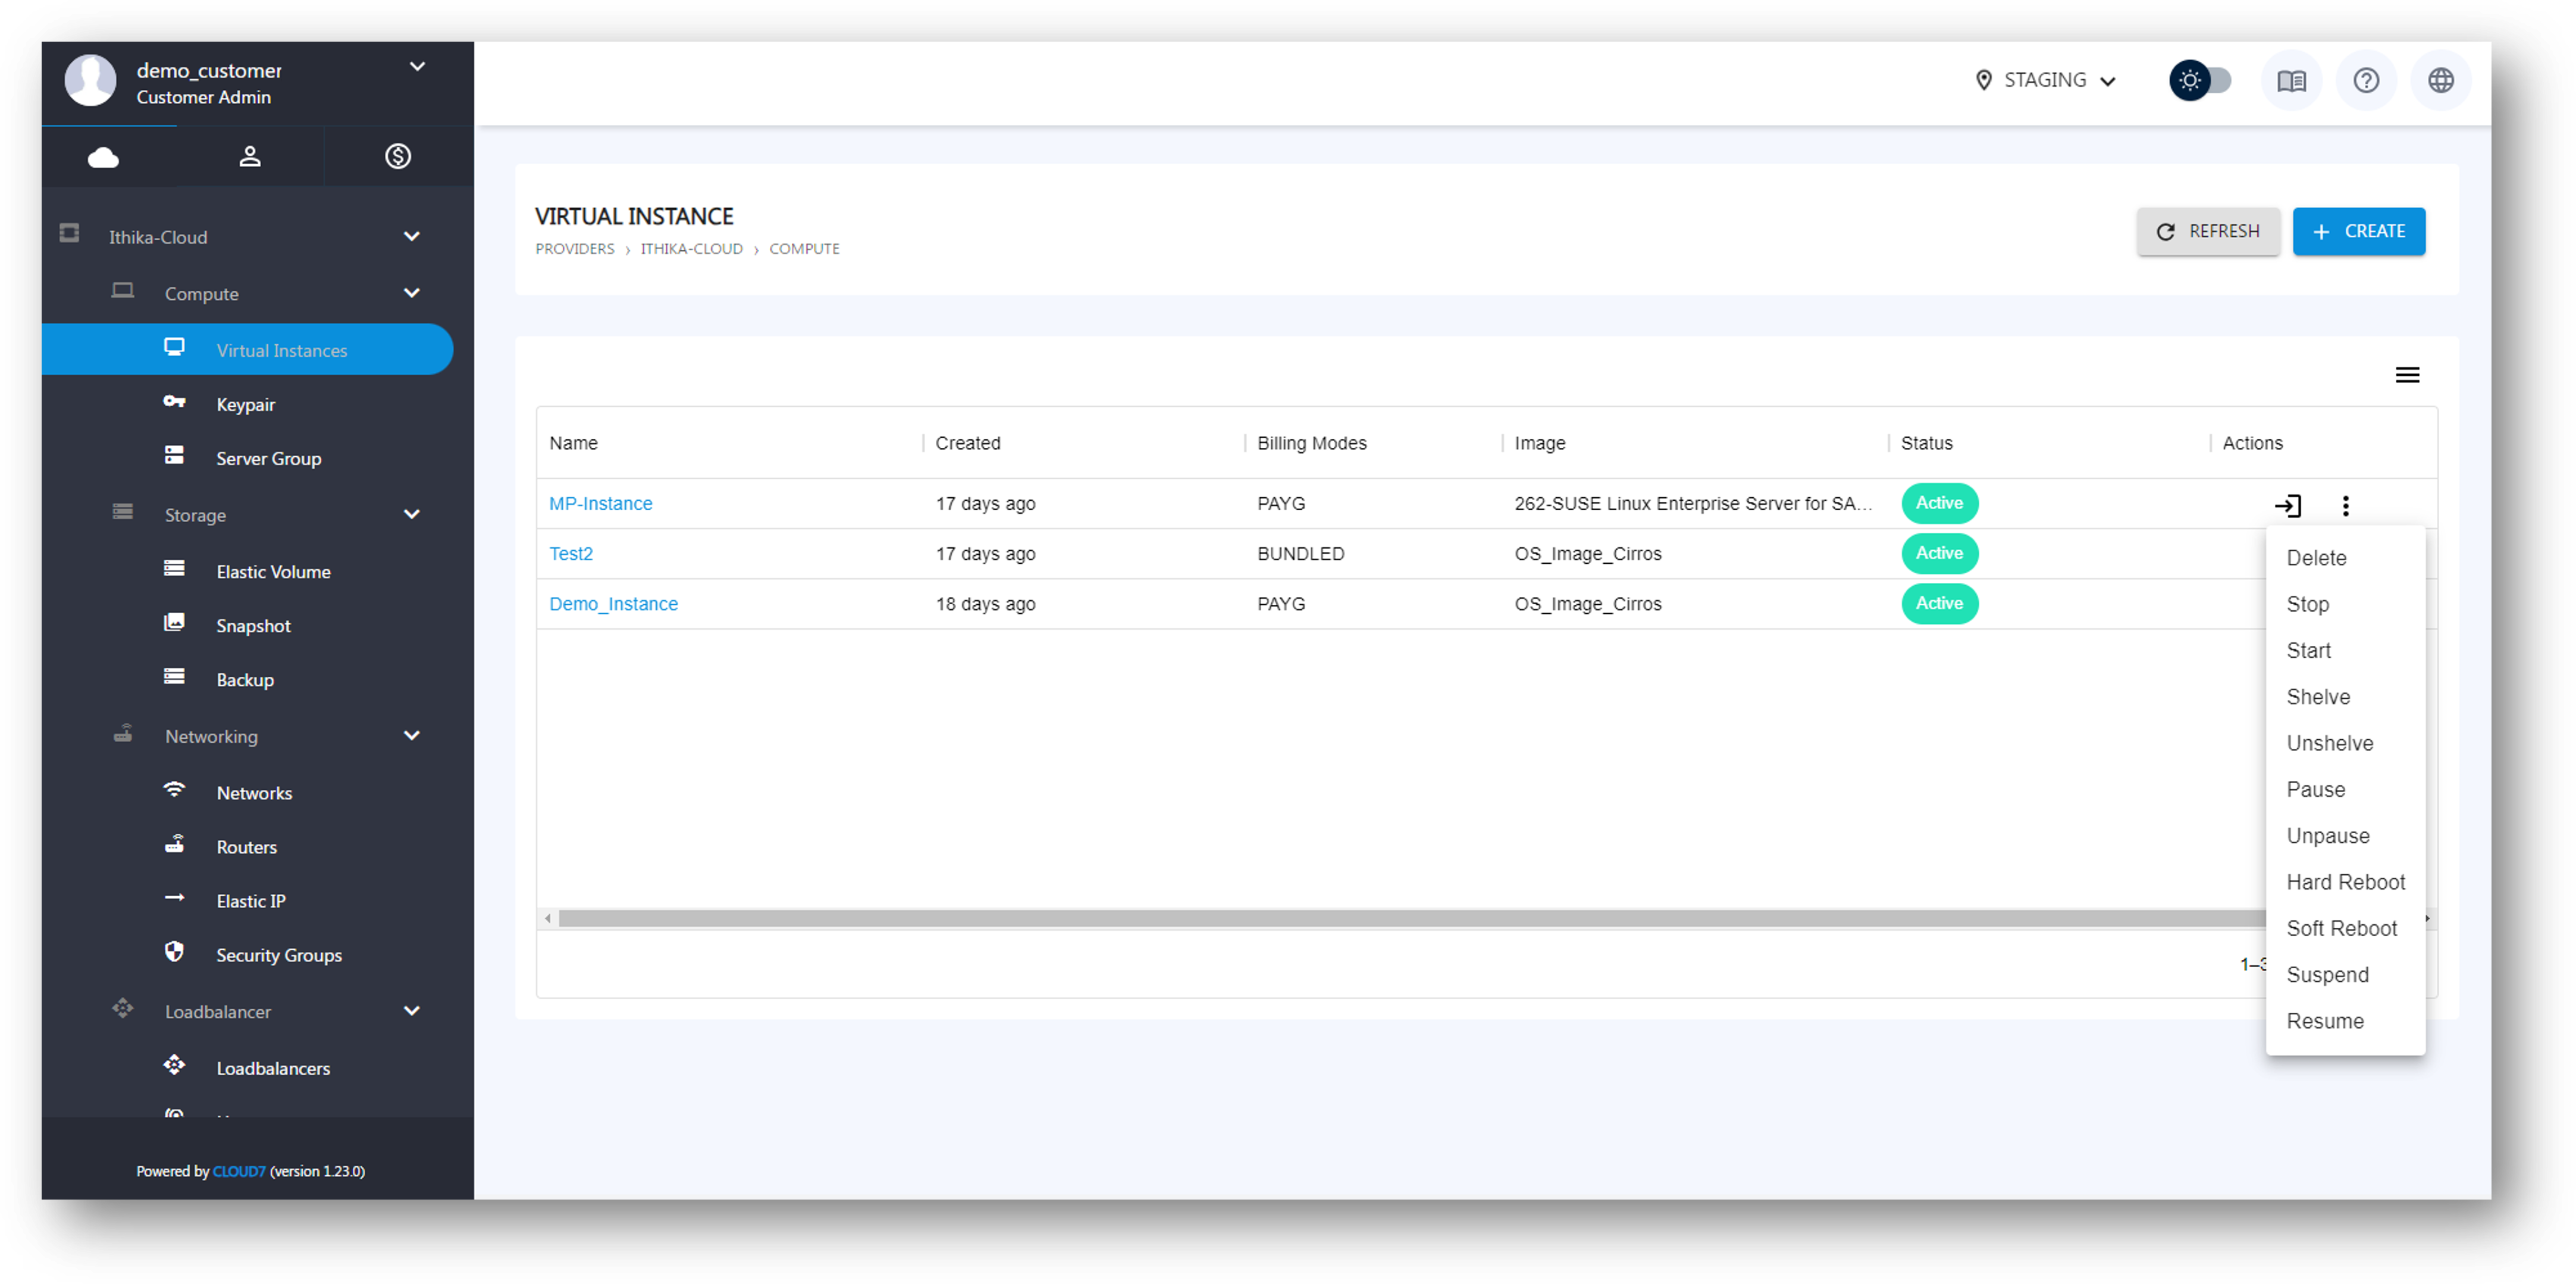
Cloud7 offers the following life-cycle actions to manage the state of a virtual instance:
- Start: Boot up a stopped instance and make it available for use.
- Stop: Shut down the running virtual instance, releasing associated resources (like vCPUs).
- Shelve / Unshelve:
- Shelve: Temporarily offload an instance without deleting it, saving the state for future reuse.
- Unshelve: Restore a shelved instance back to an active state.
- Pause / Unpause:
- Pause: Freeze the instance’s activities and keep its state in memory.
- Unpause: Resume the paused instance exactly where it left off.
- Suspend / Resume:
- Suspend: Save the instance’s state to disk and halt operations.
- Resume: Bring the suspended instance back online.
- Soft Reboot: Gracefully restart the instance, allowing it to close processes properly.
- Hard Reboot: Forcefully restart the instance without waiting for processes to shut down, similar to power-cycling.
Virtual Instance Dashboard #
The Virtual Instance Dashboard (detail page) offers several tabs for managing and viewing the instance’s configuration, resources, and performance.
Overview Tab
- Machine Summary: Displays essential information, such as the instance name, flavor, status, and availability zone.
- Elastic IP Association: You can assign a new Elastic IP to the instance or release an existing one. Elastic IPs provide public access to instances.
- Resizing (Change Specs): Modify the instance’s flavor to upgrade or downgrade resources (vCPU, RAM, etc.). This change may require the instance to reboot.
Volumes Tab
- List Attached Volumes: Displays all volumes currently attached to the instance, including their size and type.
- Attach Existing Volume:
- Attach a volume from the available list that isn’t attached to any other instance.
- Create and Attach New Volume:
- Use this option to create a new volume and attach it directly to the instance.
Security Groups Tab
- View Attached Security Groups: Lists all security groups associated with the instance.
- Add Security Group: Attach additional security groups to the instance for fine-tuned network access control.
Networks Tab
- View Existing Network Interfaces: Lists all network interfaces currently connected to the instance.
- Create New Interface: Add a new network interface to the instance from the available networks.
Virtual Instance Logs:
- Provides detailed logs about the virtual machine’s system activities and events.
Action Logs Tab:
- Shows a history of all actions performed on the instance, including lifecycle changes, resizing events, and network updates.
Console Tab
- Instance Console Access: Provides a direct interface to interact with the instance’s console. This is useful for troubleshooting and configuration tasks.
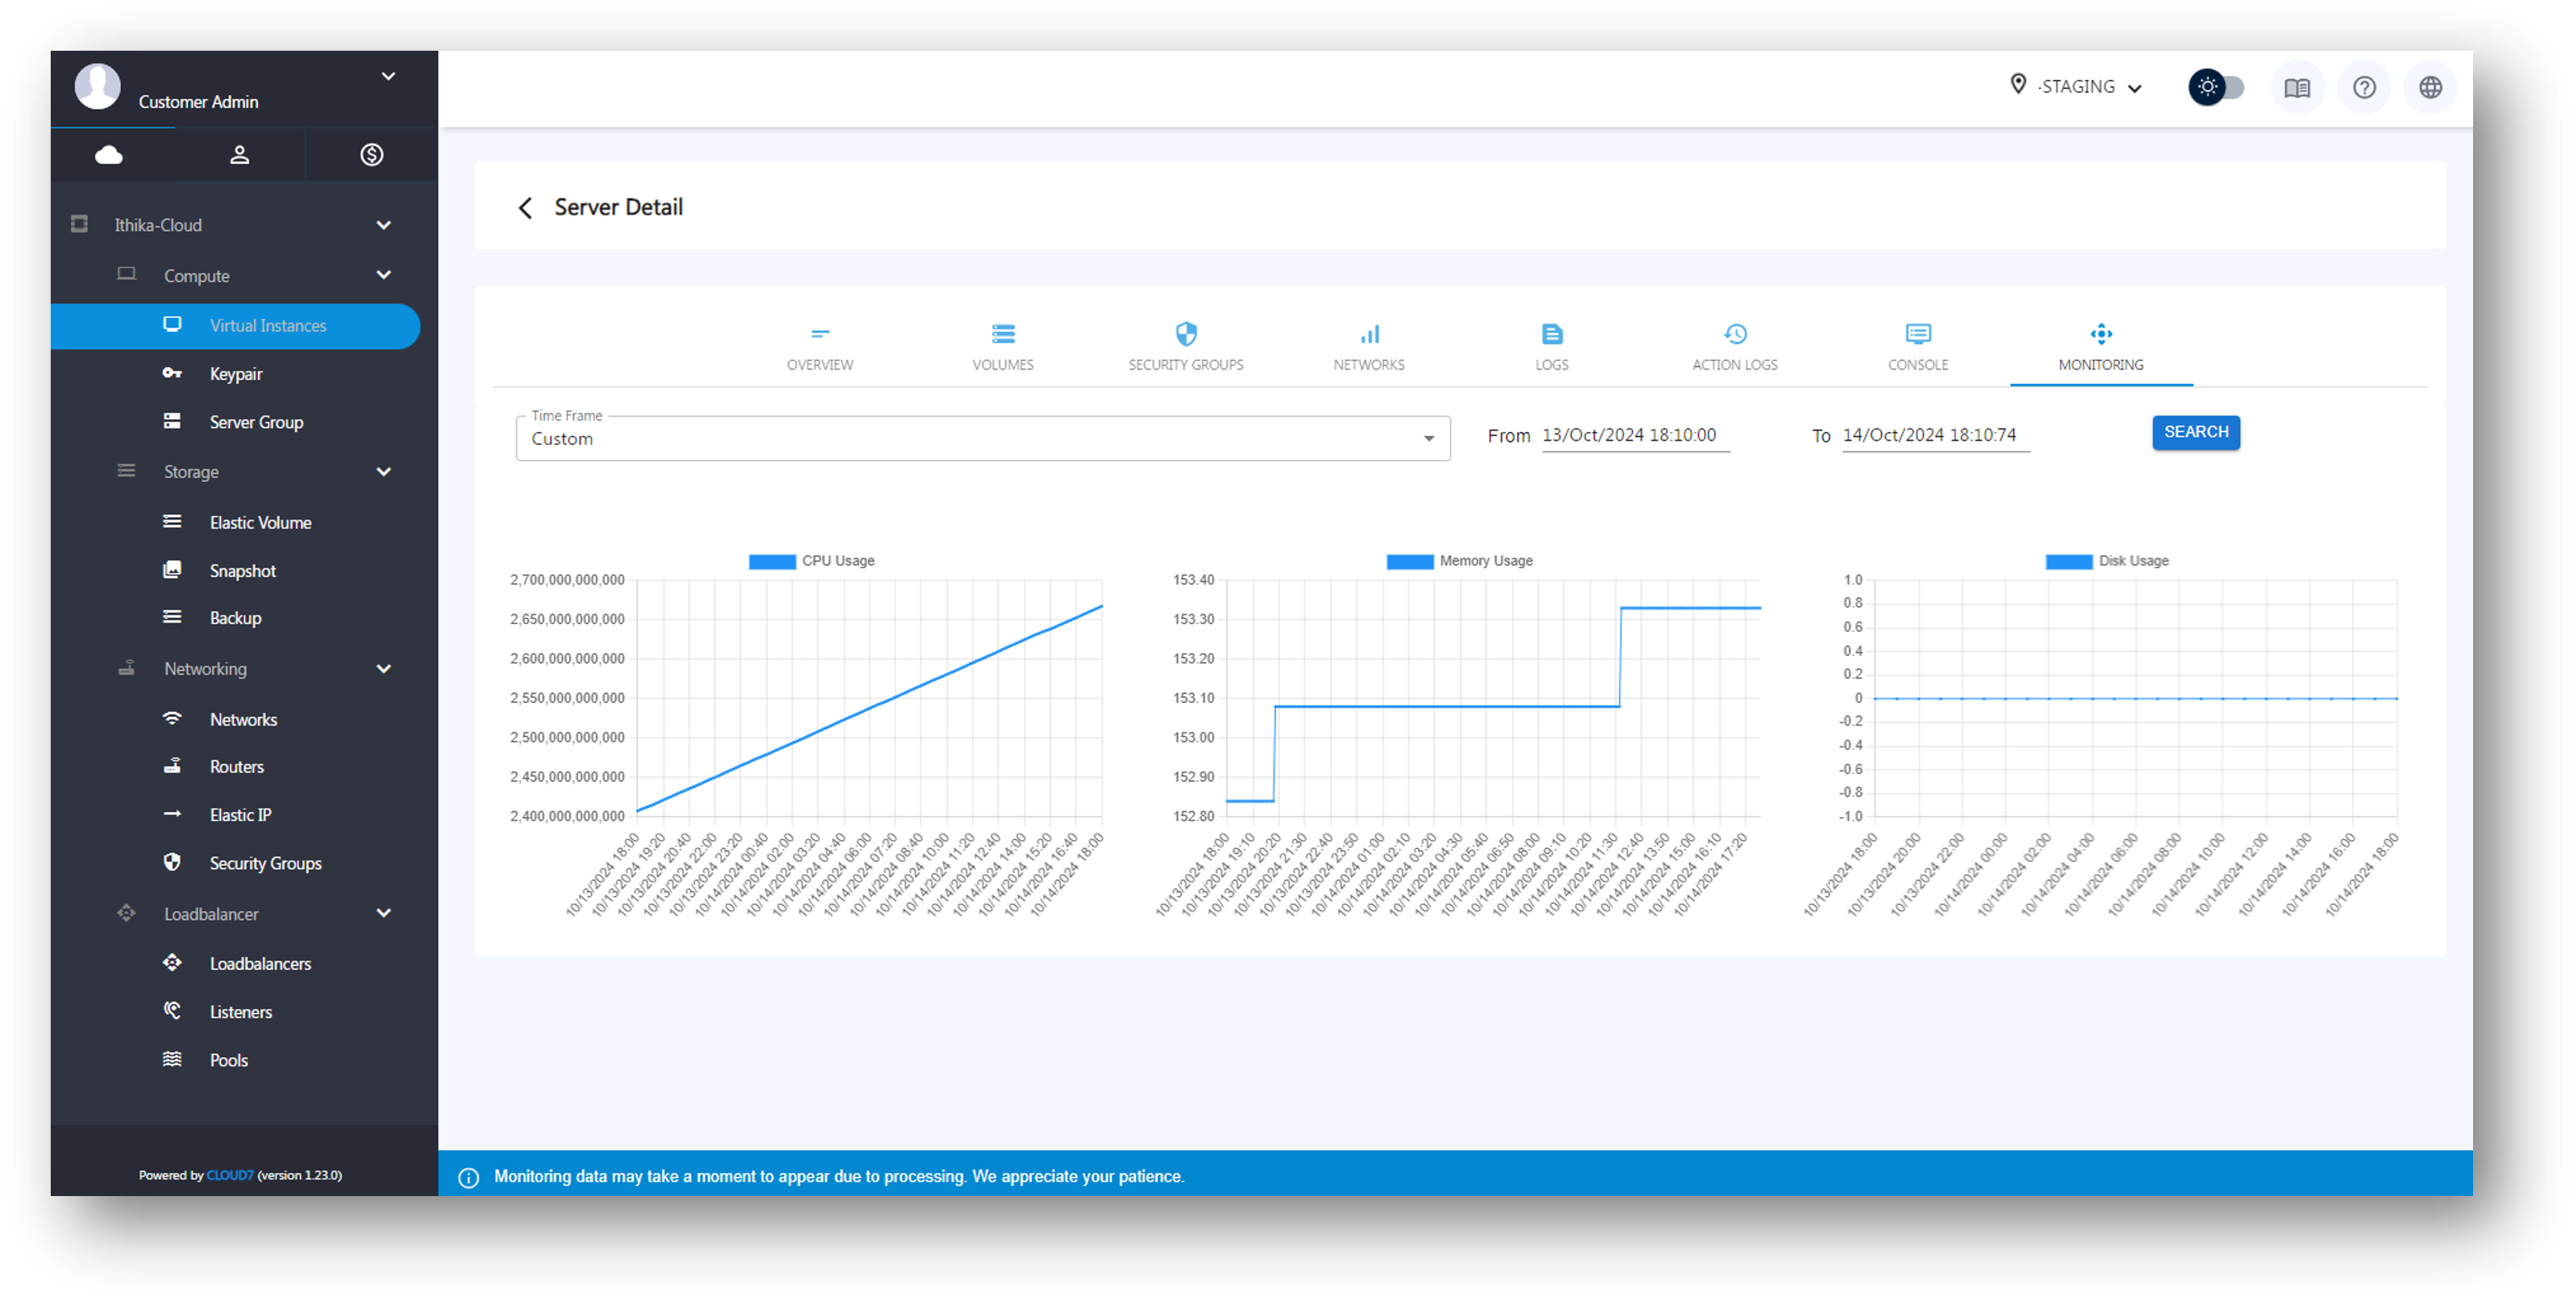
Monitoring Tab
- CPU, Memory, and Disk Usage: Displays graphs showing the instance’s vCPU usage, memory consumption, and disk utilization.
- Timeframe Selection: Customize the time frame (e.g., hourly, daily, yearly) to view specific monitoring data.
Delete Virtual Instances #
Cloud7 provides the option to delete virtual instances directly from the Virtual Instance Listing page. This feature allows you to permanently remove any instance that is no longer needed, freeing up associated resources like storage, networks, and compute capacity.
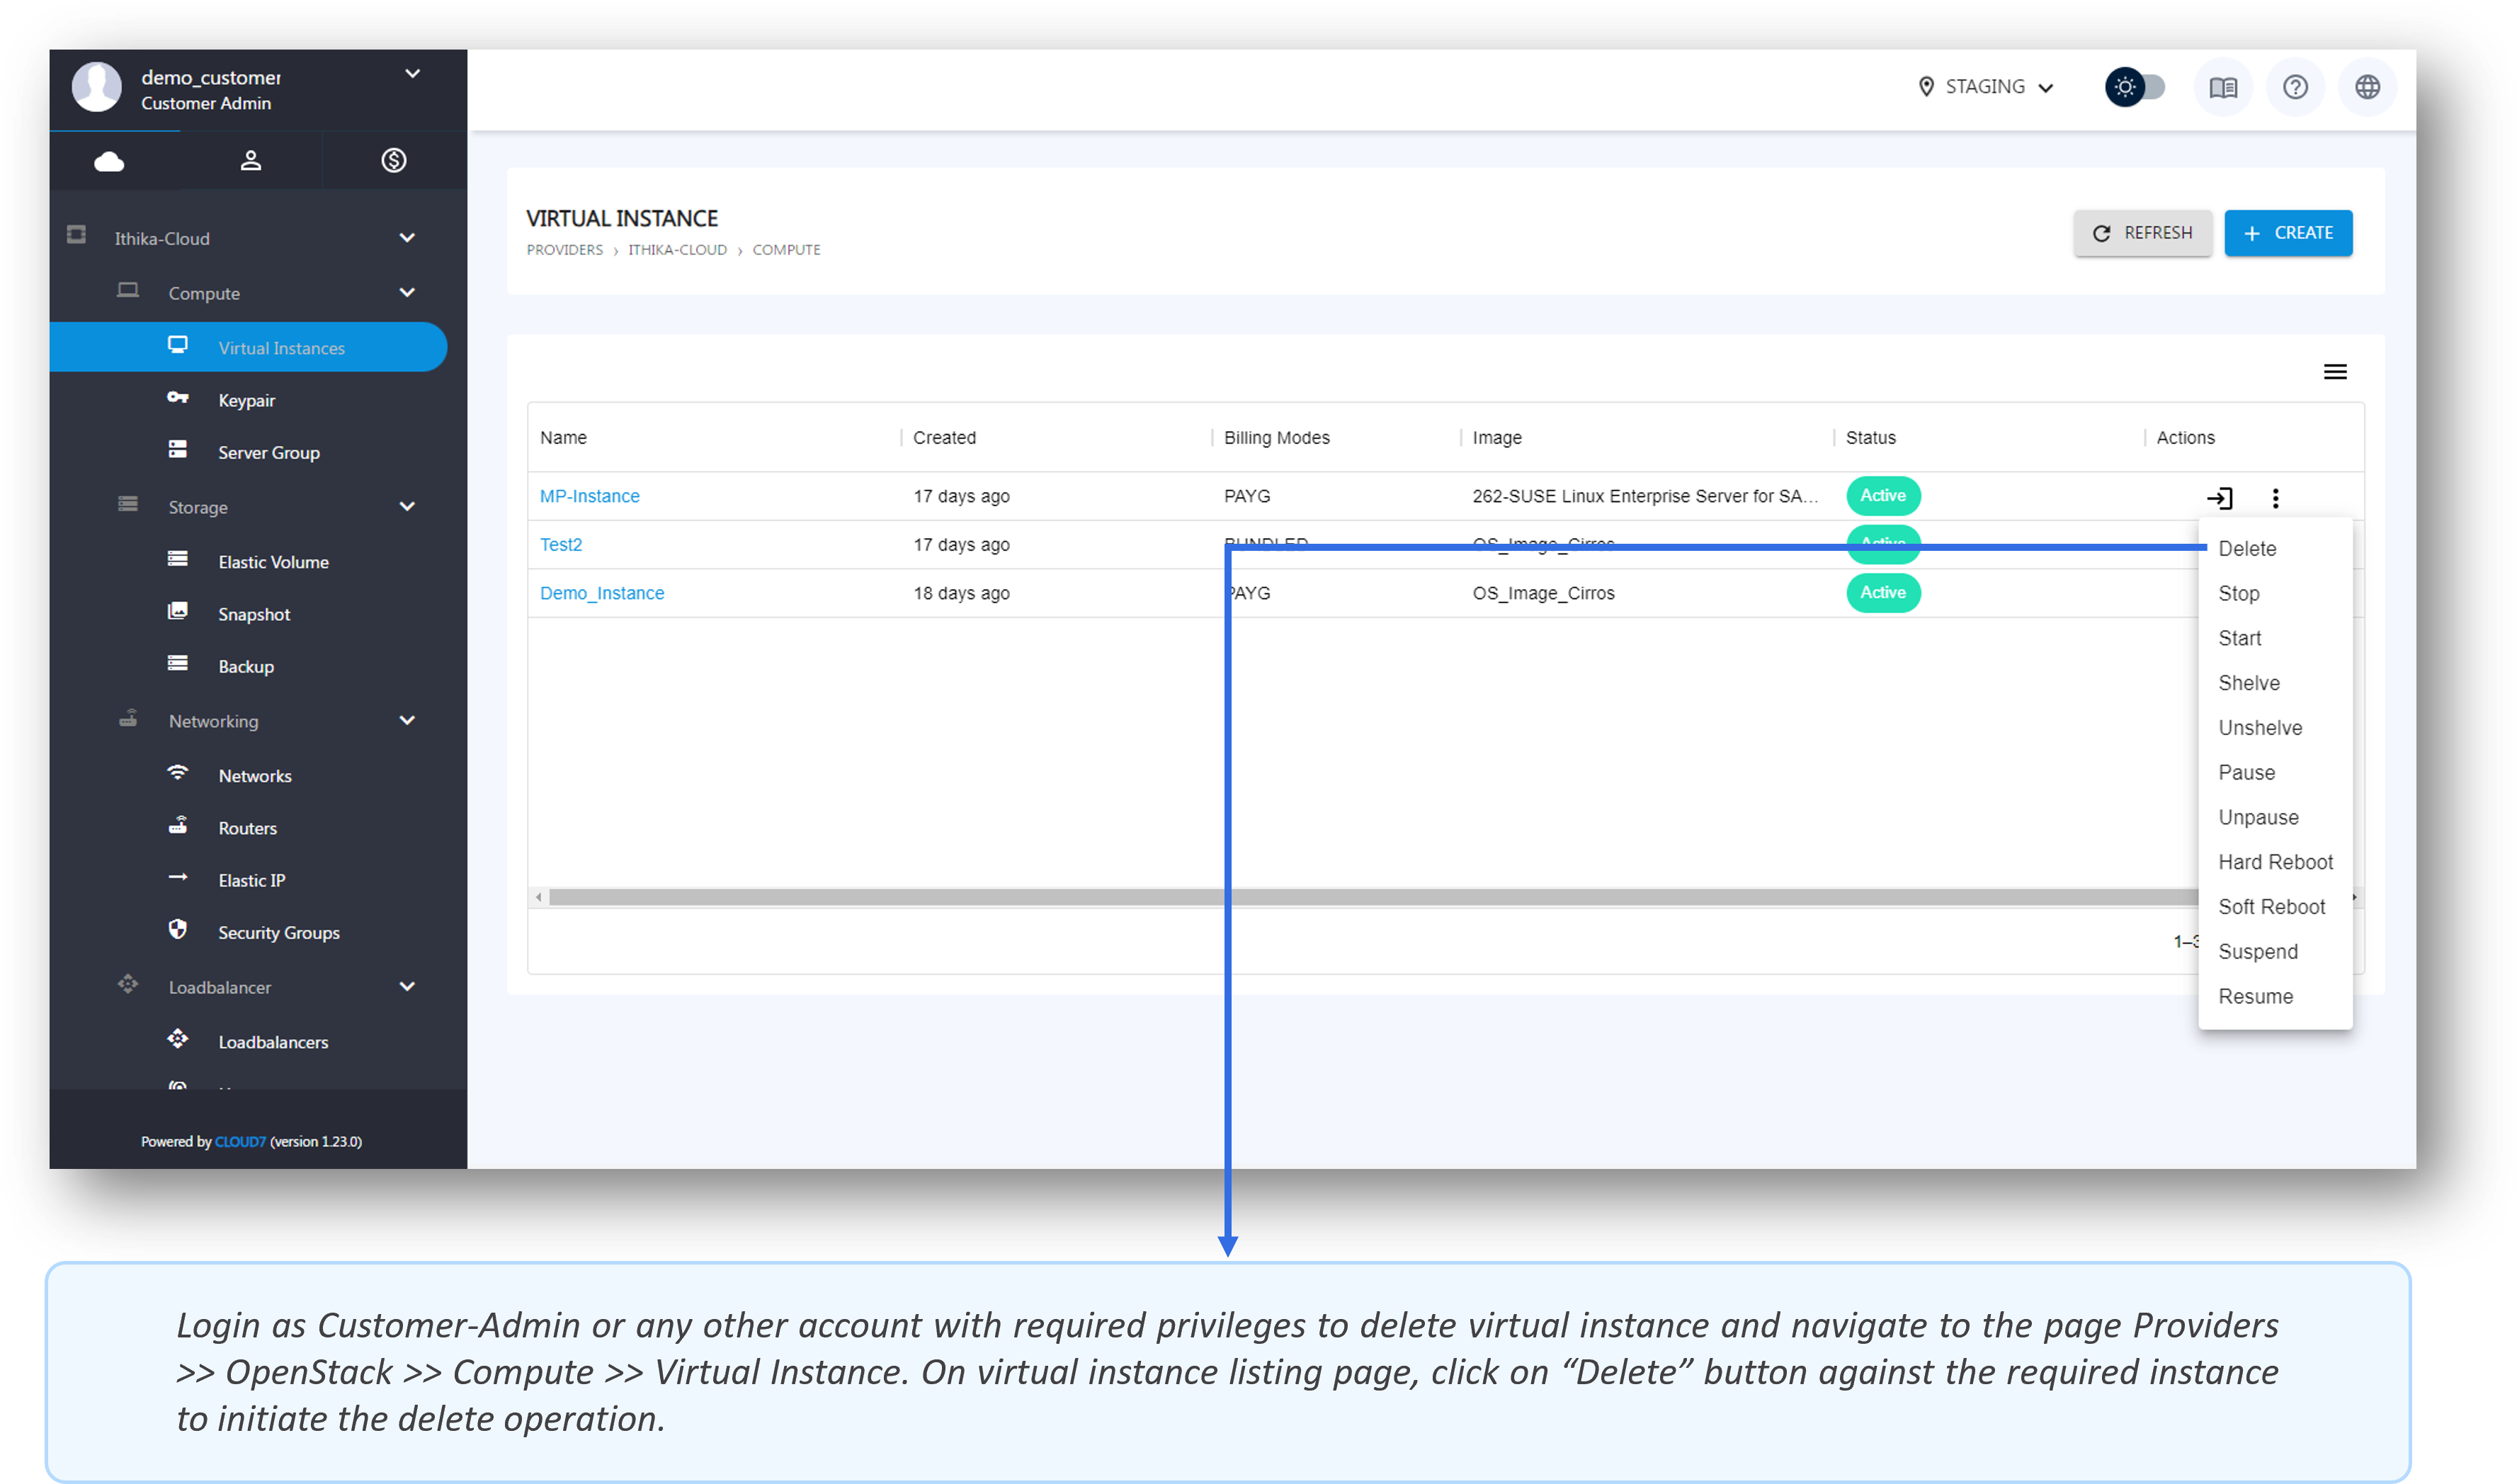
To delete a virtual-instance, please follow the given steps:
- Login as Customer-Admin or any other account with required privileges and navigate to Providers >> [Provider-DisplayName] >> Compute >> Virtual Instance from the Cloud7 menu.
- Find the virtual instance you wish to delete in the list of instances.
- Click on the Delete button (typically represented by a trash icon) next to the instance you want to remove.
- A confirmation prompt will appear to prevent accidental deletion. Review the instance details and click Confirm to proceed.

