Custom Fields #
Cloud7 includes a versatile Custom Field feature, which allows you to define your own Know Your Customer (KYC) process. This feature enables you to add various types of fields—text, image, and document fields—to the creation forms for Cloud-Admin, Resellers, and Customers, facilitating the collection of necessary information.
You have the flexibility to specify whether a field is mandatory or optional, and you can determine if the field pertains to organizational information or staff member (user) information. Additionally, you can create distinct custom fields tailored separately for Cloud-Admin, Resellers, and Customers, ensuring that each user type collects relevant and specific data.
Moreover, custom fields can be integrated into the self-signup form for customers, ensuring that critical information is gathered during the onboarding process. Alternatively, these fields can be excluded from the self-signup form and only made available in the customer organization or staff member profile after the customer has been onboarded. This allows for a more tailored and dynamic data collection process, accommodating various organizational requirements and enhancing the overall customer management system.
By leveraging the Custom Field feature, Cloud7 ensures a comprehensive and flexible approach to data collection, enabling better customer and reseller management while adhering to your organization’s unique KYC requirements.
List Custom Field #
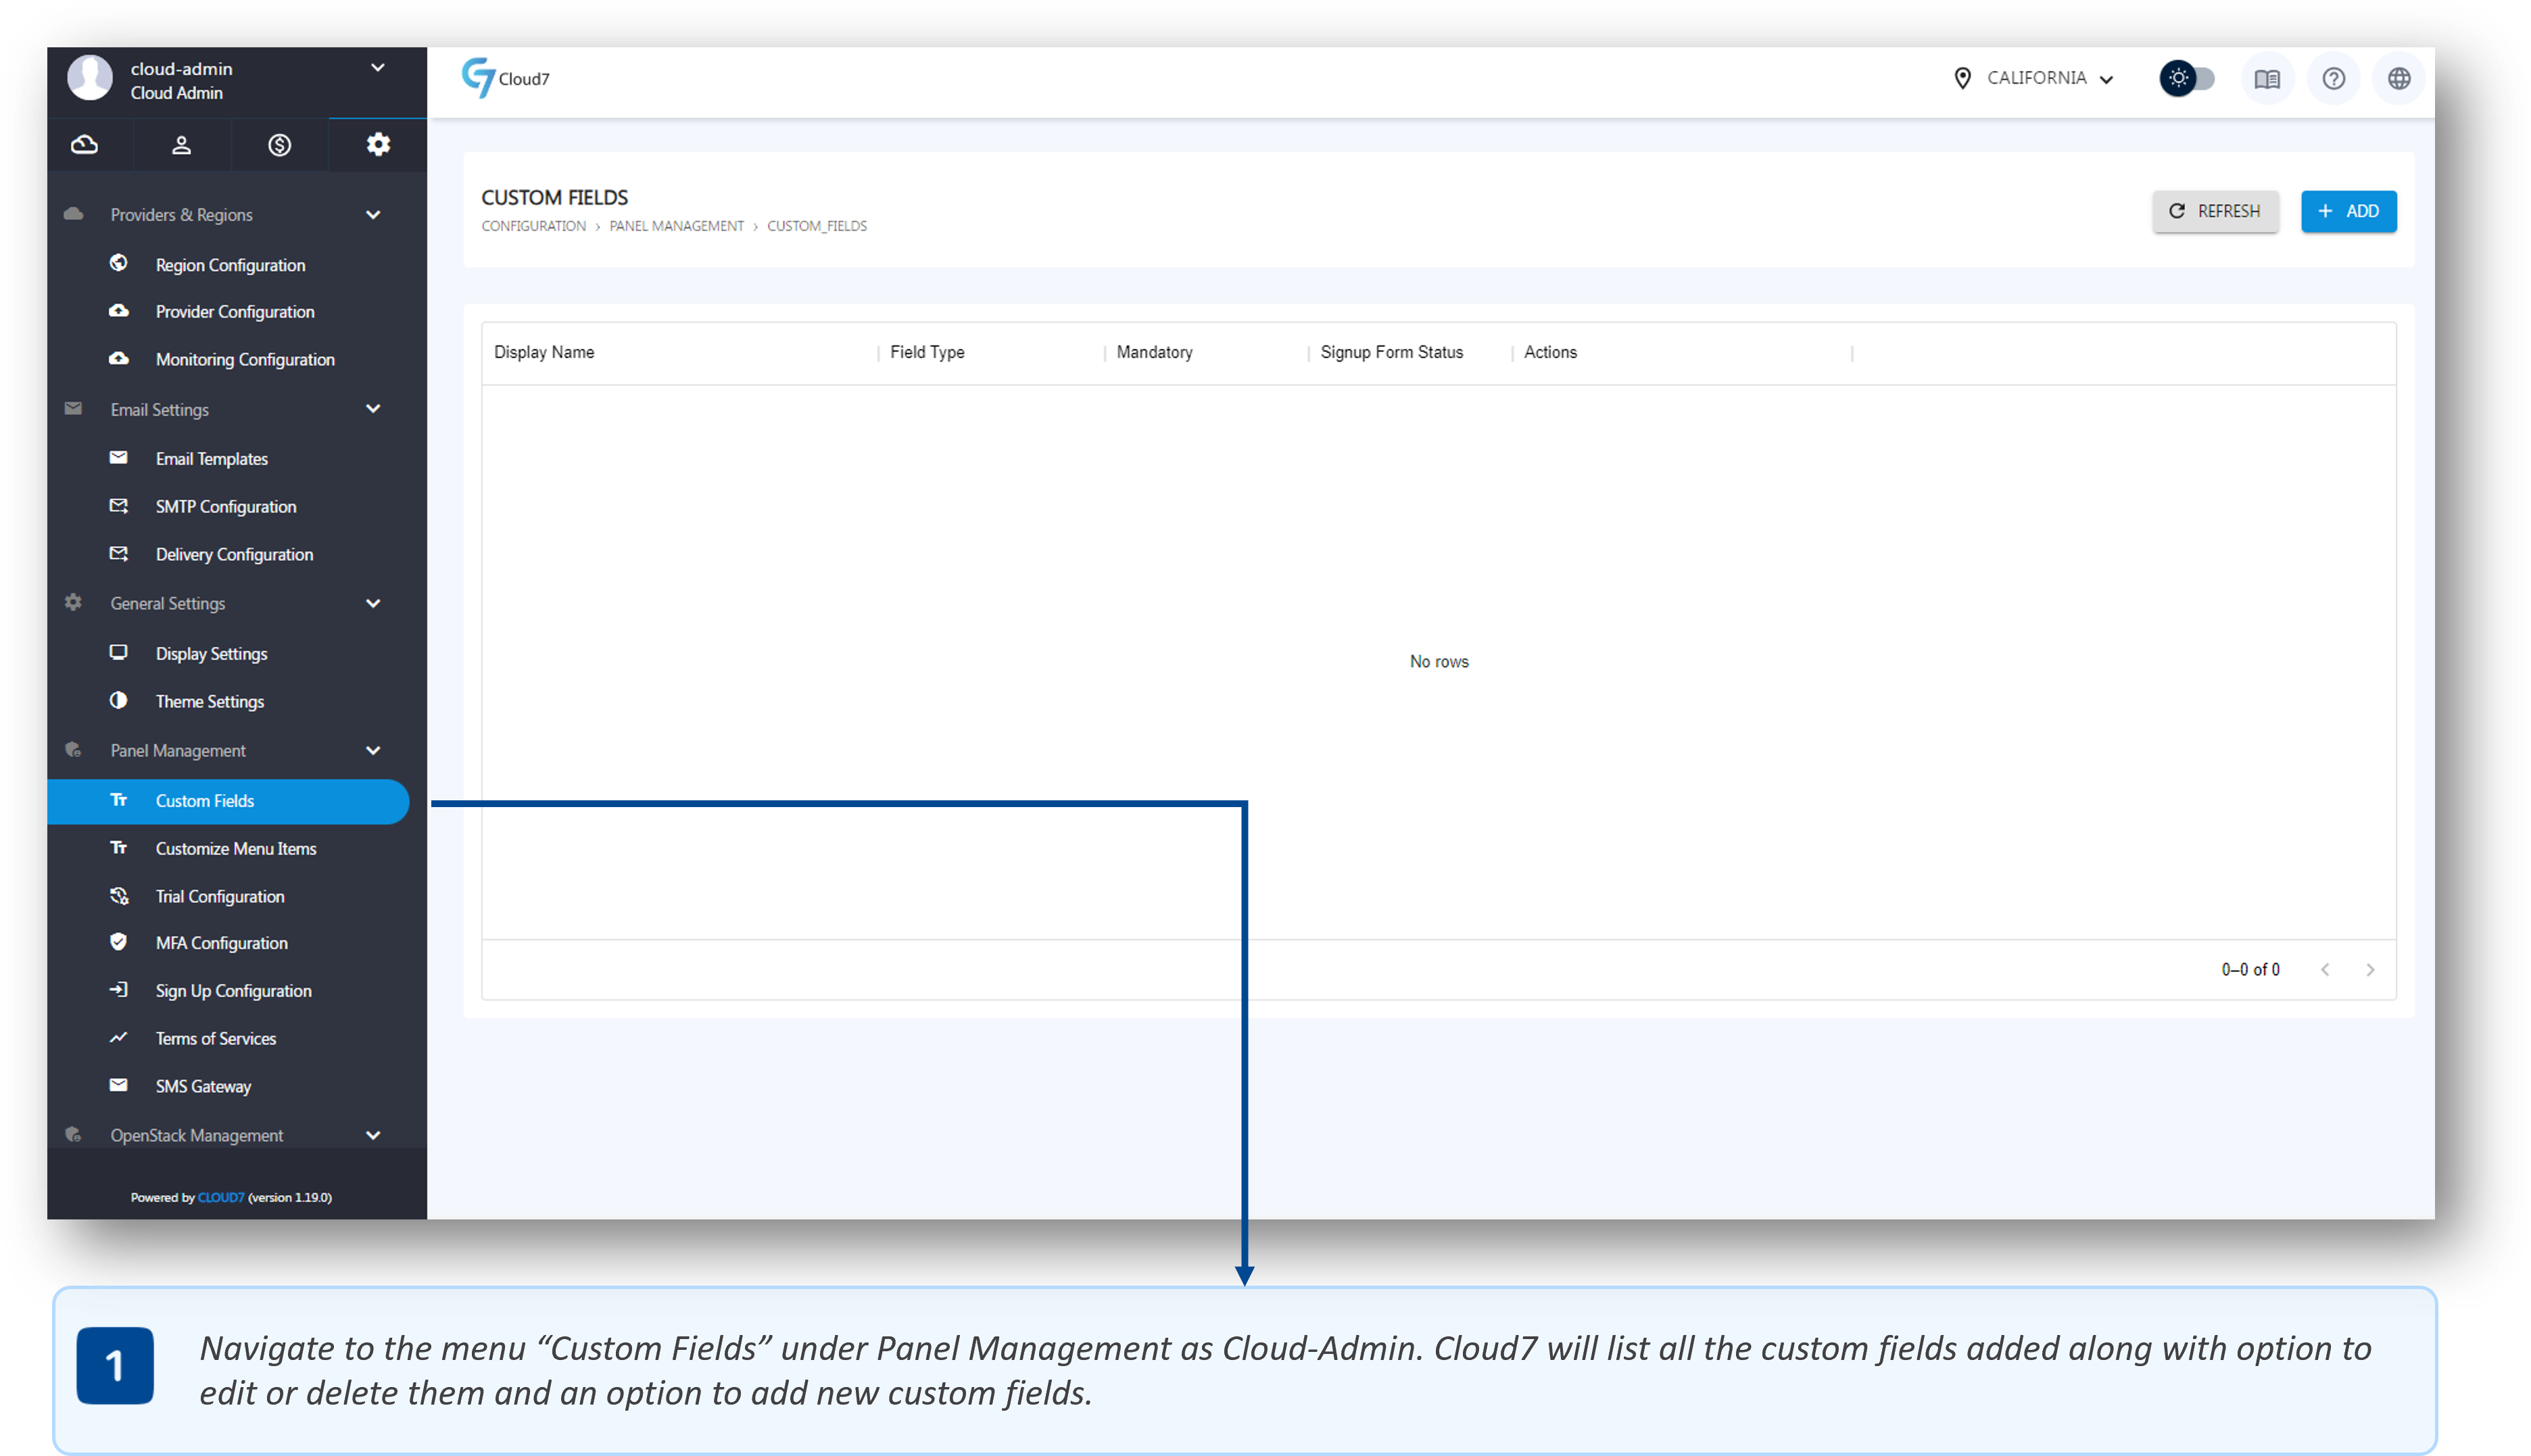
- To list the Custom Fields section, log in as Cloud-Admin (or a staff member with the necessary privileges) and navigate through the menu path: Configuration >> Panel Management >> Custom Fields.
- On this page, all the custom fields for customers, resellers and your staff members added in Cloud7 are listed with an option to add more fields, or edit and delete already added ones.
Add Custom Field #
- To list the Custom Fields section, log in as Cloud-Admin (or a staff member with the necessary privileges) and navigate through the menu path: Configuration >> Panel Management >> Custom Fields.
- On this page, all the custom fields for customers, resellers and your staff members added in Cloud7 are listed with an option to add more fields, or edit and delete already added ones.
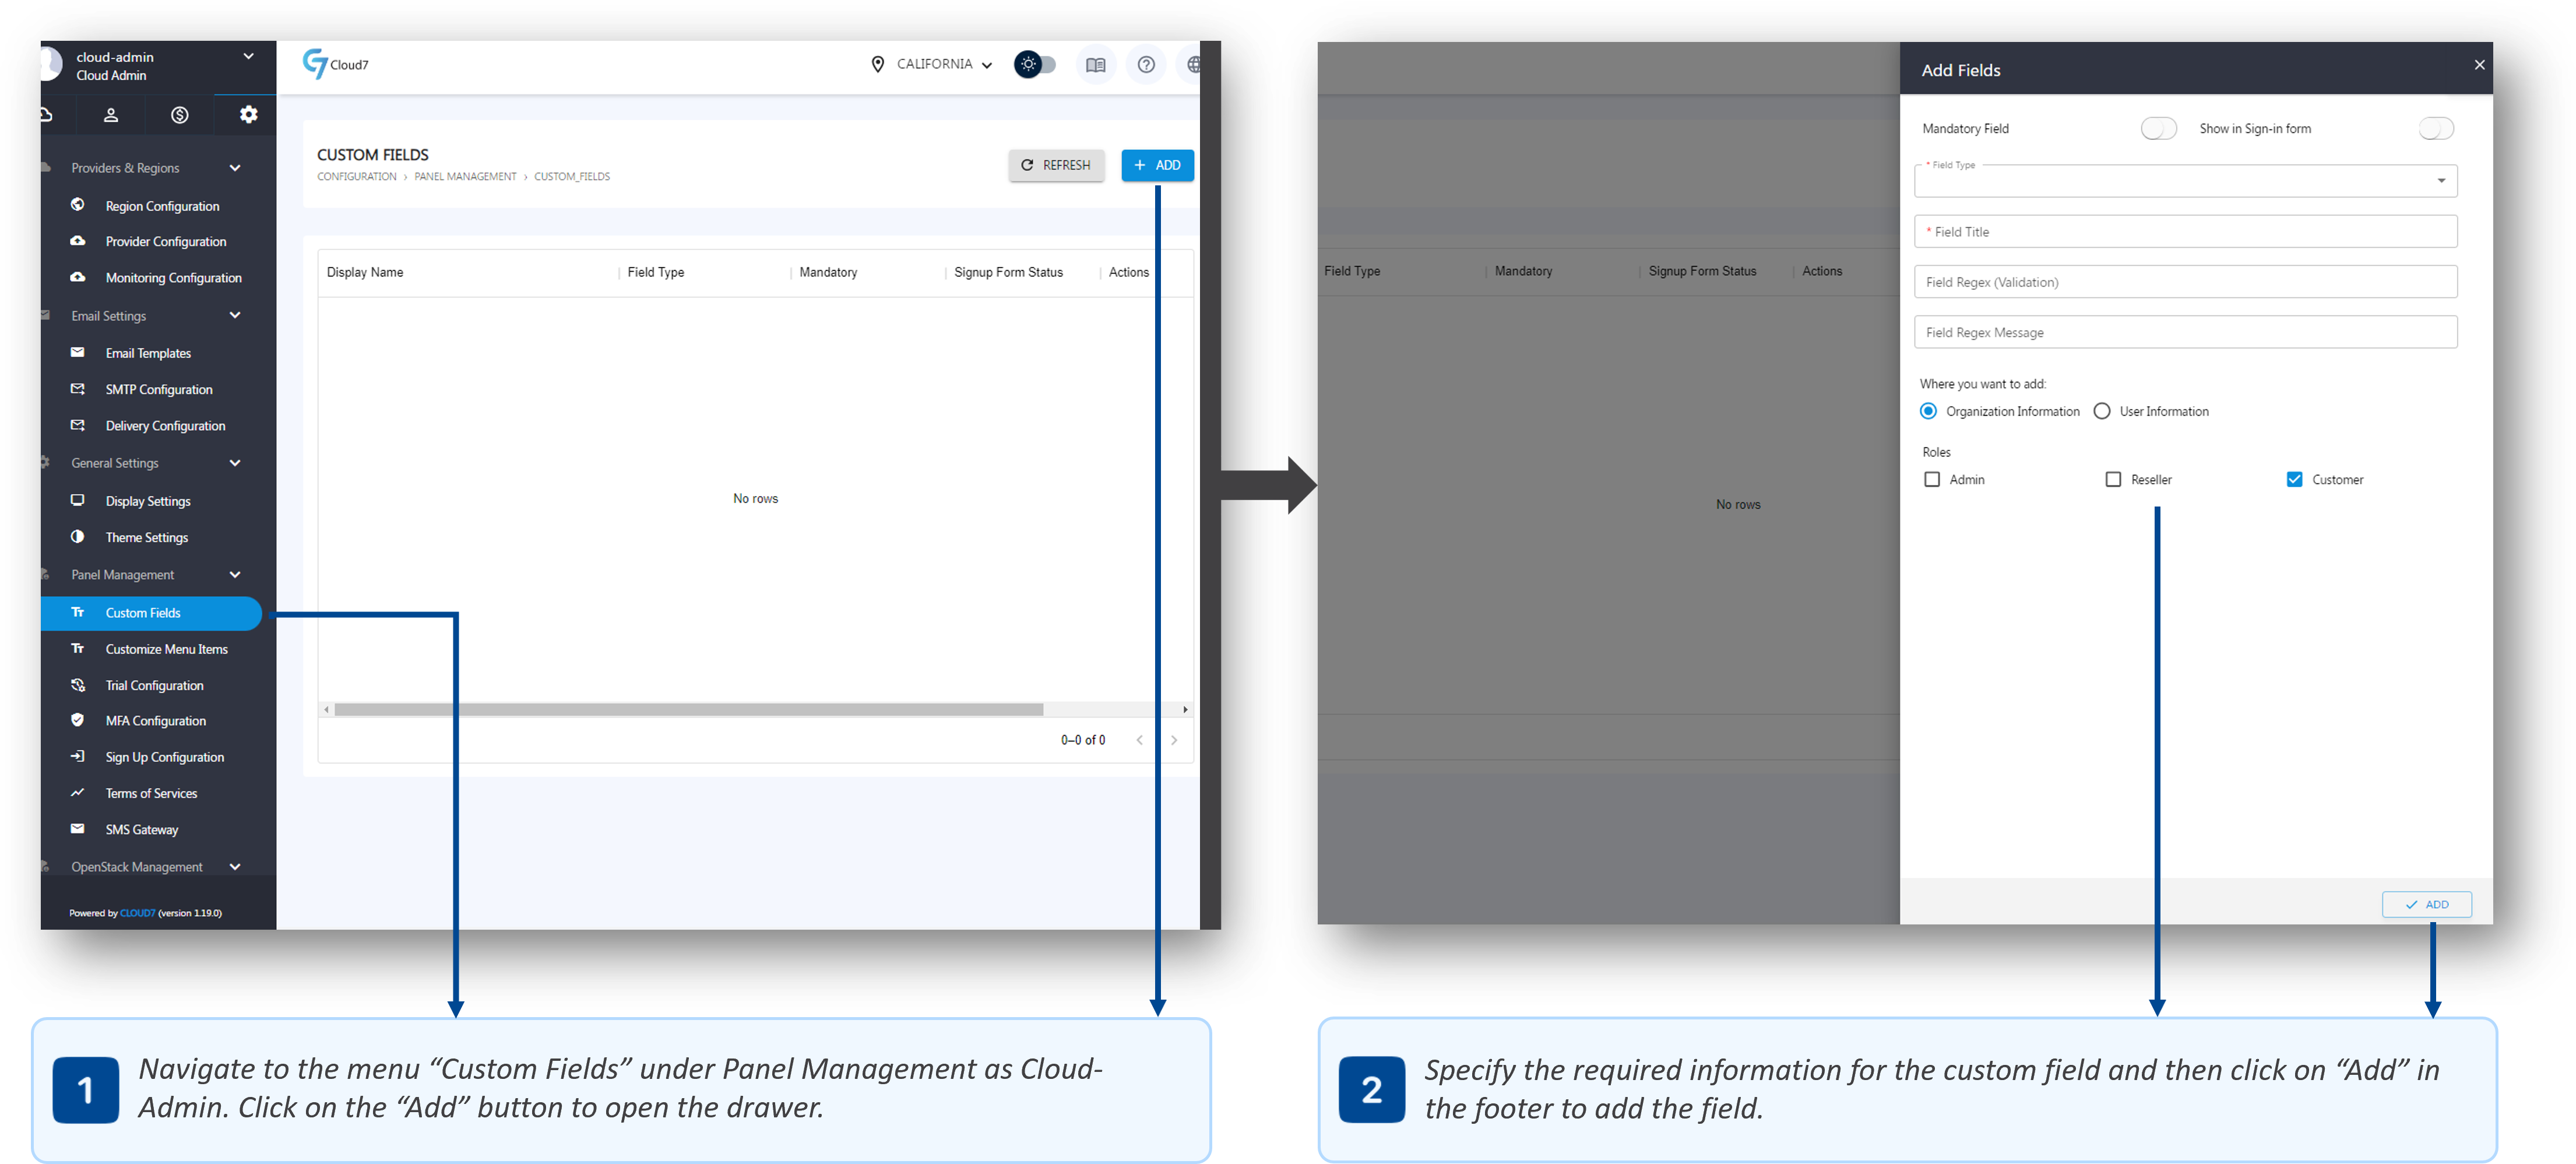
- Click on the “Add” button in the top right corner of the Cloud7 header to open the “Add Custom Field” drawer.
- Use “Mandatory Field” toggle to enforce the input of required data in the custom field. If you disable this toggle, the field will be an optional input.
- Use “Show in Signup Form” toggle to list the custom field in the signup form of Cloud7. If you disable this toggle, the field will not be listed on the signup form but will be available in the customer, reseller or your staff member profiles after their creation.
- In “Field Type” drop-down, specify and select the type of custom field from text, image and document options.
- In “Field Type” field, provide the name for the field that will appear in the signup form or the profile of the organization or users.
- Define whether this custom field data is relevant for the organization or the users belonging to those organizations by selecting either “Organization Information” or “User Information” option.
- Under Roles, select the level of organization on which this custom field will be applicable on form Admin, Resellers or Customers. For instance, if you select Customers, the field will only appear for the customers and not for the resellers or cloud-admin.
Edit Custom Field #
- To list the Custom Fields section, log in as Cloud-Admin (or a staff member with the necessary privileges) and navigate through the menu path: Configuration >> Panel Management >> Custom Fields.
- On this page, all the custom fields for customers, resellers and your staff members added in Cloud7 are listed with an option to add more fields, or edit and delete already added ones.
- Click on the “Edit” icon against the required custom field record that needs to be edited.
- Click on “Done” to submit and save the information after updating the required fields.
Delete Custom Field #
- To list the Custom Fields section, log in as Cloud-Admin (or a staff member with the necessary privileges) and navigate through the menu path: Configuration >> Panel Management >> Custom Fields.
- On this page, all the custom fields for customers, resellers and your staff members added in Cloud7 are listed with an option to add more fields, or edit and delete already added ones.
- Click on the “Delete” icon against the required custom field record that needs to be deleted.
- A delete confirmation prompt will appear. Select “Confirm” to validate your action and proceed with the removal of the custom field.
Custom Menu Items #
Cloud7 offers a robust Custom Menu Items feature, enabling you to integrate external systems into the Cloud7 menu structure. This functionality transforms Cloud7 into a centralized hub for all your technological stacks and ecosystems.
This feature is particularly advantageous for incorporating external systems that are not directly integrated with Cloud7 via its APIs or automation scripts. By adding these systems through the Custom Menu Items feature, you ensure that all your essential tools and platforms are accessible from one cohesive interface.
The key functionalities of the Custom Menu Items features are:
- Visibility Control: Determine the visibility of custom menu items for different user groups. Options include making items visible to all customers and resellers, exclusively to customers, exclusively to resellers, or based on specific subscriptions. This flexibility ensures that only relevant users have access to particular external systems.
- Subscription-Based Visibility: You can link the visibility of a custom menu item to the subscription of a product. This means that only users who have purchased a specific product through a subscription plan in the marketplace will see the related menu item, ensuring a tailored and relevant user experience.
- Seamless Redirection and Login: You can utilize the Post Credentials feature for seamless redirection and login to external systems. If the credentials for the external system match those in Cloud7, this feature allows users to access the external system without needing to re-enter their login details, enhancing user experience and integration efficiency.
By leveraging the Custom Menu Items feature, Cloud7 not only streamlines access to various external systems but also enhances the overall efficiency and usability of your technology ecosystem. This centralized approach ensures that all critical tools are easily accessible and managed within Cloud7, providing a cohesive and integrated user experience.
List Custom Menu #
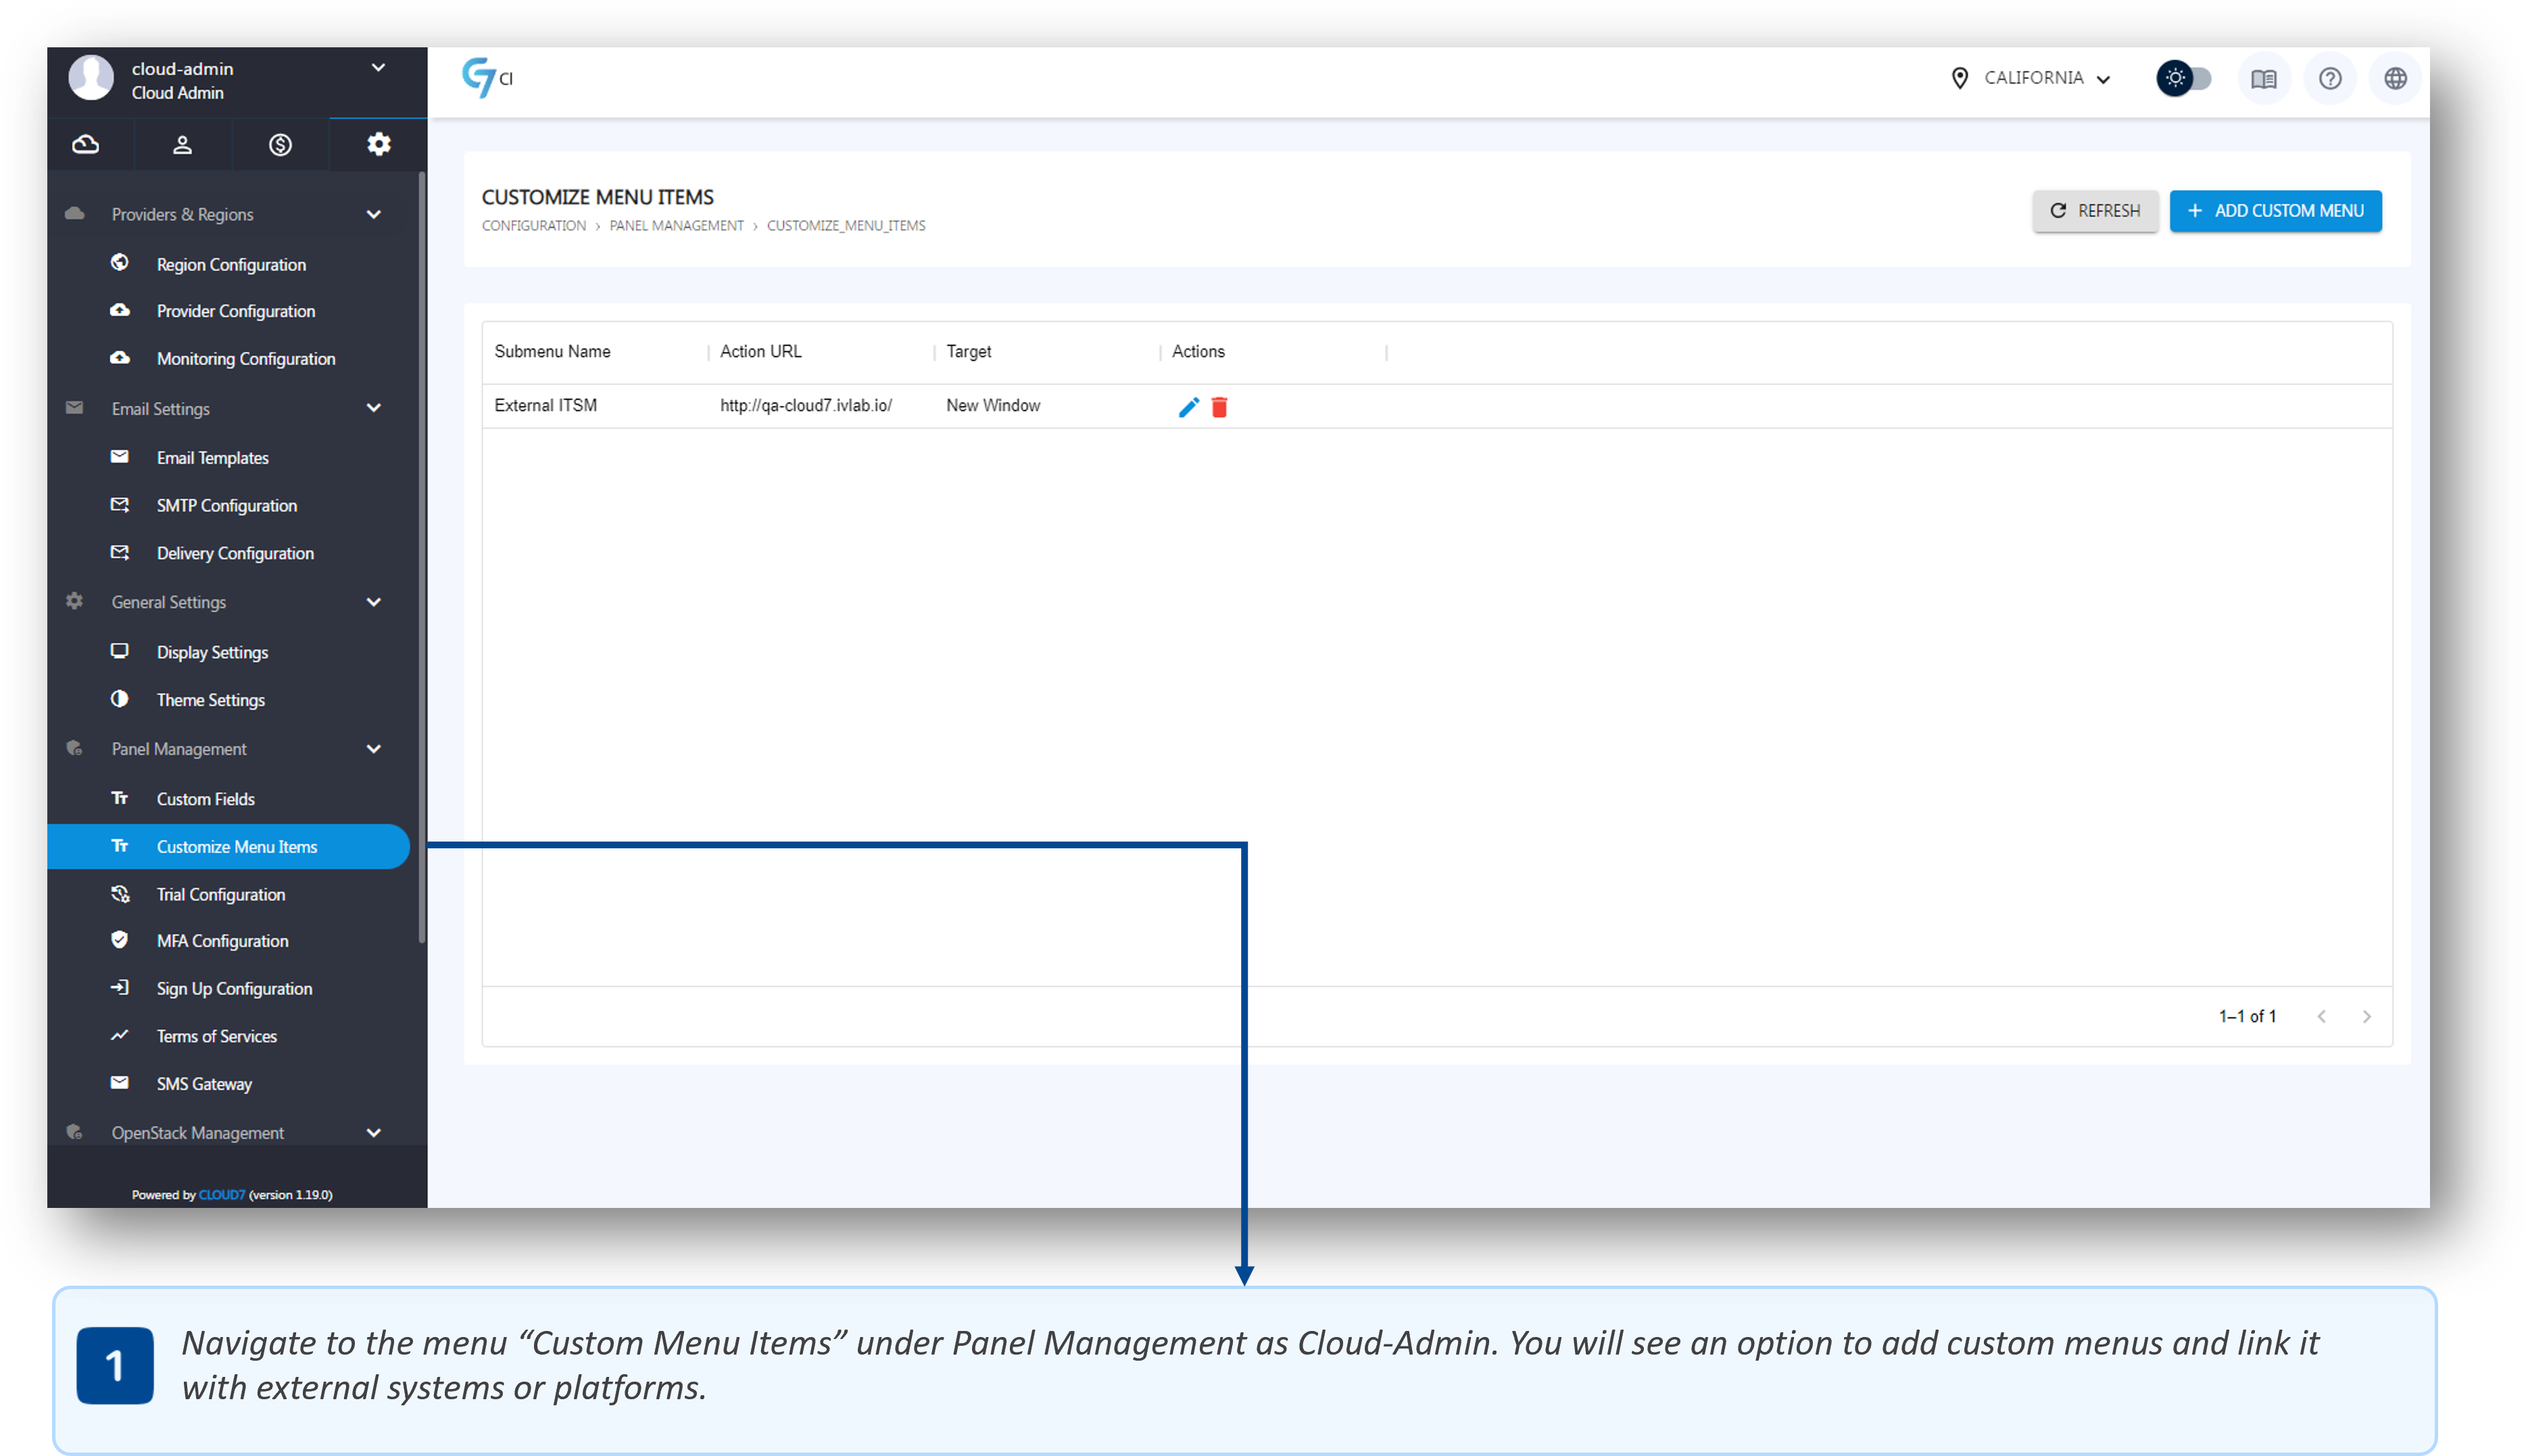
- To list the Custom Menu section, log in as Cloud-Admin (or a staff member with the necessary privileges) and navigate through the menu path: Configuration >> Panel Management >> Custom Menu.
- On this page, all the additional menus added in Cloud7 are listed with an option to add more menus, or edit and delete already added ones.
Add Custom Menu #
- To list the Custom Menu section, log in as Cloud-Admin (or a staff member with the necessary privileges) and navigate through the menu path: Configuration >> Panel Management >> Custom Menu.
- On this page, all the additional menus added in Cloud7 are listed with an option to add more menus, or edit and delete already added ones.
- From the top right corner of Cloud7 header, click on “Add Custom Menu” button to open the Add Custom Menu drawer.
- In “Menu Display Name” field, provide the name for the parent menu.
- In the “Sub Menu Name” field, provide the child or sub menu name that will appear under the parent menu.
- Specify the external application URL in the “Action URL” field. This is the URL to which the customers will be redirected.
- Select “Post Credentials” options if you want users to be redirected to the external application seamlessly without having to re-login. For this seamless login, ensure that both the credentials for Cloud7 and the external application are similar as Cloud7 will post the C7 user credentials to the external system for authentication:
- In “Username Variable” field, specify the variable used by the external application for username.
- In the “User Token Variable” field, specify the variable used by the external application for user token.
- In “Access to Users” option, select the required user levels to which this menu will apply. This is the visibility option.
- All: Select this option if you want Cloud7 to list this custom menu to all the customers and resellers.
- Customers: Select this option if you want this custom menu to list only in the customers’ C7 interfaces and the resellers.
- Resellers: Select this option if you want this custom menu to list only in the resellers’ C7 interfaces and the customers.
- Link with Product: Select this option to link the custom menu to a product subscription. This menu will list only to the customers or resellers who has self subscribed to the product (sold via a subscription plan on the marketplace) or you have assigned a subscription plan to them as Cloud-Admin. Cloud7 will list all the custom products from the “Products” section.
- In “Target” option, select whether to redirect users to the action URL of the external system in the same window or to a new window.
Edit Custom Menu #
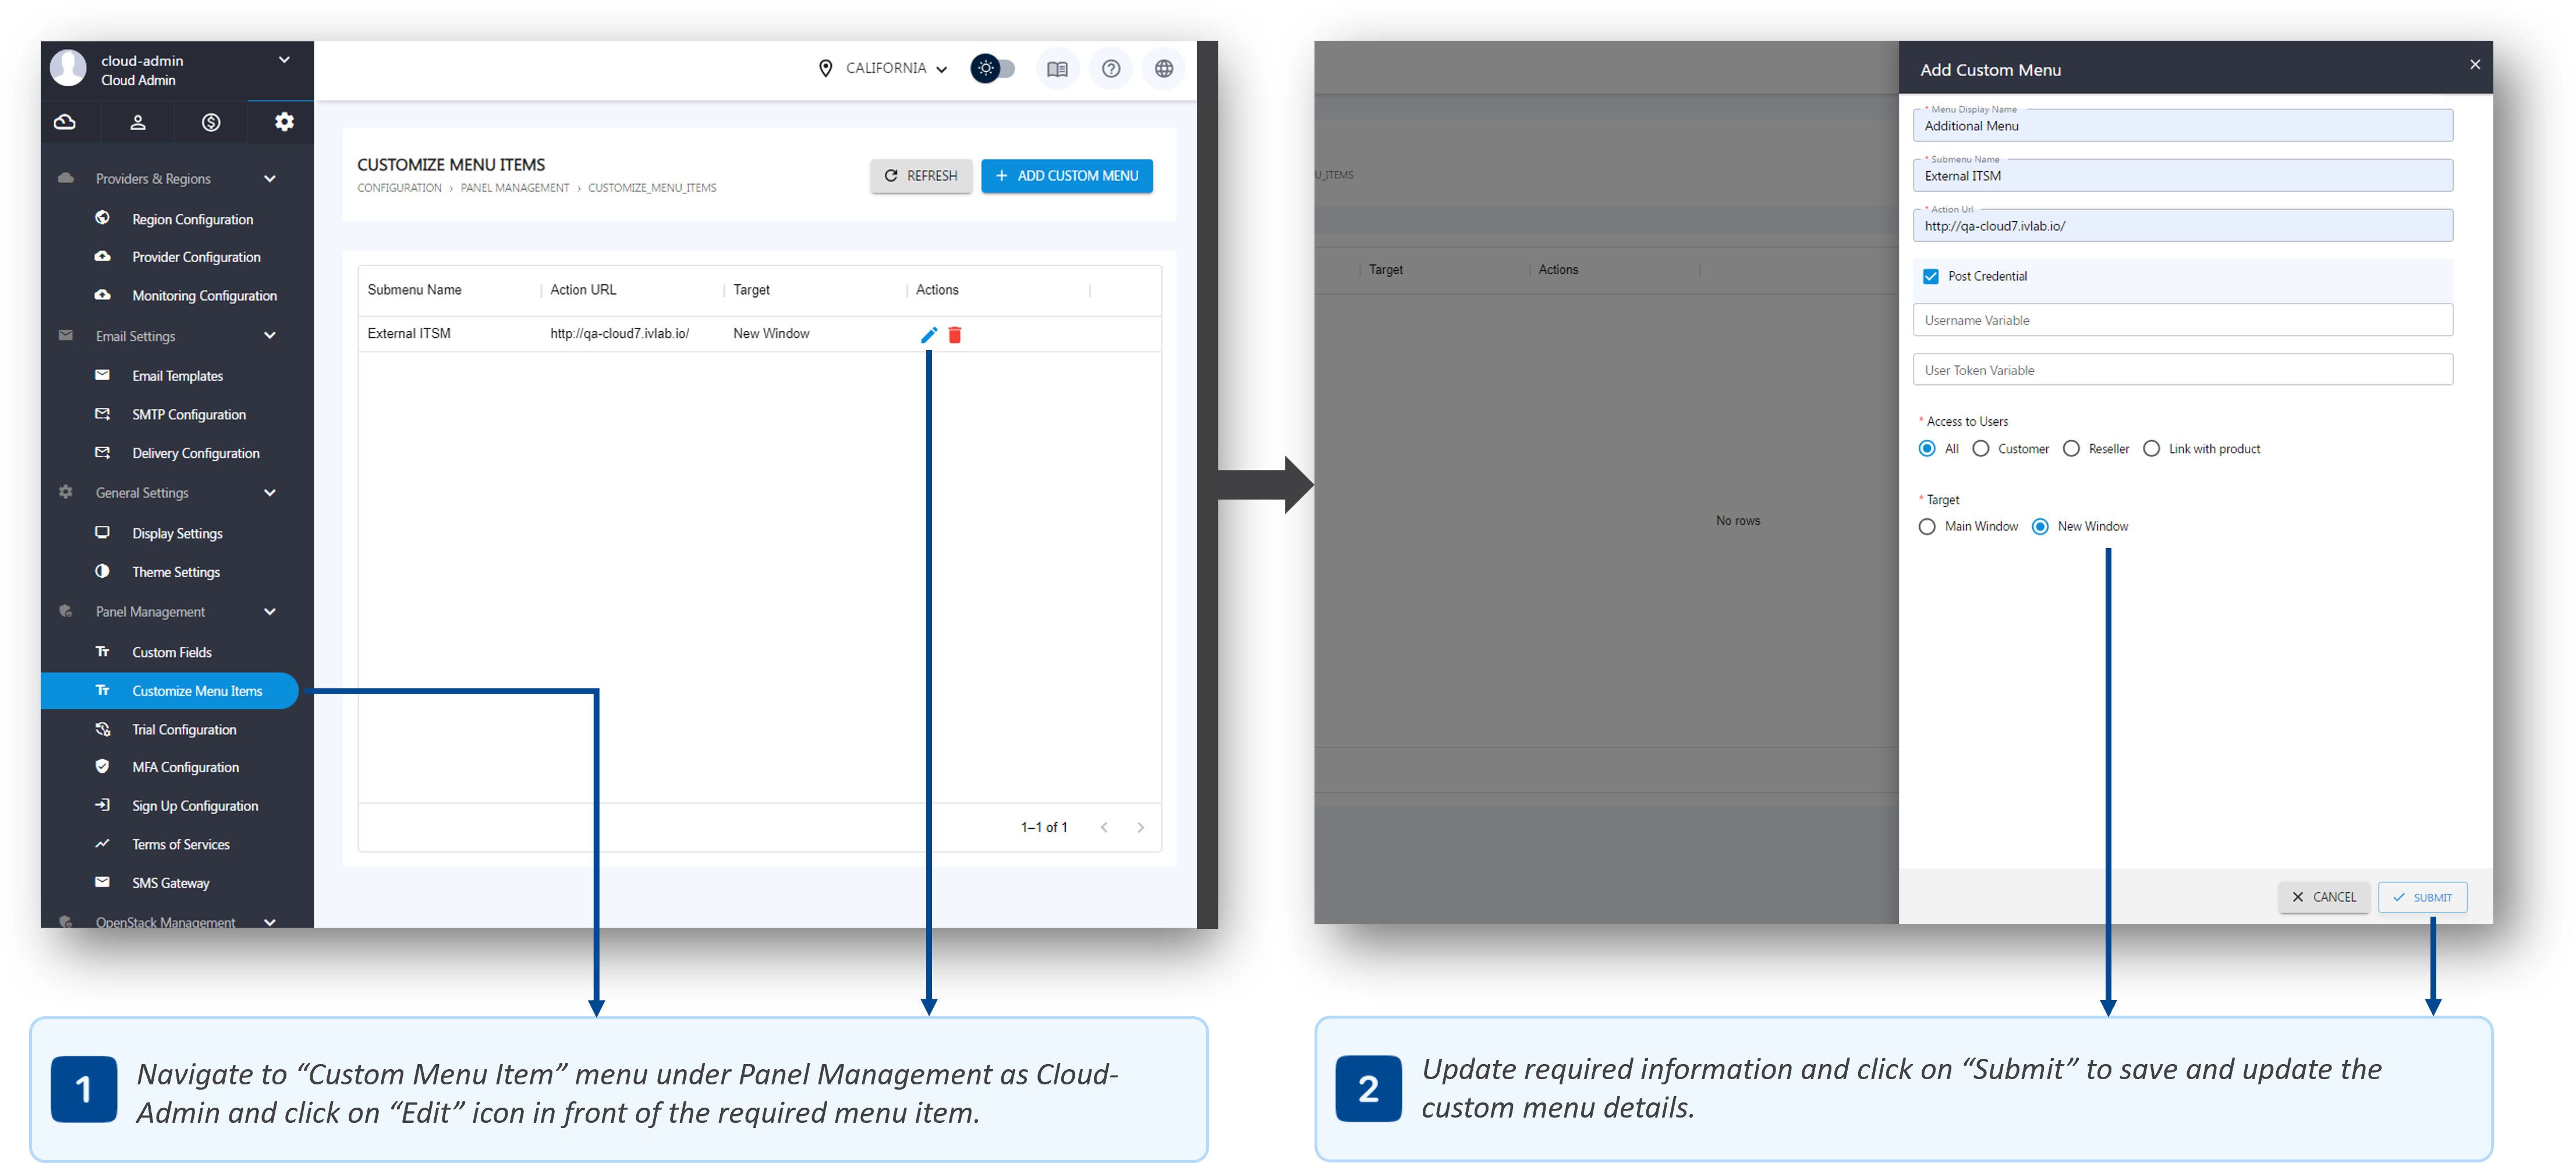
- To list the Custom Menu section, log in as Cloud-Admin (or a staff member with the necessary privileges) and navigate through the menu path: Configuration >> Panel Management >> Custom Menu.
- On this page, all the additional menus added in Cloud7 are listed with an option to add more menus, or edit and delete already added ones.
- Click on “Edit” icon to open the Edit Custom Menu drawer.
- In the drawer, change the required details for the custom menu and click on “Submit” button in the Cloud7 footer to save the settings.
Delete Custom Menu #
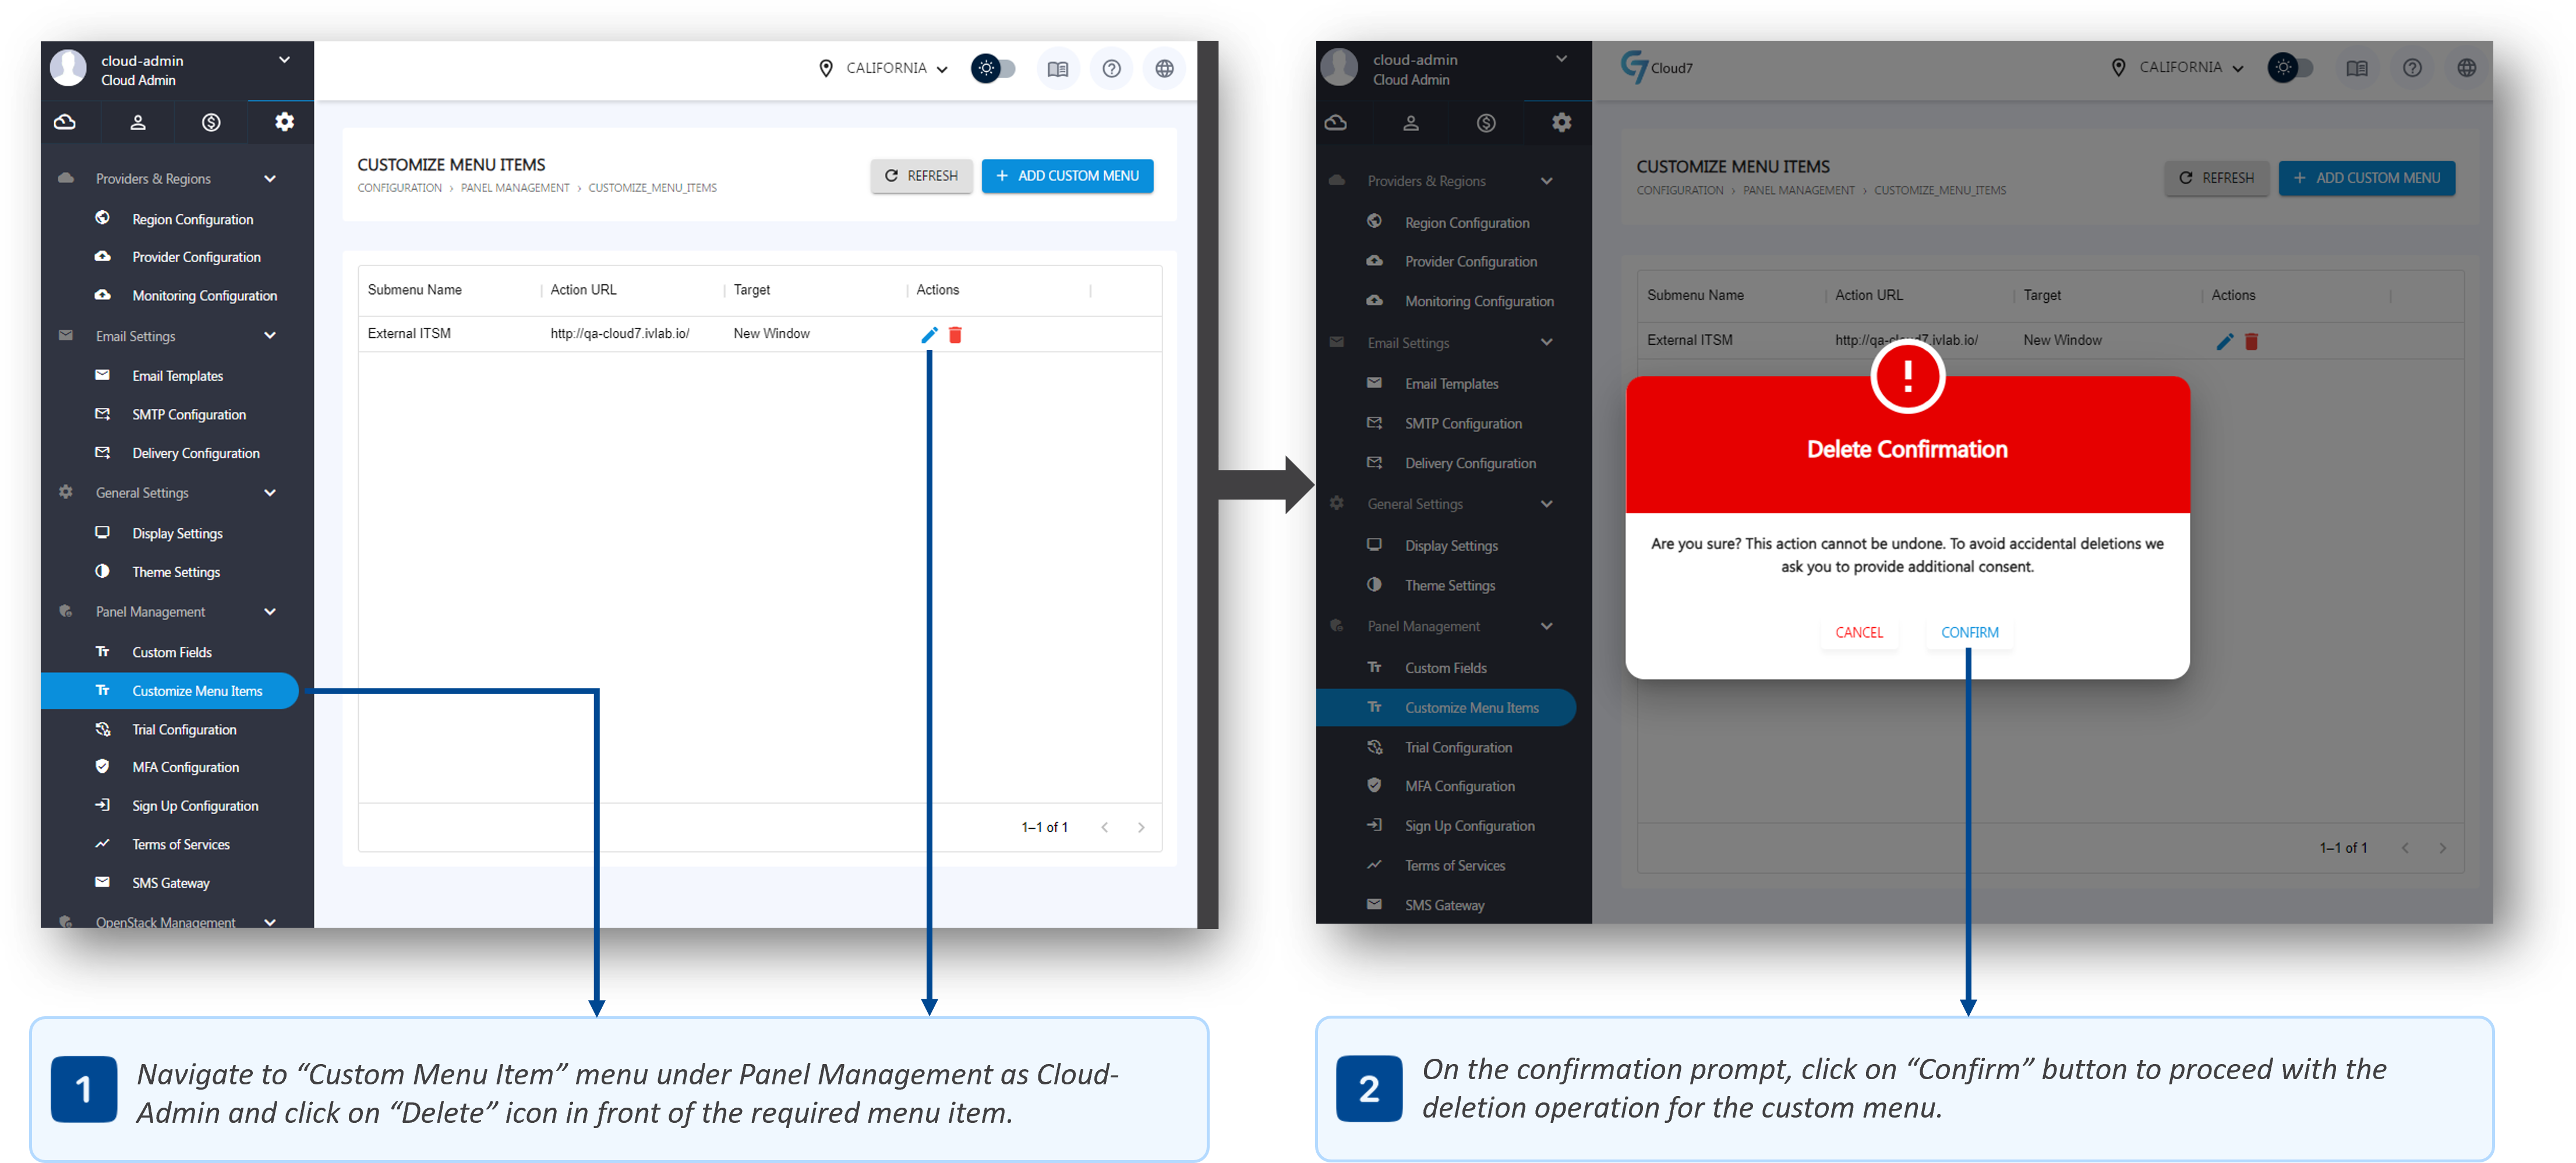
- To list the Custom Menu section, log in as Cloud-Admin (or a staff member with the necessary privileges) and navigate through the menu path: Configuration >> Panel Management >> Custom Menu.
- On this page, all the additional menus added in Cloud7 are listed with an option to add more menus, or edit and delete already added ones.
- Click on “Delete” icon to open the initiate the delete operation.
- In the delete confirmation prompt, select “Confirm” option to validate your action and proceed with the removal of the custom menu.
Custom Menu Visibility #
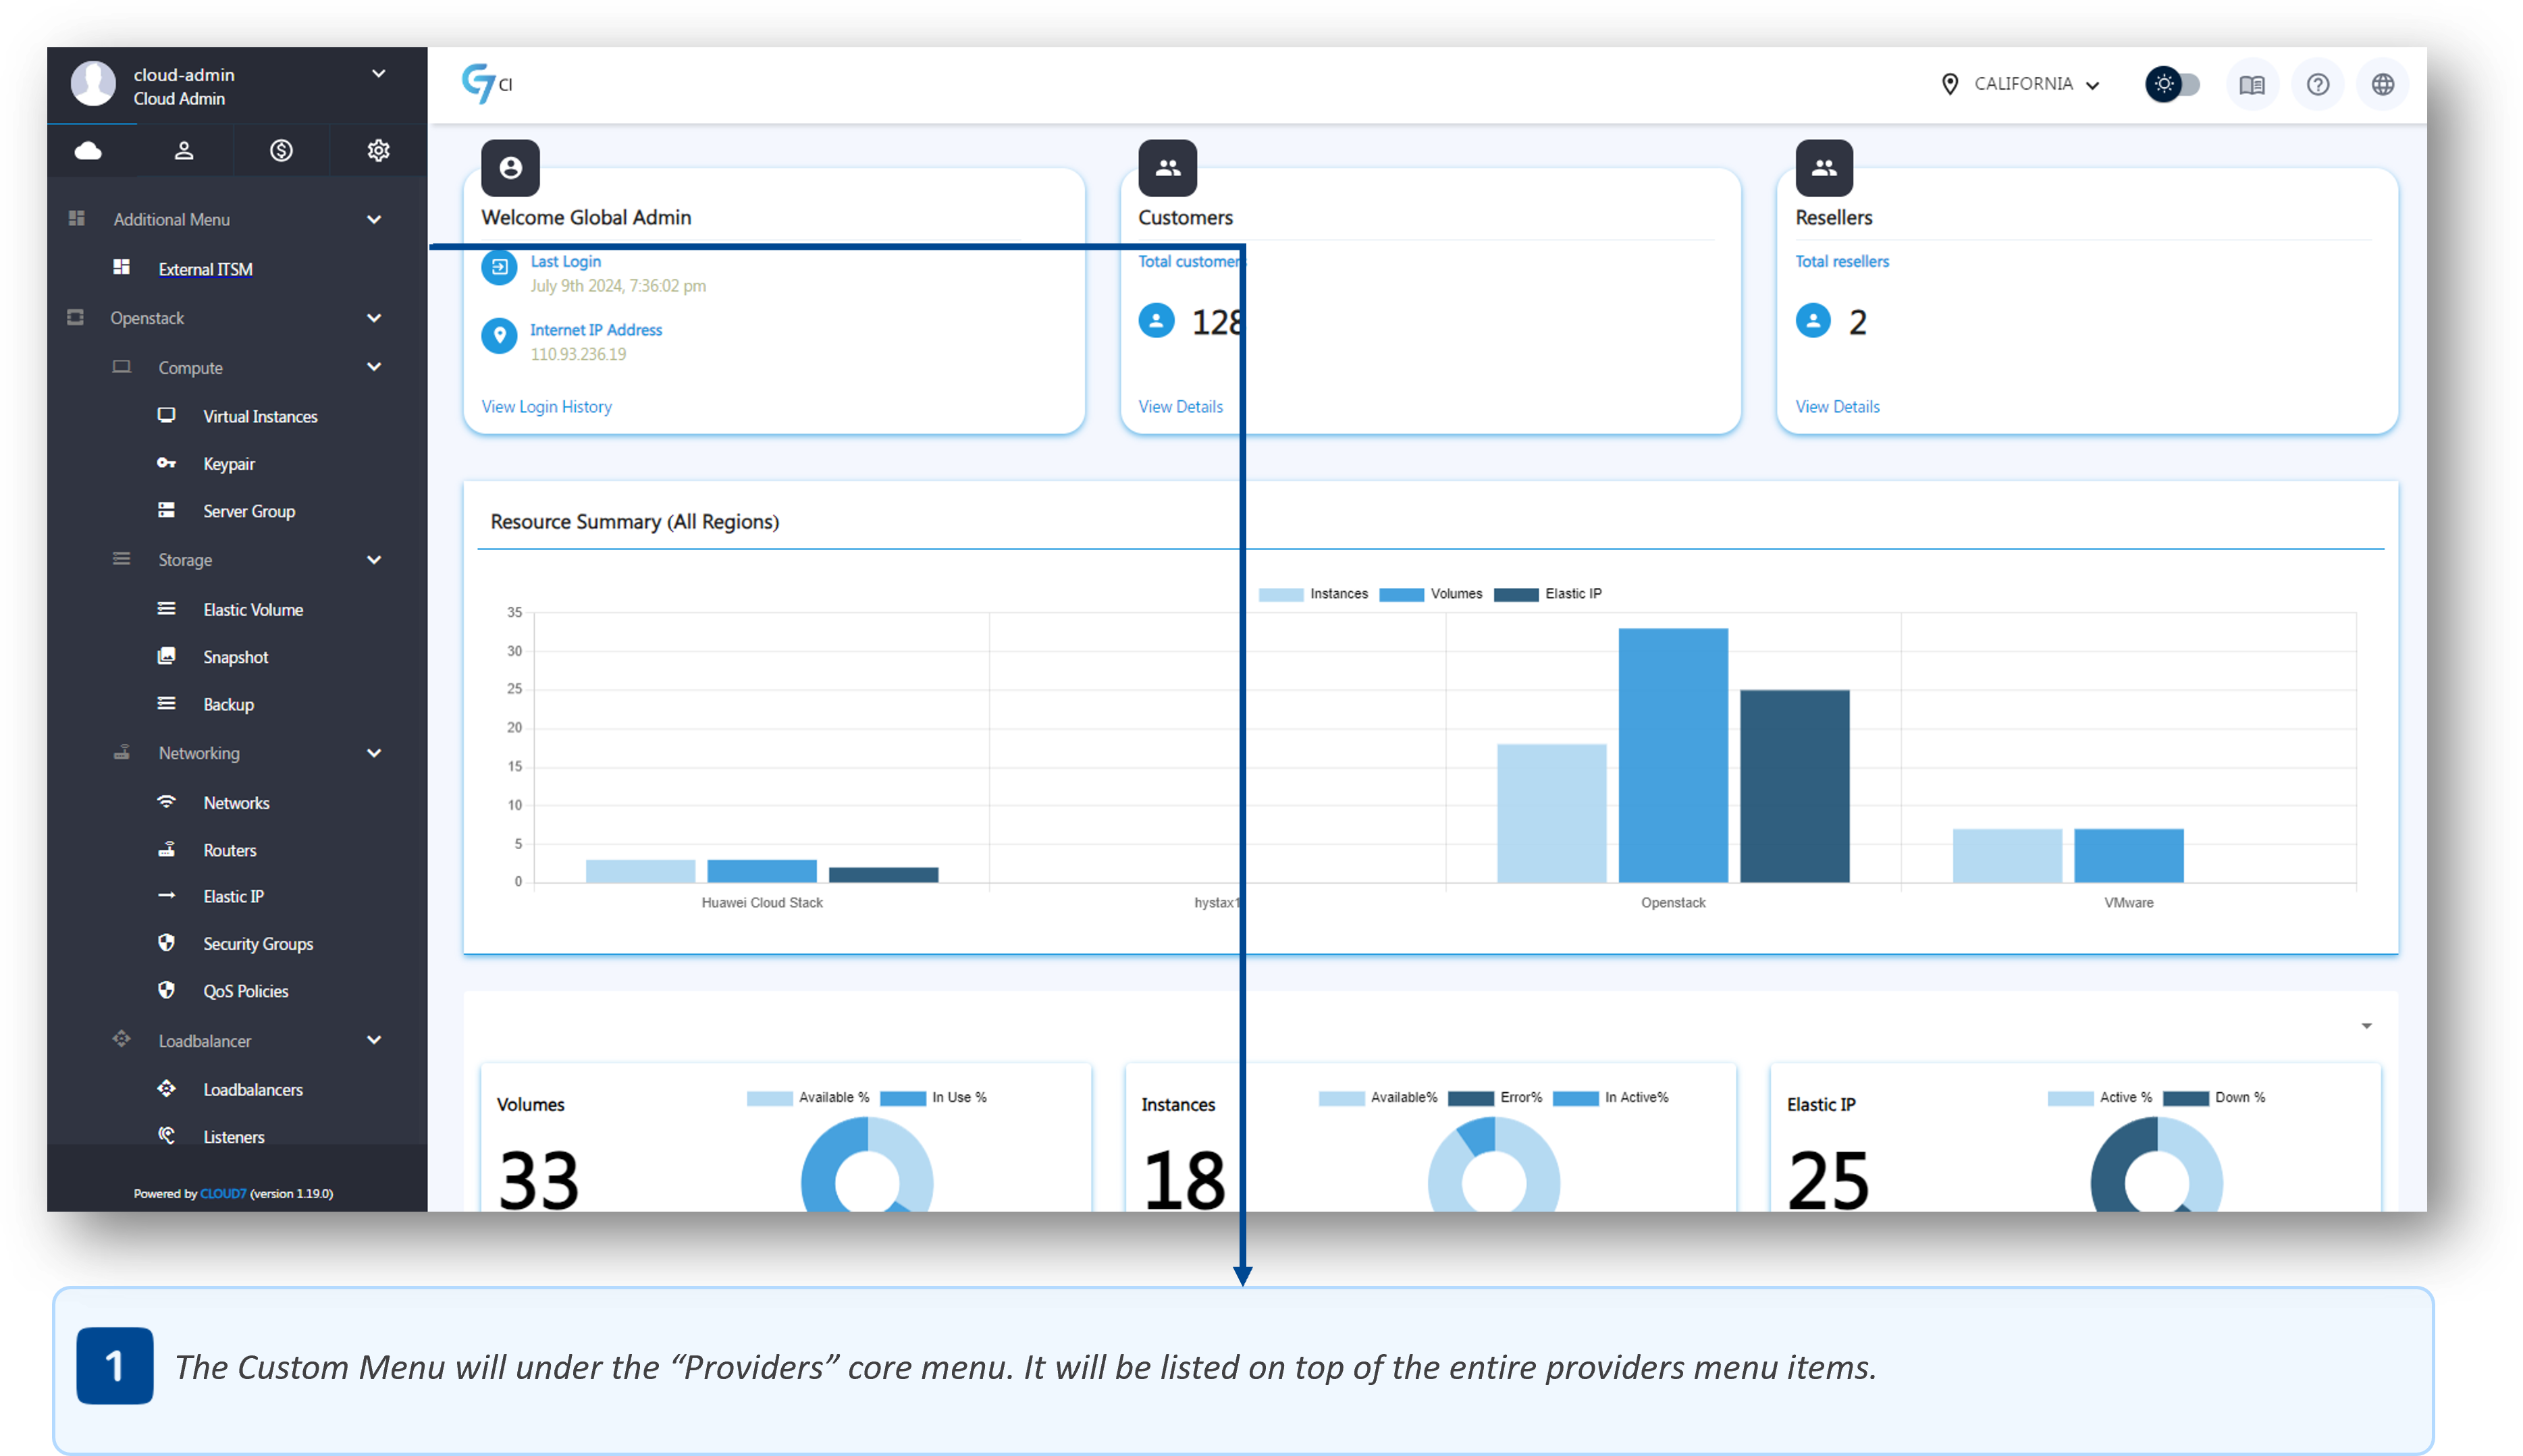
- To view the custom menu as Cloud-Admin, Reseller or Customer (based on the visibility configuration of the custom menu), please navigate to: Providers >> Custom Menu Name. This menu will always appear at the top of all the menu items under “Providers” section.
Trial Configurations #
Cloud7 offers a comprehensive trial or evaluation feature that enables your end-customers to assess your services before committing to a subscription. This feature is designed to provide potential customers and resellers with a limited period evaluation, allowing them to experience the capabilities of Cloud7 firsthand.
They key features of this module includes:
- Customizable Trial Period: You can define the default trial period duration that will apply to all trial Resource Plans. You can tailor the trial period to suit your business needs and provide ample time for potential customers to evaluate your services.
- Efficient Resource Management: You can assign specific trial Resource Plans to customers or resellers. These plans contain a predefined set of resources (products) that customers can consume during their trial period, ensuring they get a comprehensive overview of your offerings.
- Controlled Evaluation: Specify the types of resources that can be consumed during the trial period. This control ensures that customers only use the resources you want to offer in the trial, managing costs and resource allocation effectively.
- Seamless Transition to Paid Subscriptions: Customers can seamlessly activate their trial subscription into a live subscription from within their self-service portal. This process is user-friendly and encourages conversion from trial to paid subscriptions.
- Activation Leads to Billing: Once customers activate their subscription, billing initiates immediately. This ensures that your services are monetized as soon as customers decide to move forward with a paid subscription.
- Non Activation Leads to Termination: If customers do not activate their subscription before the trial period ends, Cloud7 will automatically terminate the resources associated with the trial Resource Plan. This automation helps manage resources efficiently and prevents overuse beyond the trial period.
The trial and evaluation feature in Cloud7 is designed to provide potential customers with a thorough evaluation of your services, facilitating informed decision-making and encouraging conversions to paid subscriptions. This feature not only enhances customer experience but also ensures efficient resource management and streamlined billing processes.
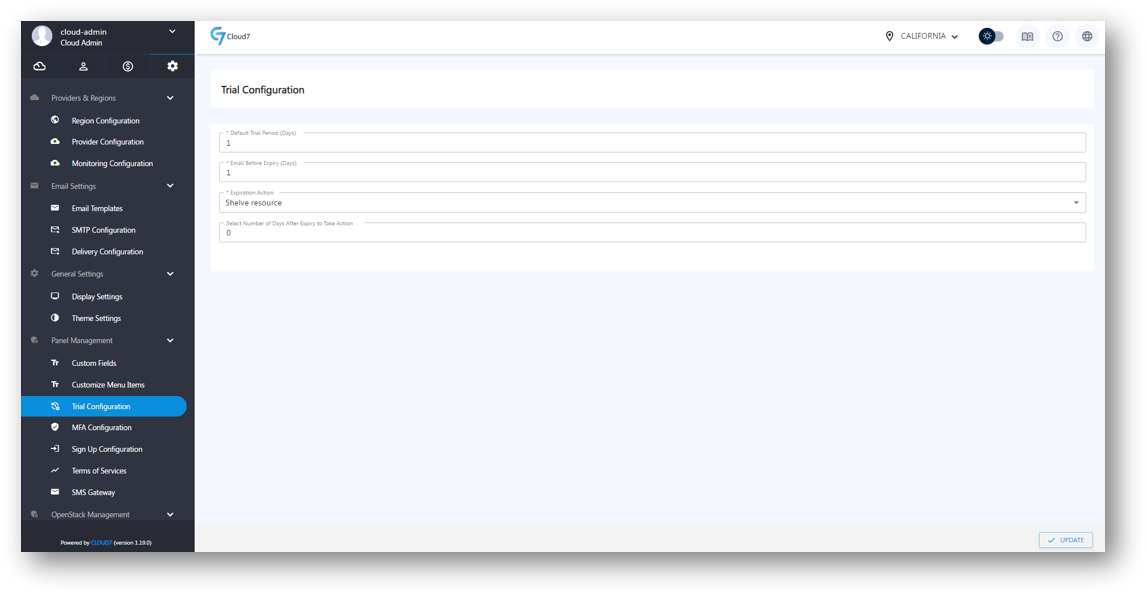
- To view Trial Configuration page, log in as Cloud-Admin (or a staff member with the necessary privileges) and navigate through the menu path: Configuration >> Panel Management >> Trial Configuration.
- In “Default Trial Period (Days)” field, specify the default period in days for the trial.
- In the “Email Before Expiry (Days)” field, specify the number of days before the trial expires that Cloud7 will send a reminder email to the user.
- In “Expiration Action” drop down, select the action to be performed by Cloud7 upon the expiry of the trial period. The actions include Shelve Resources and Terminate Resources.
- You can also specify whether to immediately take an action from shelve or termination upon trial expiration, or wait for a few days before executing the action. This can be done by specify the number of days in “Select Number of Days After Expiry to Take Action” field. If this is set to 0 (zero), the action will be performed immediately upon expiry of trial period.
- Click on “Update” button in the footer of Cloud7 to save and submit the default settings for trial feature.

MFA Configurations #
Cloud7 provides robust security features to ensure the safety and integrity of your platform by supporting Multi-Factor Authentication (MFA) and One-Time Password (OTP) authentication. These features can be enforced for all staff members, customers, and resellers, offering an additional layer of security beyond standard password protection.
Cloud7 offers two primary security options:
- Multi-Factor Authentication (MFA): When MFA is enabled, users must use an authenticator application, such as Google Authenticator, to scan a QR code provided by Cloud7. The authenticator app will generate a time-based token, which users must enter in addition to their username and password. This method ensures that even if a password is compromised, unauthorized access is prevented without the token.
- One-Time Password (OTP): When OTP is enabled, Cloud7 will send a unique OTP code to the user’s registered email address, contact number, or both, based on your configuration. Users must enter this OTP code along with their username and password to complete the authentication process. You can choose to send the OTP via email, SMS, or both, ensuring users receive the code through their preferred communication channel. You may also refer to SMTP Configurations and SMS Gateway Configurations to generate email and SMS OTPs.
Cloud7 allows you to enable both MFA and OTP simultaneously for maximum security. Combining both MFA and OTP ensures a multi-layered defense against unauthorized access, significantly reducing the risk of security breaches. By implementing these robust authentication methods, Cloud7 ensures that your platform remains secure, providing peace of mind to both administrators and users.
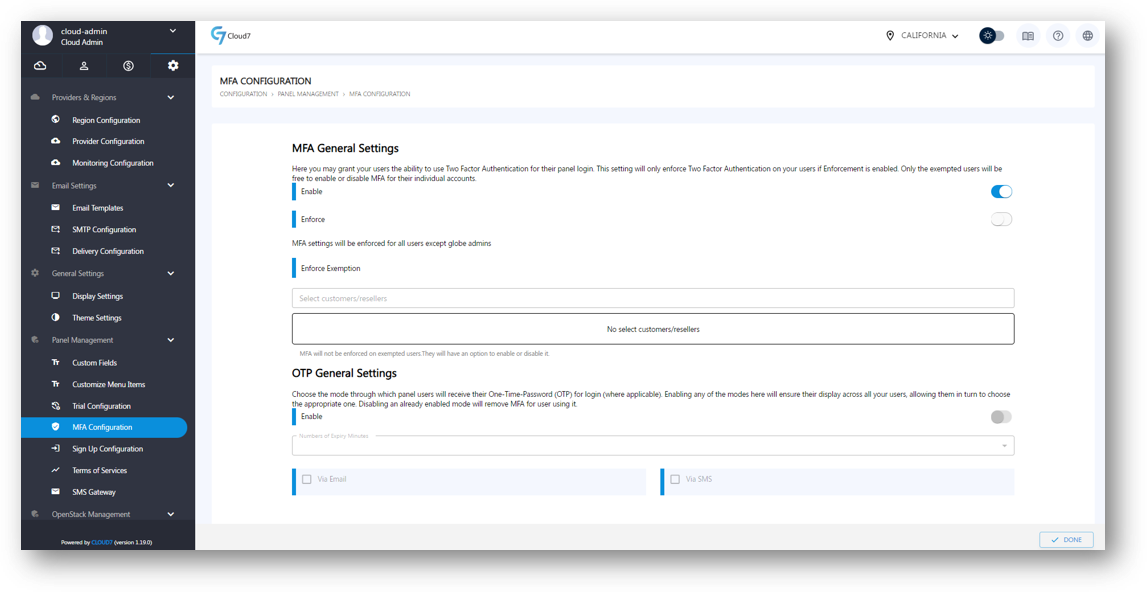
- To view MFA Configuration page, log in as Cloud-Admin (or a staff member with the necessary privileges) and navigate through the menu path: Configuration >> Panel Management >> MFA Configuration.
- For the “MFA General Settings” section:
- Use “Enable” toggle button to enable or disable the MFA feature.
- Use “Enforce” toggle button to enforce the MFA on all the staff members of the customers and reseller organizations.
- You can use “Enforce Exemptions” option to specify the customers or resellers exempted from the MFA enforcement. This means that the exempted customers or resellers will not be required to setup their MFA.
- For the “OTP General Settings” section:
- Use “Enable” toggle button to enable or disable the OTP generation and requirement for the authentication of users.
- In “Number of Expiry Minutes”, specify the time (in minutes) after which the generated OTP will expire.
- Select “Via Email” checkbox to enable the OTP delivery through email.
- Select “Via SMS” checkbox to enable the OTP delivery through SMS.
- If you check both “Via Email” and “Via SMS”, the same OTP will be sent out to both the registered email address and contact number of the users.
- Click on “Done” button in Cloud7 footer to submit and save the settings.
To enable the OTP delivery for secure authentication, ensure that you have configured SMTP for email delivery and SMS Gateway for SMS delivery.
Signup Configuration #
Cloud7 offers a robust built-in signup and self-registration functionality for customers, ensuring a seamless onboarding process. This feature can be tailored to meet your specific requirements through the Signup Configuration settings. Here’s a detailed overview of how you can leverage and customize this feature:
- Email and Phone Validation: During the signup process, Cloud7 can be configured to validate a customer’s email address and phone number. This adds an extra layer of security and ensures the authenticity of the customer’s contact information. Customers receive a One-Time Password (OTP) via email and/or SMS, which they must enter to complete the signup process.
Automatic Account Provisioning - Instant Access & Pending Signups: Cloud7 offers the option to automatically provision customer accounts upon successful validation of their email and phone number. This means customers can gain immediate access to cloud resources without administrative intervention. Alternatively, you can choose to place new signups in a pending status. This allows you to review and approve each registration manually before granting access to the platform. For further details on listing pending signups, please refer to the Pending Signups article.
- Default Resource Subscription: You, as Cloud-Admin, can specify a default resource subscription plan for new signups. This ensures that every new customer is automatically allocated a predefined set of resources, streamlining the onboarding process. The default subscription plan can include various resources such as virtual instances, storage, and network components, tailored to your service offerings.
- Domain Whitelisting & Blacklisting: You can enhance security and control by whitelisting or blacklisting specific domains. This feature offers an advanced layer of control and security during the customer signup process. It allows you to manage which email domains are permitted or restricted from registering on the platform.
By customizing the signup and self-registration process, Cloud7 allows you to create a secure, efficient, and user-friendly onboarding experience for your customers.
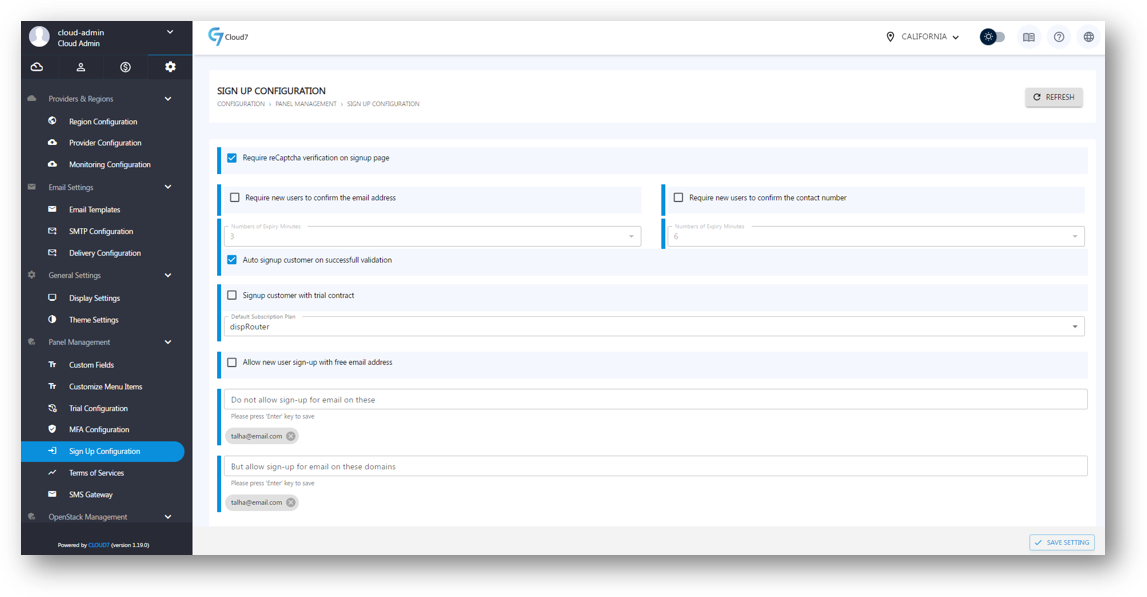
- To view Signup Configuration page, log in as Cloud-Admin (or a staff member with the necessary privileges) and navigate through the menu path: Configuration >> Panel Management >> Signup Configuration.
- Check “Require reCaptcha verification on signup page” option to activate the reCaptcha validation to detect and block signups from bots.
- Enable “Require new users to confirm the email address” option to enforce email address verification by new signups. Cloud7 will send an OTP to the email address of the signing-up customer for verification. Ensure that you have properly configure the SMTP for email OTP delivery.
- Define the OTP expiry minutes in the “Number of Expiry Minutes” field.
- Enable “Require new users to confirm the contact number” option to enforce contact number (phone) validation by new signups. Cloud7 will send an OTP to the contact number of the signing-up customer for verification. Ensure that you have properly configure the SMS Gateway for SMS OTP delivery.
- Define the OTP expiry minutes in the “Number of Expiry Minutes” field.
- Check “Auto signup customer on successful validation” option if you want the new signing up customers to have an account created automatically in Cloud7. If you keep this option unchecked, Cloud7 will place and hold the new signups in the “Pending Signups” list for your (Cloud-Admin) approval.
- Enable “Signup customers with trial contract” option to let the newly signed up customers do the evaluation of your services after successful signup. The trial period will apply as per the default trial configuration.
- Select the default Resource Subscription for all newly signed-up customers coming through the self-registration process using the “Default Subscription Plan” drop-down list. This list will display all available Resource Plans. If you have checked the “Signup customer with trial contract” option, Resource Plans with the trial option enabled will also be listed. In this list, you can also select “Assign No Plan” to let customer have an account created without any default Resource Subscription. In this case, the customer will not see the “Providers” core menu populated with any features unless they self subscribe to a Resource Plan using Cloud7 marketplace.
- Enable the “New user sign-up with free email address” option to allow customers to sign up using free email services like Gmail, Yahoo, and Hotmail. If this option is disabled, Cloud7 will block all sign-ups using free email addresses, requiring customers to enter valid business email addresses instead.
- In the “Do not allow sign-ups for email on these domains” field, enter the domains to blacklist them from signup. All the email addresses belonging to blacklisted domains will be blocked from signup.
- In “But allow sign-ups for email on these domains” field, enter the domains to whitelist them for signup. If you enable “New user sign-up with free email address” option and whitelist a free email service domain, the email addresses belonging to that domain will be allowed to signup. The whitelisted domains have priority over blacklisted domains.
- Click on “Save Settings” button in the footer to save and submit the signup configurations.
Terms of Services #
Cloud7 offers a feature that allows you to define the Terms of Service (ToS) and Privacy Policy for both customers and resellers. This ensures that all users are aware of and agree to the policies governing their use of the platform. The key features of this module are:
- Agreement for New Signups: Any new customer signing up for Cloud7 services must agree to the Terms of Service and Privacy Policy during the registration process. This ensures legal compliance and user acknowledgment of your policies from the outset.
- Policy Updates & Reaffirmation: If you update any part of the ToS or Privacy Policy, existing customers and resellers will be prompted to review and agree to the new terms. This guarantees that all users are continuously informed about the latest policies and that their consent is up-to-date.
- Customization & Management: As a Cloud-Admin, you have the ability to customize the ToS and Privacy Policy according to your organizational requirements. These documents can be easily updated and managed within the Cloud7 platform, ensuring they reflect your current policies and legal standards.
By using this feature, Cloud7 helps you maintain a clear and legally compliant relationship with your customers and resellers, providing transparency and ensuring that all parties are informed about the terms under which services are provided.
List TOS #

- To list Terms of Services page, log in as Cloud-Admin (or a staff member with the necessary privileges) and navigate through the menu path: Configuration >> Panel Management >> Terms of Services.
- On this page, you will be able to see current enforced TOS along with the all the old and draft TOS versions.
- At the top, you can enable the enforcement of the TOS on all customers and resellers by enabling the toggle button “Ask end-users to agree with the latest Term of Condition”.
Add TOS #
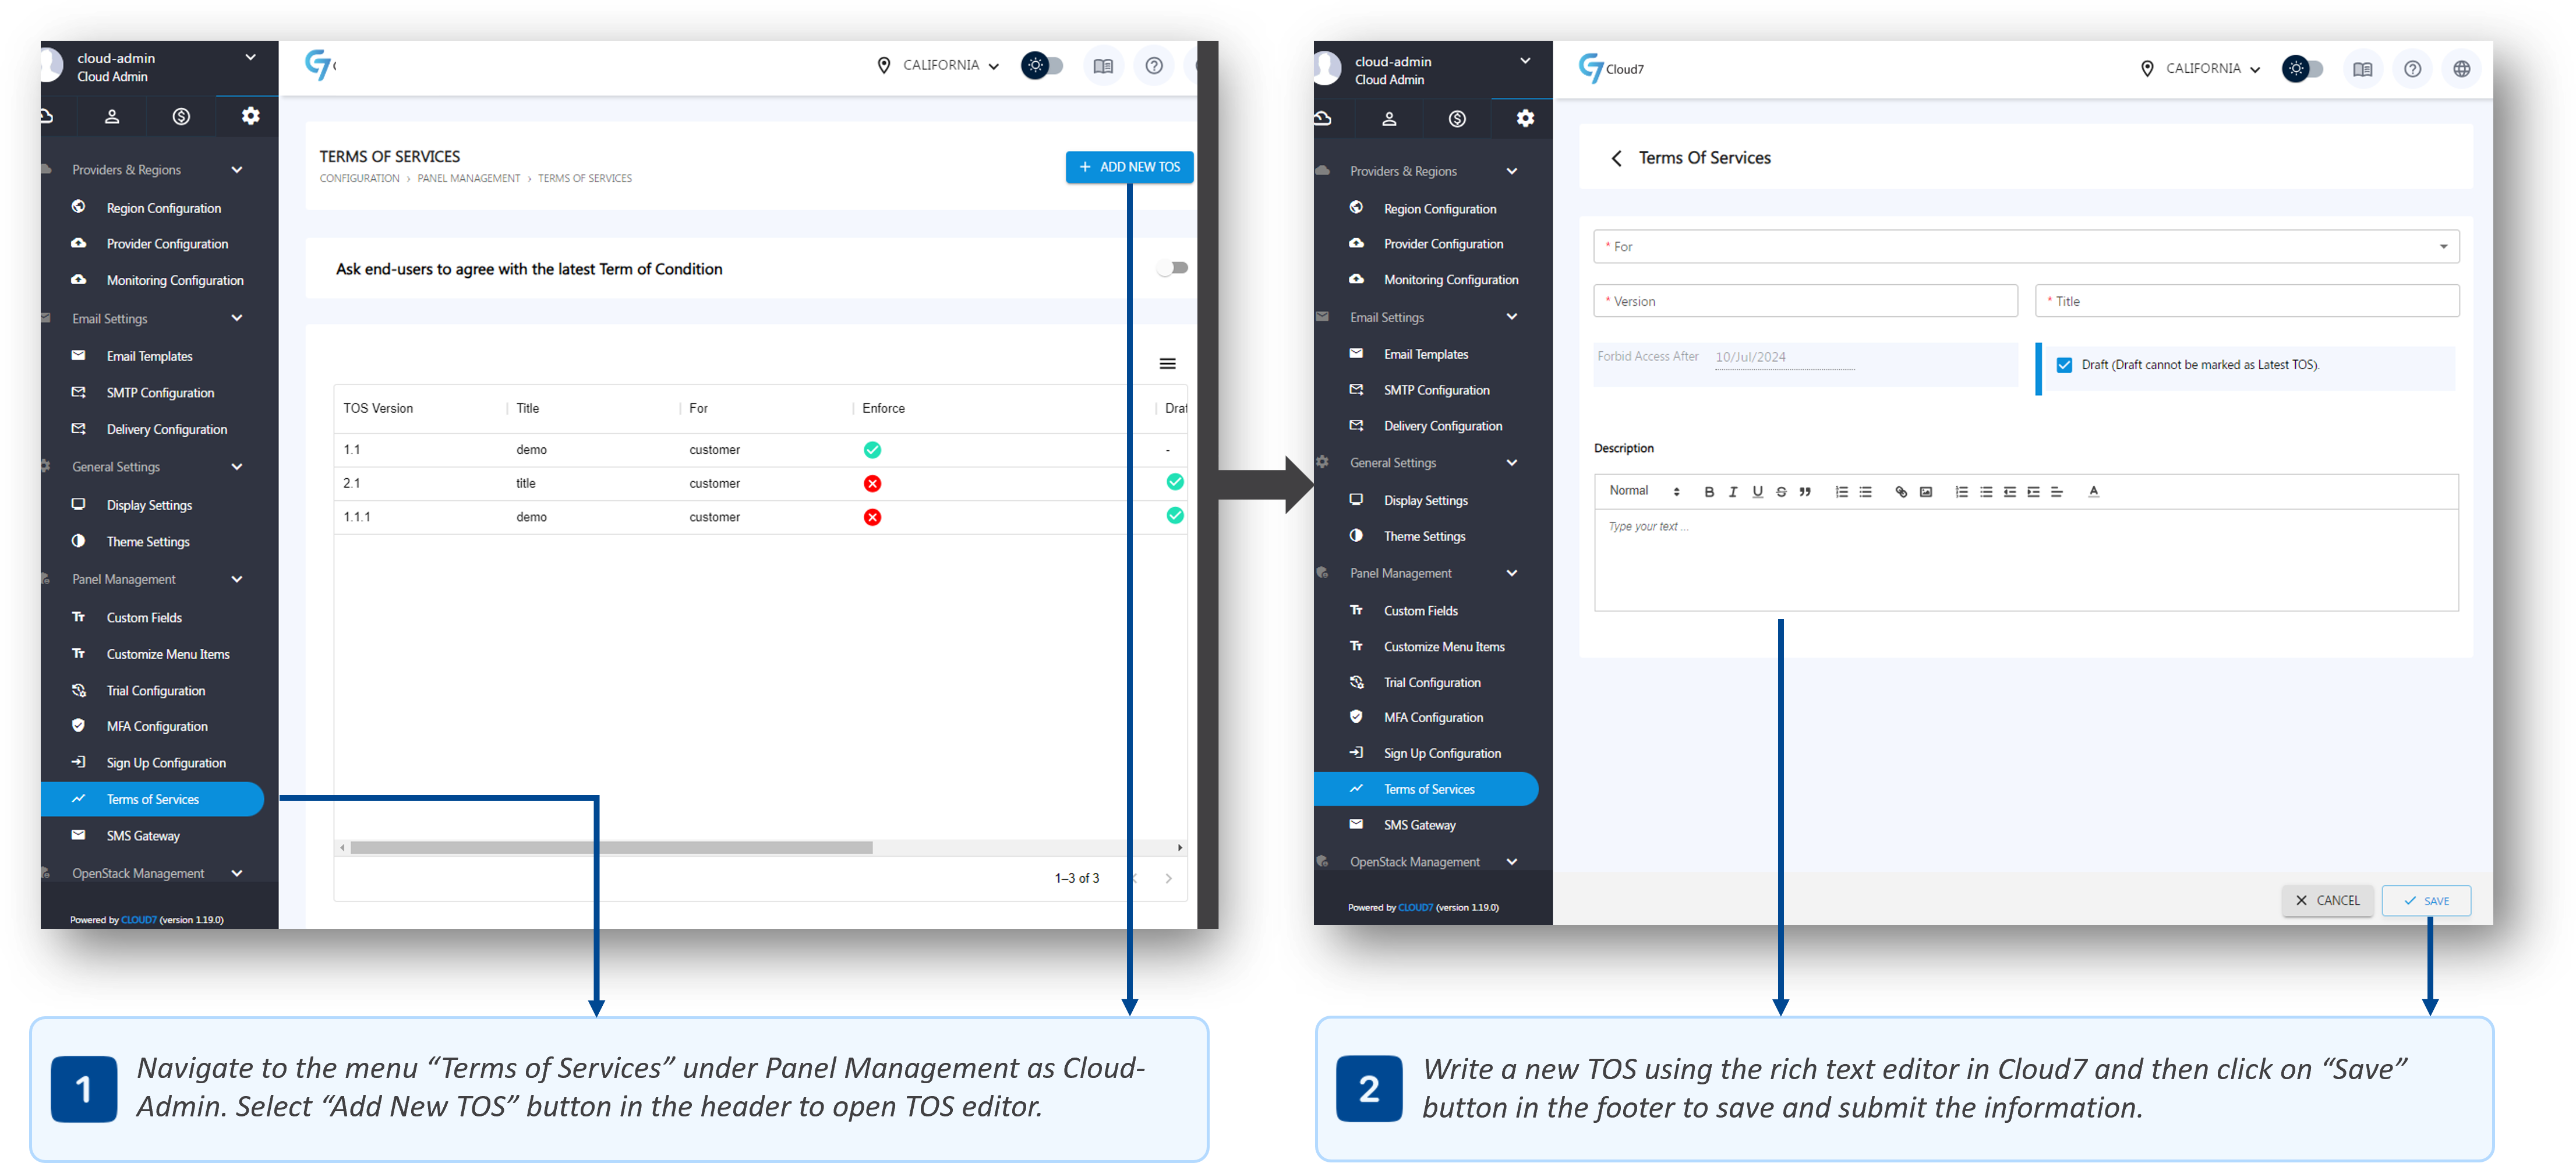
- To list Terms of Services page, log in as Cloud-Admin (or a staff member with the necessary privileges) and navigate through the menu path: Configuration >> Panel Management >> Terms of Services.
- Click on “Add New TOS” button in the top right corner of the Cloud7 header to open the TOS text editor.
- On the editor page, select “Reseller” or “Customer” from the “For” drop-down list. The TOS will be applied over the selected type of accounts. You can create two TOS defined separately for the resellers and customers.
- In the “Version” field, specify the version for the TOS.
- In the “Title” field, provide the name or the tile of the TOS to be added.
- In “Forbit Access After” section, select the date up till when the customers or resellers can agree to the new terms of the services. After this date, the access of the customers or resellers not agreeing to the terms will be suspended. Upon login to the Cloud7 interface, they will be shown a prompt (popup window) to agree to the TOS, while the rest of the features will be disabled.
- Select “Draft” option to save the TOS as a draft only. You cannot enforce a TOS that is saved as draft.
- In “Description” section, write the terms and conditions of the services.
Edit TOS #
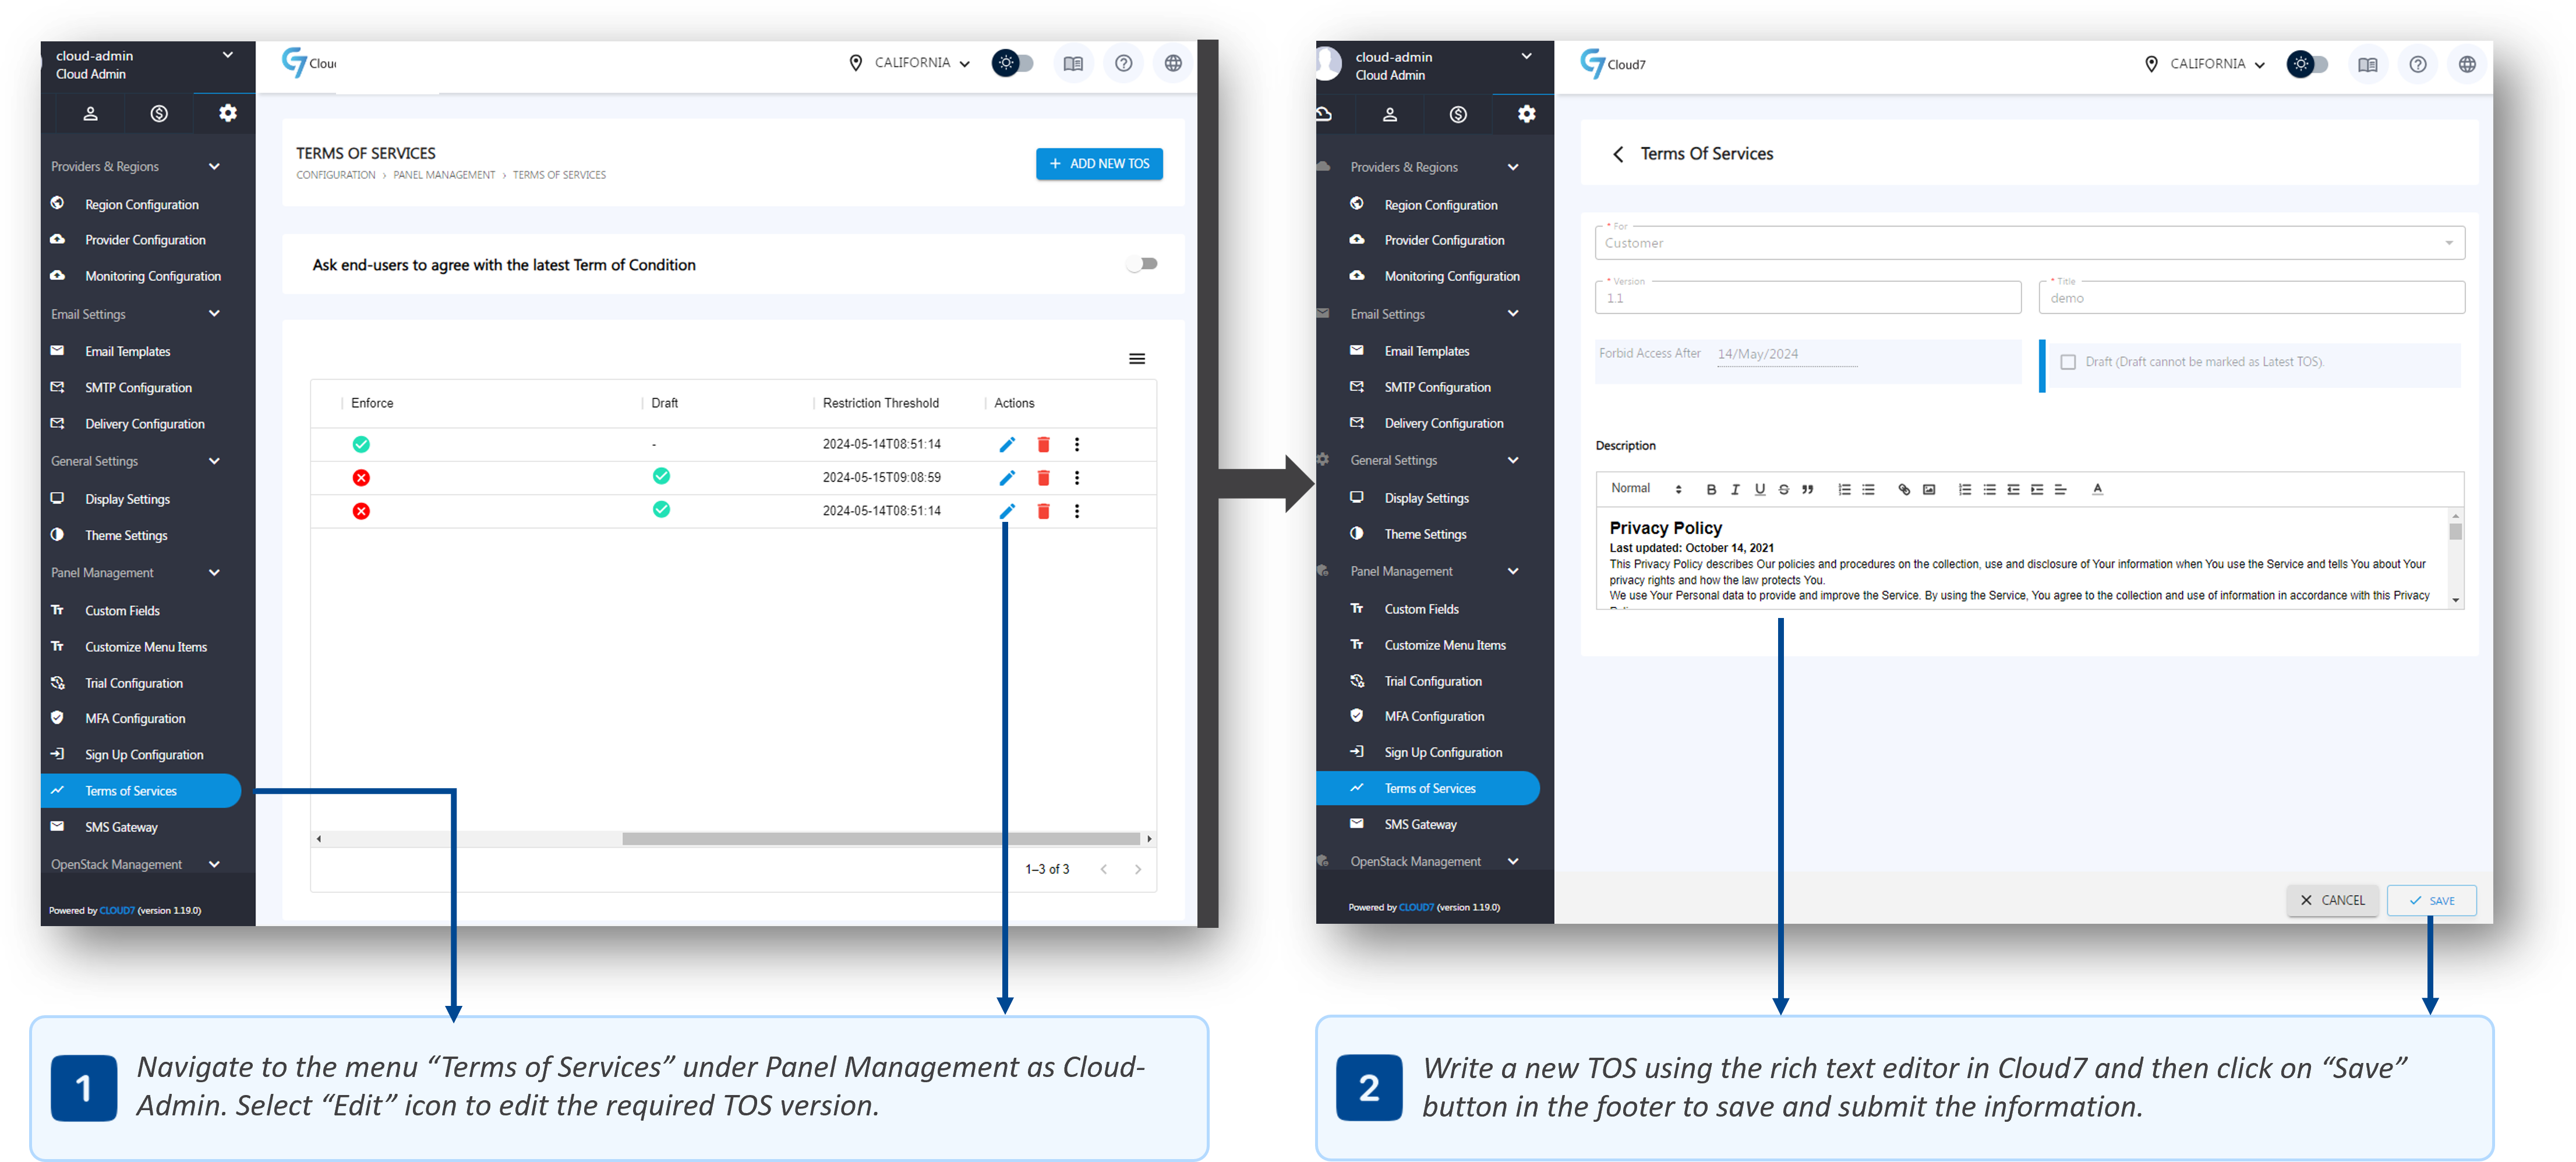
- To list Terms of Services page, log in as Cloud-Admin (or a staff member with the necessary privileges) and navigate through the menu path: Configuration >> Panel Management >> Terms of Services.
- Click on the “Edit” icon against the required TOS to open the text editor.
- Update the TOS and click on “Save” button in the footer to save and submit the TOS.
Delete TOS #

- To list Terms of Services page, log in as Cloud-Admin (or a staff member with the necessary privileges) and navigate through the menu path: Configuration >> Panel Management >> Terms of Services.
- Click on the “Delete” icon against the required TOS to delete it. You cannot delete the current enforced TOS.
- Cloud7 will show a delete confirmation prompt. Click on the “Confirm” button on the prompt to proceed with the delete operation.
Enforce TOS #
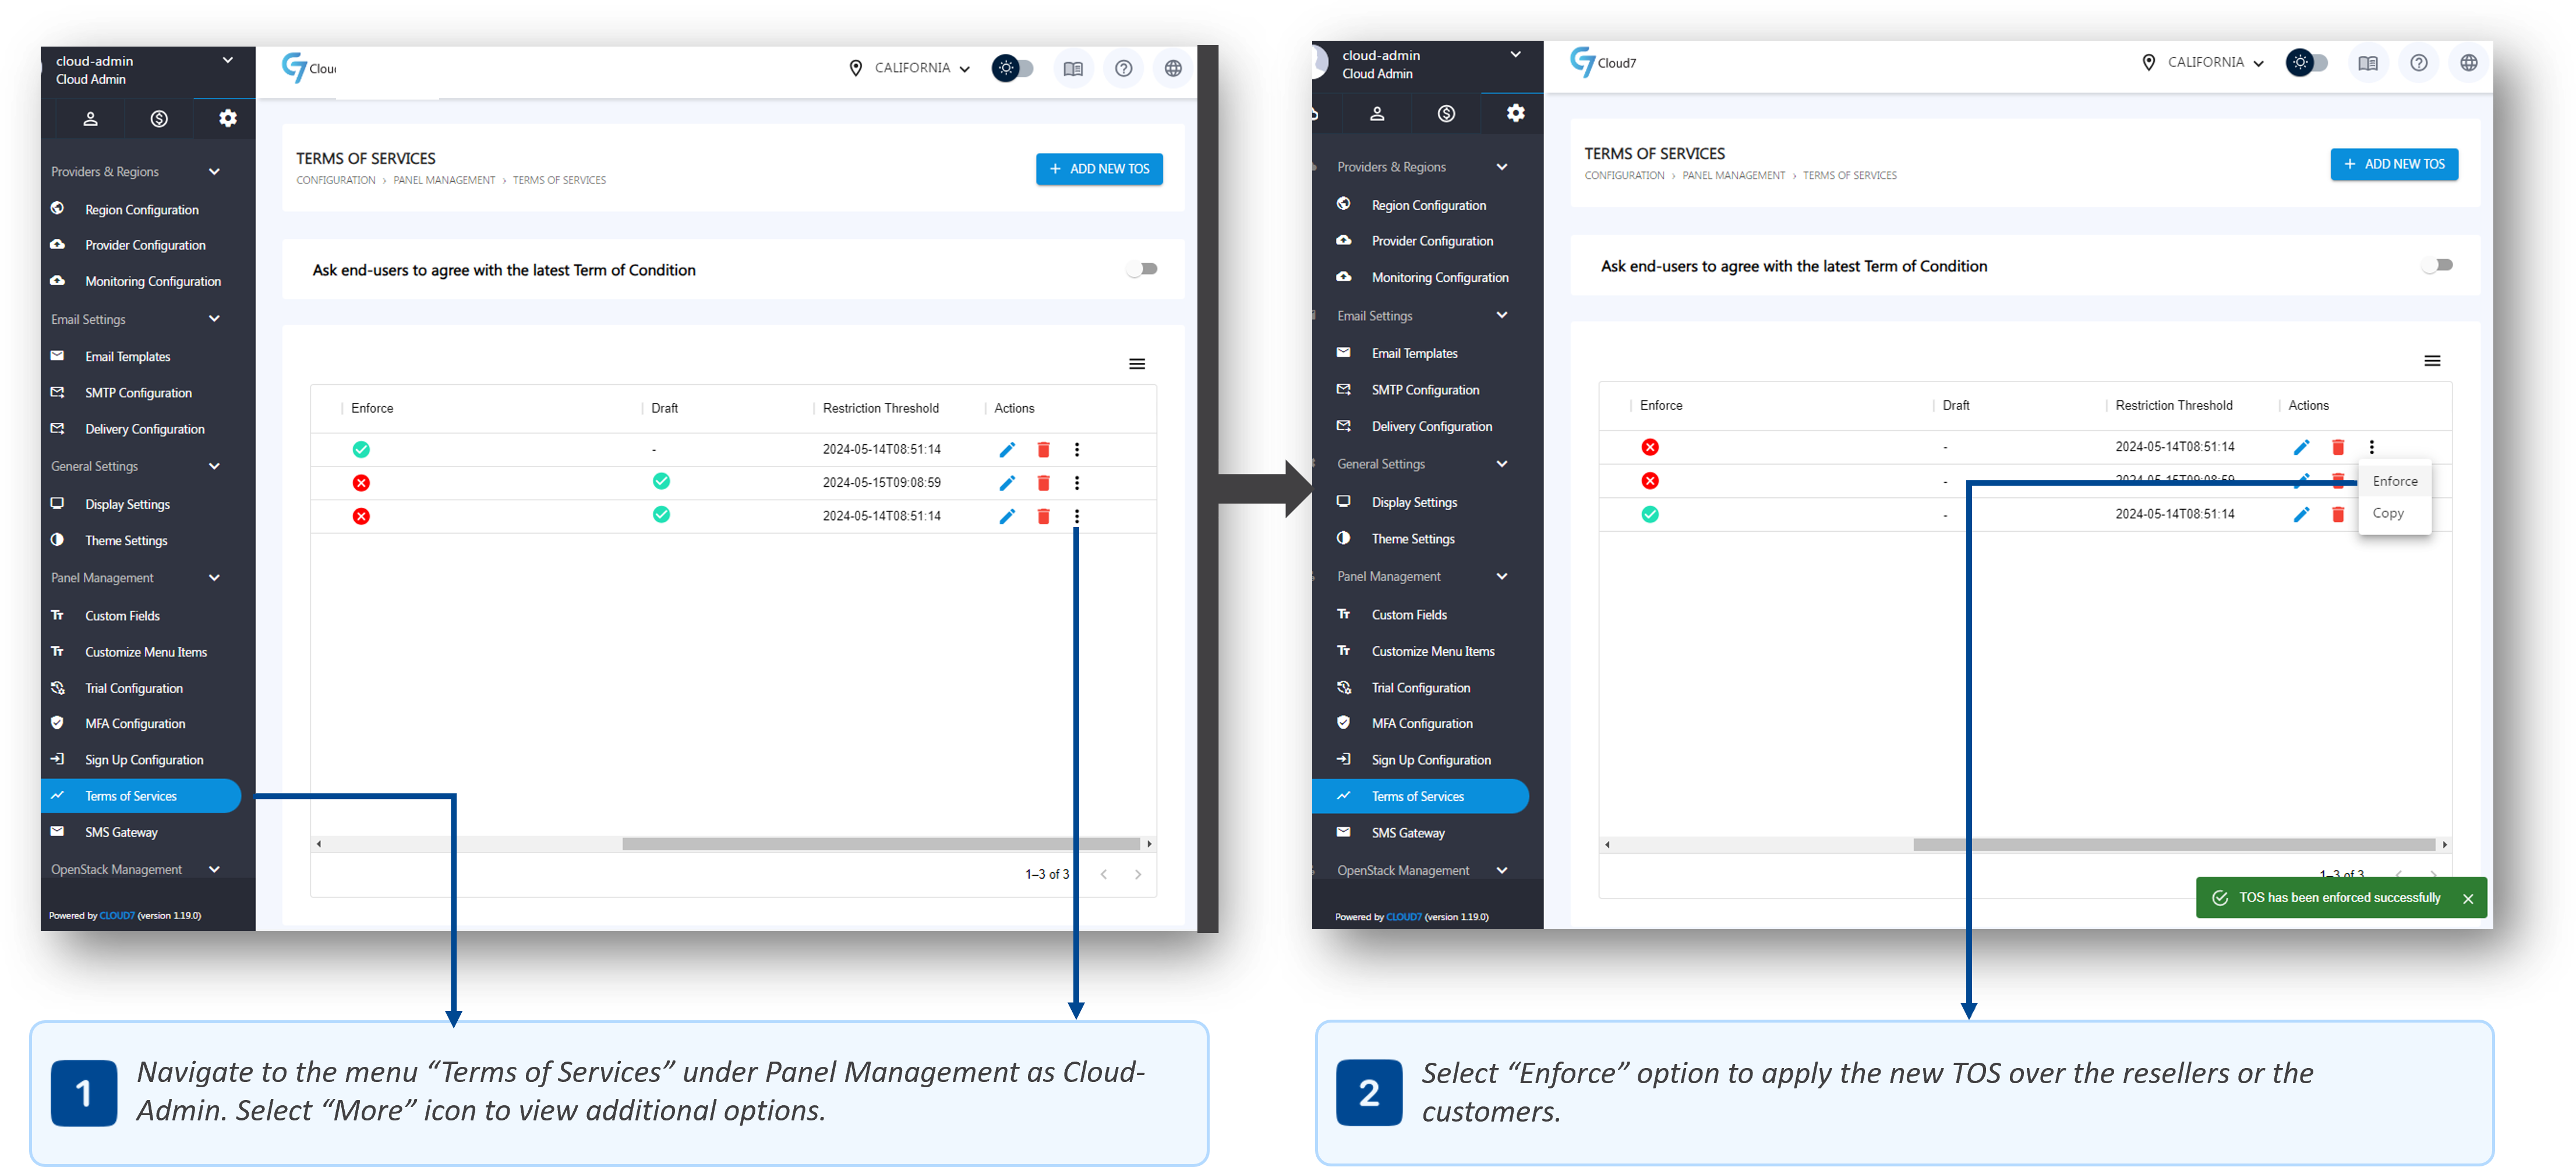
- To list Terms of Services page, log in as Cloud-Admin (or a staff member with the necessary privileges) and navigate through the menu path: Configuration >> Panel Management >> Terms of Services.
- Click on the “More” icon against the required TOS to view additional options.
- Click on “Enforce” option to enforce the new TOS on all the applicable organizations (customers or resellers).
- All the existing organizations on which these TOS are applicable (customers or resellers) will receive a header notification to read and accept the new terms as shown in the below screenshot:

SMS Gateways #
Cloud7 supports integration with various SMS gateways to ensure reliable and efficient communication with your customers and resellers. Among the supported gateways are Twilio, a global standard, and Veevo Tech, a regional SMS gateway. By configuring these accounts in Cloud7, you can enable the platform to send SMS notifications directly to customer or reseller phone numbers.
Supported SMS Gateways #
- Twilio: It is a globally recognized SMS gateway known for its reliability and extensive coverage. It is an ideal choice for businesses with an international customer base. With Twilio, you can send SMS notifications to customers and resellers worldwide.
- Veevo Tech: It is a regional SMS gateway that offers robust services tailored to specific regions. It is particularly useful for businesses operating in areas where Veevo Tech provides enhanced local support and competitive pricing.
List SMS Gateways #
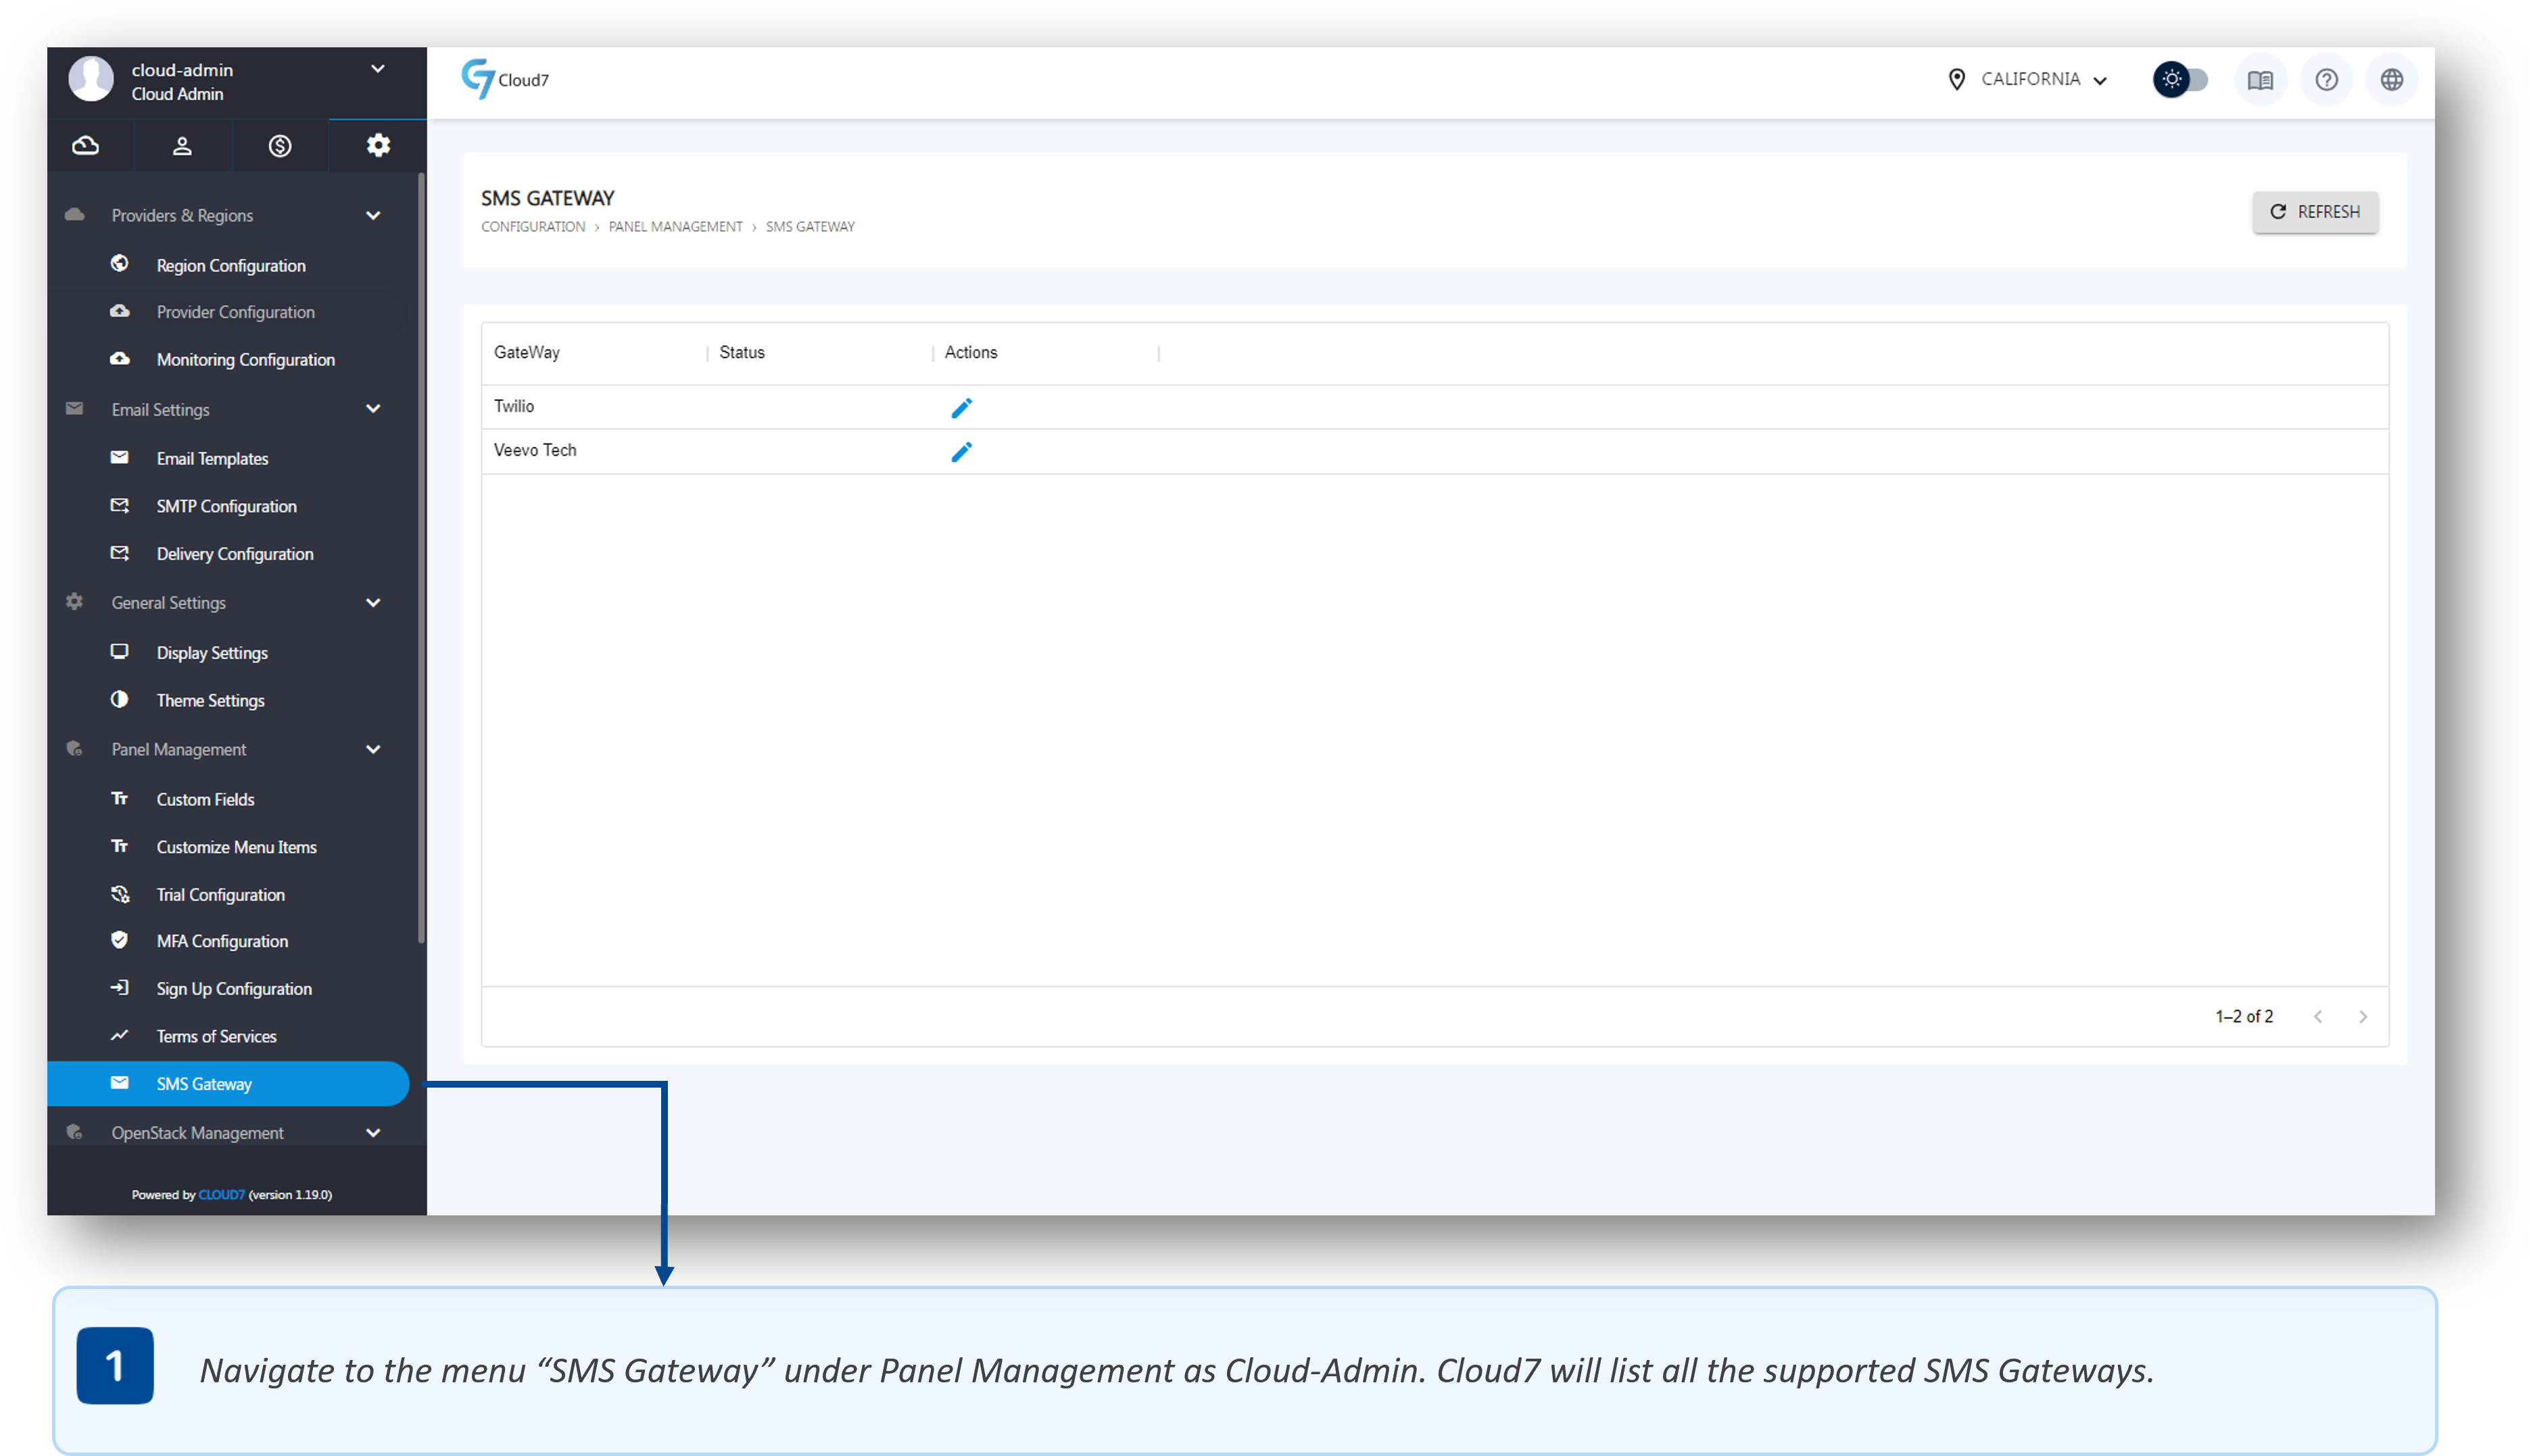
- To list supported SMS Gateways, log in as Cloud-Admin (or a staff member with the necessary privileges) and navigate through the menu path: Configuration >> Panel Management >> SMS Gateway.
- On this page, you will see the list of all the supported SMS Gateways as well as an option to configure them.
Configure Twilio #

- To list supported SMS Gateways, log in as Cloud-Admin (or a staff member with the necessary privileges) and navigate through the menu path: Configuration >> Panel Management >> SMS Gateway.
- Click on the “Edit” icon against Twilio to open its configuration page.
- On the Twilio configuration page, provide Twilio SID in the “Account ID” field.
- In the “Auth Number” field, provide Twilio Auth Token.
- In the “Phone Number” field, provide your Twilio phone number.
- Click on “Save” button in the footer to save and submit the configurations.
Configure Veevo Tech #

- To list supported SMS Gateways, log in as Cloud-Admin (or a staff member with the necessary privileges) and navigate through the menu path: Configuration >> Panel Management >> SMS Gateway.
- Click on the “Edit” icon against Veevo Tech to open its configuration page.
- On the Veevo Tech configuration page, provide the SMS Gateway URL in the “Veevo Tech URL” field.
- In the “Hash” field, provide hash for Veevo Tech.
- Click on “Save” button in the footer to save and submit the configurations.
Send Test SMS #

- To list supported SMS Gateways, log in as Cloud-Admin (or a staff member with the necessary privileges) and navigate through the menu path: Configuration >> Panel Management >> SMS Gateway.
- Click on the “Edit” icon against any of the required and configured SMS Gateways to open its configuration page.
- In the footer, click on the “Send Test SMS” button to open the drawer. In it, enter the contact number to which you want to send a test SMS.
- Cloud7 will send out a test SMS once you click on the “Send” button in the drawers footer.
- Verify the delivery and close the drawer.